
User Manual

4
English Deutsch Español Français Português
日本語
简体中文
Safari 3000
+
-
+
-
1
2
V
D
C
12V
D
C
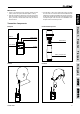
Power-Related Instruction
AC Power
The Safari’s universal switching power operates between 90VAC ~
265 VAC. Connect the AC power cord and turn on power. AC power
supplies electricity to unit itself as well as to the internal batteries.
You may operate unit and charge the batteries simultaneously.
DC Power 24V ~ 32V
There are 2 ways to use DC power -- through a DC adaptor
or through the Safari’s internal DC batteries. On fully charged
batteries, the Safari can operate continuously for 7 to 10 hours in
standby mode (CD/USB player and two receivers are turned on).
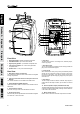
Battery Status LEDs
Note: To use the Safari’s internal batteries, ensure that the Battery
Power and Charging switch is in the ON position. If the battery
wires are disconnected or if the Battery Power and Charging switch
is OFF, you may still use the unit in AC power mode, but note that
the four battery indication LEDs will blink continuously.
There are four segment LEDs above the Power LED-Blue to
indicate the batteries status:
• 100% - Green
• 75% - Green
• 50% - Yellow
• 25% - Red
Replacing the Batteries
Depending on frequency and duration of use, the Safari’s batteries
may need to be replaced every few years. Please contact your
Phonic dealer / distributor for replacement batteries.
To replace the internal batteries, you will only need a Phillips
screwdriver. Please follow the following instructions. We
recommend that an authorized Phonic repair facility or dealer/
distributor carryout the steps below:
1. Unplug all power cables and ensure the power switch and the
Battery Power and Charging switch are off
2. Using a Phillips-head screwdriver, remove the two screws at
the top of the metal battery compartment cover
3. Remove the battery cover
4. Remove the batteries from the compartment and detach the
battery cables
5. Connect the new batteries to the detached cables and place
into the compartment
6. Replace the battery compartment cover and screw into place
Note: Batteries should be fully charged if the Safari 3000 will
be stored or unused for a prolonged period of time. Prior to
storage, ensure that the Battery Power and Charging Switch
is in the OFF position. Phonic recommends that customers
charge batteries at least once a month for at least 12 hours
when the Safari 3000 is not in use.
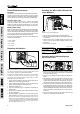
Installing the WR-1 Safari Wireless Re-
ceiver Modules
We recommend that an authorized Phonic repair facility or dealer/
distributor carryout the steps below:
1. Remove all power cables and turn the Safari 3000 off.
2. Unscrew the protective faceplate on the wireless receiver slots
and remove it.
3. Place the WR-1 into an available wireless slot and push the
WR-1 into the slot until the WR-1 faceplate is ush with the
back panel.
4. Screw the WR-1 into place.
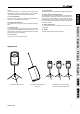
Operating Safari’s Wireless System
One-Touch Auto Scan
1. Power-on the Safari One-Touch Autoscan wireless receiver
(WR-1) by turning the volume knob clockwise. You should hear
a click sound from the knob.
2. Power-on your handheld microphone (WM-1) or beltpack unit
(WB-1)
3. Hold the WM-1 / WB-1 close against the receiver WR-1 and
push the Scan button on the WR-1 for 4 to 5 seconds until the
numeric channel LED digits start to automatically change, indi-
cating that the autoscan is nding the best wireless channel.
4. The autoscan process is nished when the LED display stops
at the optimal channel. At this point, the RF LEDs will activate.
If the RF LEDs on the WR-1 do not light on, the connection has
not been established successfully. To reinforce the connection,
click the Lock button while holding the WM-1 or WB-1 close to
the receiver.
5. Upon a successful connection, the AF LEDs on the WR-1 will
activate as you speak into the microphone.
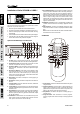
WB-1
UHF
Power Switch/Volume Knob
Volume Gain
Noise Status
Communication Status
Infrared
Auto Scan Button
Frequency Band Lock Button
Channel LED