STUDIO WIZARD Studio Monitor Controller
IMPORTANT SAFETY INSTRUCTIONS The apparatus shall not be exposed to dripping or splashing and that no objects with liquids, such as vases, shall be placed on the apparatus. The MAINS plug is used as the disconnect device, the disconnect device shall remain readily operable. Warning: the user shall not place this apparatus in the can be easily accessible. area during the operation so that the mains switch 1. Read these instructions before operating this apparatus. CAUTION 2.
STUDIO WIZARD Studio Monitor Controller INTRODUCTION............................................................................................................................4 FEATURES........................................................................................................................................4 QUICK SETUP...............................................................................................................................5 Initial Setup..................................
INTRODUCTION FEATURES Thank you for your purchase of the Phonic Studio Wizard, the perfect device for complementing your DAW setup. The possibilities are endless with the Studio Wizard, as you can accept multiple audio signals and send them to any number of destinations – all through the touch of a few simple buttons. Digital or analog, the Studio Wizard can accommodate any device, and will unquestionably enhance your set up regardless of your requirements.
QUICK SETUP Signal Routing Initial Setup 1. Choose the output you wish to route any signal to from the Studio Select area of the remote unit. This could include the Record 1 and 2, Studio 1 and 2, and Head Phone 1 and 2 outputs. In this example, let’s say you want to route the signal to the Record 1 outputs. Hold the Rec 1 button down for a couple of seconds to enter Group Settings Mode. 2. The LEDs in the Input Select buttons section should start flashing red.
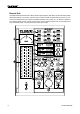
Main Unit The main unit of the Studio Wizard can be placed in a typical audio rack with the rest of your gear (amplifiers, equalizers, etc). On this unit you will find all of the Studio Wizards inputs and outputs, as well as trim controls ensuring that audio levels of the different inputs (and outputs) are not excessive.
REAR PANEL 12. AC Power Connector This is a standard IEC power cable receptacle. Plug the power cable in here and connect the other end of the cable to an appropriate AC power supply. 13. “To Remote" Connector This RJ-45 jack allows users to connect the main unit of the Studio Wizard to the remote desk-top controller. 14. Digital Inputs (S/PDIF and AES) These RCA and XLR inputs accept signals in S/ PDIF (RCA) or AES/EBU (XLR) format. Transfer rates are 24-bit, with sampling rates up to 192kHz (Mono). 15.
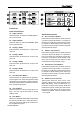
Remote Unit The Studio Wizard’s Remote Unit is where all the magic happens. With all the inputs and outputs made else where (and out of your way), users are free to move this small unit around as they see fit. You can route your input signals to any number of possible outputs (record, studio, etc.), as well as to speakers for monitoring within a booth or studio, and use many of the included functions such as auto fade (in and out), and the dim switch, for when producers receive phone calls.
Front Panel Input Select Section 21. Digital 1 Button Press this button to select the S/PDIF digital input on the main unit. 22. Digital 2 Button Press this button to select the AES/EBU digital input on the main unit. 23. Analog 1 Button Press this button to select the ST 1 input on the main unit. 24. Analog 2 Button Press this button to select the ST 2 input on the main unit. 25. Analog 3 Button Press this button to select the ST 3 input on the main unit. 26.
Speaker Select Section 34. Mini Button Press this button to send the selected inputs to the mini speaker output on the main unit. 35. Main Button Press this button to send the selected inputs to the main speaker output on the main unit. 36. Alternative Button Press this button to send the selected inputs to the alternative speaker output on the main unit. Fader 37. Fade In Time Control Adjust this knob to set the fade in time. 38. Fade Out Time Control Adjust this knob to set the fade out time. 39.
49. To Record Button Press this button once and release to route the talkback microphone signal to the REC outputs. 50. Talkback Button After selecting the destination for the talkback microphone signal, press and hold the Talkback key to use the talkback microphone. Press the button twice in quick succession to keep the talk back on. Push once more to turn the talk back off. 51. Talkback Microphone This built-in condenser talkback microphone has a sensitivity of -42dB and a gain range of 15 dB – 55 dB.
TROUBLESHOOTING No Power? The obligatory ‘is it plugged in?’ Check the AC connection to see if there is, in fact, power coming out of the socket. Is the Power LED on? If so, check the ‘No Sound’ section. No Sound? 12 Is the power on? Check the LED indicator. If the indicator remains dark, consult the ‘no power’ section of this troubleshooting guide. Ensure external devices are turned up high enough for the signal to be clear through the Studio Wizard.
APPLICATIONS HEADPHONE MICROPHONE TURNTABLE SPEAKER COMPUTER SOUNDCARD PHONIC P8A ACTIVE MONITORS HELIX BOARD 24 FIREWIRE AMPLIFIER TAPE RECORDER MIXER ACTIVE SPEAKERS STUDIO WIZARD REMOTE UNIT STUDIO WIZARD SUBWOOFER HEADPHONES DAT RECORDER 13
SPECIFICATIONS Audio Inputs TRS1-4 Type Input Impedance Nominal Line level setting Input level maximum Trim Range THD+N Frequency Response 1/4" TRS Balanced & RCA-unbalanced 2K Ω Balanced , 20K Ω unbalanced +4dBu(center detented) +4 to +18dB unbalanced & Balanced -∞to +18dB variable Less than .0005% (1KHz @ 0dBu) 10Hz-50KHz, +/-0.5dB S/PDIF Sample Rates Auto detect 24 bit, 44.1K, 48K, 96K, 192K(Mono) Types RCA 75Ω AES/EBU Types Sample Rates Auto detect 24 bit, 44.
THD+N Less than .008% (1KHz @ 0dBu) Frequency Response 10Hz-50KHz, +/-1dB Output level maximum +4dB Gain control Range -∞ to +4dB H.phone out 2 Type Maximum Output THD+N Frequency Response 1/4" TRS Active Stereo 420mW/channel @ 60 Ω load .015% (150mW/channel @ 60 Ω load) 10Hz-50KHz, +1dB Noise floor 20 to 20kHz bandwidth @ 1KHz 0 dBu All input to output -90 dBu Talkback EXT.
DIMENSIONS 482/19 44/1.7 195/7.7 * All measurements are shown in mm/inches.
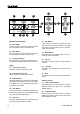
STUDIO WIZARD R L R L R L R L R L R MIC EXT IN DIGITAL2 DIGITAL 1 Analog 4 A n alo g 3 Analog 2 Analog 1 L GAIN GAIN GAI N GAIN GAIN R R L GAIN MON1 L MON3 R L REC1 R L REC2 R L HP1 R L HP2 R L STD1 R L STD2 YAMAHA&Micro Controller L R GAIN MON2 REMOTE Board REMOTE Switching Power Supply 35W Doughter Board SIN100,1K,10K,PINK NOISE ETHER NET CABLE MIC INT IN BLOCK DIAGRAM 17