
User Manual


9
STUDIO WIZARD
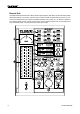
Front Panel
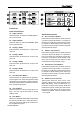
Input Select Section
21. Digital 1 Button
Press this button to select the S/PDIF digital in-
put on the main unit.
22. Digital 2 Button
Press this button to select the AES/EBU digital
input on the main unit.
23. Analog 1 Button
Press this button to select the ST 1 input on the
main unit.
24. Analog 2 Button
Press this button to select the ST 2 input on the
main unit.
25. Analog 3 Button
Press this button to select the ST 3 input on the
main unit.
26. Analog 4 Button
Press this button to select the ST 4 input on the
main unit.
27. Tone Generator Button
Press this button to activate the tone generator.
Press it again to turn off the tone generator. After
activating the tone generator, press the appropri-
ate Studio Select buttons to send the test tone to
their corresponding outputs.
28. Cancel Button
Press this button to cancel current group set-
tings. This can only be done when in “Group
Setting" mode.
29. Sum Button
When any of the Studio Select buttons is pressed,
the sum key will allow you to select all of the in-
puts from your Group Setting and send them to
the corresponding output.
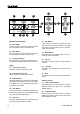
Studio Select Section
30. Rec 1 and Rec 2 Buttons
Press either of these buttons to select the inputs
you wish to send to the Record 1 or 2 outputs on
the main unit. Hold either of these buttons down
to activate the Group Setting mode, where you
can select all of the Inputs you wish to associate
with that particular output.
31. Studio 1 and 2 Buttons
Press either of these buttons to select the inputs
you wish to send to the Studio 1 or 2 stereo out-
puts on the main unit. Hold either of these but-
tons down to activate the Group Setting mode,
where you can select all of the Inputs you wish
to associate with that particular output.
32. Head Phone 1 and 2 Buttons
Press either of these buttons to select the inputs
you wish to send to the Record 1 or 2 outputs on
the main unit. Hold either of these buttons down
to activate the Group Setting mode, where you
can select all of the Inputs you wish to associate
with that particular output.
33. Studio Out Level Controls
These knobs control the level of their corre-
sponding outputs, which will be displayed in the
digital LED display. There are three level con-
trol knobs, one each for the Record, Studio and
Head Phone outputs. Pushing the control will al-
low users to toggle the use of the level control
between the Record, Studio and Head Phones
1 or 2 outputs.