
Instruction Manual


StarFire™ Instruction manual
Before use, please read this user manual carefully in order to ensure
your safety. Store it properly for reference in the future.
I. Warning
Always keep this product from rain or damp environment in order to
prevent re or electric shock.
If any of the following cases occur, please immediately remove the
battery and discontinue use.
• When this product falls or suffers strong impact and thus its
inside is exposed.
• When there is caustic liquid leakage inside.
• When this product has a strange smell, heat or smoke.
Do not dismantle or maintain this product. If you touch the high-voltage
circuit inside of this product, electric shock may occur. If this product is
idle for long, please take out all batteries.
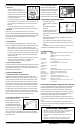
II. Product Features
1. Reection board
2. Wide Angle diffuser
3. Flash head
4. Battery compartment cover
5. Optic control sensor
6. Locking ring
7. Hot shoe stand
8. Hot shoe pin
9. Mode select indicator (M, S1, S2)
10. Output level indicator
11. Ready light
12. Test button
13. Flash power level
14. Power switch
15. Mode select
16. Mini stand
III. Installation
1. Install battery
• Slide the battery cover along the arrow direction
and then open it
• Install the batteries according to the direction indicated by the
sticker in the battery compartment and make sure the positive
and negative of the batteries are correct.
• Slide the battery cover along the arrow direction and then
close it.
2. Install Flash to Camera
• In the direction indicated by the arrow, turn the locking ring to
the highest point.
• Push the hot shoe of the ash completely into the hot shoe of
the camera. In the direction indicated by the arrow, turn the
locking ring until it is tightened.
• To remove the ash, loosen the locking ring and then push it
out of the hot shoe of the camera.
1.
2.
3.
4.
5.
6.
7
8.
9.
10.
11.
12.
13.
14.
15.
16.
StarFire
™
Digital Flash, SKU# AC-STARFIRE
photoexlightingschool.com™
For warranty registration and information, please visit www.photoflex.com
®