
Owner manual

visit photoexlightingschool.com® for the best free learning resource!
For detailed specifications, product tutorials and more, please visit www.photoflex.com®
PROFESSIONAL PHOTOGEAR
WhiteDome Family Instruction Manual Rev Whitedome 5/29/12
Figure 2.Figure 1.
Figure 3.
Figure 6.Figure 5.
Figure 4.
Figure 7.
Figure 8.
Figure 9. Figure 10.
WhiteDome
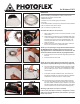
Before assembling your WhiteDome softbox, make sure all
components are present. You will need:
• WhiteDome softbox
• Connector for your specic light (not included)
• Four rods
• Inner bafe (medium, and large only) should be factory installed
• Set of 2 skirts for short sides of dome
• Set of 2 skirts for long sides of dome
Assemble the Softbox to the Connector
1. Place softbox with all four rods into their sleeves on a flat,
clean surface.
2. Notice that the connector has nine receptacle holes, three
of which are tapped. The SilverDome and other rectangular
soft boxes use only four of these receptacle holes. (The
remaining four holes are for use with the OctoDome, an
eight rod soft box.)
3. Position connector at the center of the softbox. Insert the
rst rod into one of the rod receptacle holes)
NOTE: If you are planning on using the Shoe Mount hardware
AC-B222SM with this assembly, make sure that one of the
large tapped holes is centered between two inserted rods. The
red arrows indicate the holes with 3/8” large tapped threads.
4. Insert the second rod into the hole diagonally opposite the
rst hole.
5. Insert the third and fourth rods.
NOTE: For proper dome shape to be achieved all rods must
be pushed in completely.Attaching the Rear Flaps (Optional).
6. The inner bafe has elastic bands with metal clips at each
of the four corners. The interior of the WhiteDome softbox
has four white nylon loops. Secure one metal clip to each
of these loops.
7. Inner bafe correctly installed in place. The softbox and
light xture assembly can now be mounted to a LiteStand,
or attached to a boom mounted on a Boom Stand.
8/9. The rear aps can be closed by pulling them toward the
connector and attaching with the Velcro
®
sewn into each
ap. The softbox is built and ready to attach to your strobe
light head. Finally, with the softbox face down, press rmly
on the connector to be sure all rods are seated properly.
Attaching Light Head to Connector and Stand
In most cases, the softbox connector is designed to connect
with your strobe light head in the same manner as your light
head’s accessories.