
Owner manual

visit photoexlightingschool.com® for the best free learning resource!
For detailed specifications, product tutorials and more, please visit www.photoflex.com®
Customer Support (800) 486-2674
email: sales@photoflex.com
Corporate Office (831) 786-1370 • FAX (831) 786-1372
97 Hangar Way, Watsonville, CA 95076
PHOTOFLEX
®
WARRANTY
• Warranties only cover manufacturer’s defects and workmanship
• We reserve the right to inspect all merchandise returned (end users
and dealers) for warranty fulfillment.
• All returns must be accompanied by a receipt showing date of
purchase.
• Freight must be paid by the customer or dealer.
• Warranties are valid only from date of Original Purchase.
Thank you for purchasing this
PHOTOFLEX
®
product!
Based on this purchase, we think you may be interested in our StarLite:
Learn about the StarLite here: http://photoflex.com/products/starlite-ql
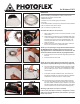
Figure 13.
Figure 12.Figure 11.
Figure 14.
Figure 15.
10. Connect the light to the softbox connector making sure
that your lights locking mechanism is securely attached.
11/12 Carefully lift the softbox and light assembly and position
over the LiteStand. Line up the LiteStand’s riser (stud) with
the stand receptacle hole on the light head. Place the light
head on the LiteStand and secure the light’s tilt bracket
set screw or handle to prevent the assembly from falling
down. Tighten the set screw on the tilt bracket to securely
attach the light to the stand.
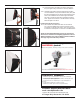
Installing the light blocking skirts
13-15 The included removable black skirts can be added to
any or all of the WhiteDome’s sides to block light output,
as needed. The panels have Velcro
®
sewn on each corner
to match their counterparts on each side of the WhiteDome.
NOTE: The assembled WhiteDome can also be mounted to a
boom arm for overhead or downlighting applications. Internal
Bafe and Diffusion Face (Internal Bafe available for Medium
and Large only) should be factory installed.