
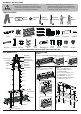
Instructions / Assembly


Wire
strippers
Ladder
Safety
glasses
Electrical
tape
Phillips
screwdriver
PliersFlat blade
screwdriver
CAUTION
◆ Inspect the wire insulation for any cuts,
abrasions, or exposed copper that may have
resulted during shipping. If there is a defect
in the wire, do not attempt installation.
◆ Before starting installation of this fixture or
removal of a previous fixture, disconnect the
power by turning off the circuit breaker or by
removing the fuse at the fuse box.
Bulbs
(not included)
*PARTS SHOWN MAY DIFFER SLIGHTLY PER LIGHT FIXTURE
ASSEMBLY INSTRUCTIONS
TOOLS REQUIRED
EXPLODED PARTS INSTALLATION
STEP 1
Attach the iron rack B into iron rack A using screws a as shown.
STEP 2
Attach the iron rack into fixture
using screws as shown.
STEP 3
1. Unscrew the ball nuts and
green grounding screw from
the mounting unit.
2. Disassemble the swivels under
the ceiling plate by unscrewing
decorative nuts. Keep the
baseplate, washers, ground wire
and lanyards for latar use.
HARDWARE INCLUDED
Fixture
Fixture Iron Rack A Iron Rack B
Iron Rack B
Iron Rack B
Ball Nuts
Ball Nuts
Stem
Screws
Screws
Screws
Stems Swivels
Swivels
Ceiling Plate
Ceiling Plate
Mounting
Screws
Mounting Screws
Wire Nuts
Wire Nuts
Washers
Washers
Ground
Wire
Ground
Wire
Mounting Unit
Mounting Unit
Baseplate
Baseplate
Lanyards
Lanyards
Decorative
Nuts
Decorative
Nuts
Wood
Screws
Wood Screws
Wall
Anchors
Wall Anchors
Stem
Stem
Stem