Bringing You the World of Free Satellite Entertainment Installation and Operation Manual www.picomacom.
TABLE OF CONTENTS 1. General information . . . . . . . . . . . . . . . . . . . . . . . . . . . . . . . . . . . . . 3 1.1 Safety Instructions. . . . . . . . . . . . . . . . . . . . . . . . . . . . . . . . . . . . . . . . . . . 3 1.2 General Features . . . . . . . . . . . . . . . . . . . . . . . . . . . . . . . . . . . . . . . . . . . 4 1.3 Accessories. . . . . . . . . . . . . . . . . . . . . . . . . . . . . . . . . . . . . . . . . . . . . . . . 5 2. Controls and Functions . . . . . . . . . . . . . . . . . .
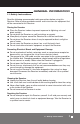
GENERAL INFORMATION 1.1 Safety Instructions Read the following recommended safety precautions before using this Receiver. Refer to other provided manuals and instructions for equipment that will be connected to this Receiver. Placing the Receiver < Place the Receiver indoors to prevent exposure to lightning, rain and direct sunlight. < Do not place the Receiver on soft furnishings or carpets. < Allow plenty of space around the Receiver for sufficient ventilation.
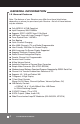
GENERAL INFORMATION 1.2 General Features Note: The features of your Receiver may differ from those listed below, depending on where you purchased your Receiver. Not all of these features may be available. < < < < < < < < < < < < < < < < < < < < < < < < < < 4 Fully MPEG-2 & DVB Compliant Input Frequency 950-2150MHz Supports SCPC & MCPC from C-/Ku-Band LNB Input Tuner with Loop-Through IF Signal Tuner Symbol Rate: 1-45 MS/s Fast Booting Quick Channel Changing Max.
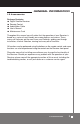
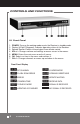
GENERAL INFORMATION 1.3 Accessories Package Contents: < Digital Satellite Receiver < Remote Control < Audio/Video Cable < User’s Manual < Maintenance Card Throughout this manual you will notice that the operation of your Receiver is based on a series of user-friendly on-screen displays and menus. These menus will help you get the most from your Receiver, guiding you through installation, channel selection, viewing and many other functions.
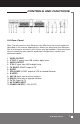
CONTROLS AND FUNCTIONS 2.1 Front Panel 1. 2. 3. 4. 5. 6. 7. POWER: Turns on the working mode or puts the Receiver in standby mode. Display (4-Digit/7-Segment): Indicates operating status of the Receiver. Remote Sensor: Detects infrared signal from remote control. VOL+/–: Changes volume and settings or moves cursor in the menus. MENU: Enters the main menu or exits all menus. OK: Selects an item in the menu and confirms it. CH+/–: Changes channels or moves up and down in the menus.
CONTROLS AND FUNCTIONS 2.2 Rear Panel Note: The rear panel on your Receiver may differ from the one pictured and described in this manual, depending on where you purchased your Receiver. Not all of the ports pictured in this section may be available. lf you need assistance in identifying your specific equipment configuration, contact your authorized dealer. 1. VIDEO OUTPUT 2. IF OUT: IF output from LNB to other digital tuner 3. AUDIO OUTPUT 4. IF IN: IF input from LNB to digital tuner 5.
CONTROLS AND FUNCTIONS 2.3 Remote Control Unit 8 2.
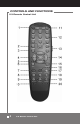
CONTROLS AND FUNCTIONS 2.3 Remote Control Unit Note: The remote control for your Receiver may differ slightly from the one pictured and described in this manual, depending on where you purchased your Receiver. lf you need assistance in identifying the remote control buttons for specific commands, contact your authorized dealer. Refer to the numbers shown on the picture. 1. POWER: To turn on the working mode or to place the unit on standby mode. 2. SAT: To select the satellite channel list. 3.
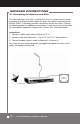
RECEIVER CONNECTIONS 3.1 Connecting to Antenna and Dish This Receiver works only with a satellite dish that can access free-to-air programming. The diagram below shows the basic connections required for the satellite LNB, TV and other possible connections on the rear panel. (Consult the following pages for additional connections.) lf you need assistance to identify your specific equipment configuration, contact your authorized dealer. Instructions: 1. Connect satellite input cable to Receiver “IF In.” 2.
RECEIVER CONNECTIONS 3.2 Connecting to TV and VCR using SCART Support Note: These instructions apply to a Receiver with both TV and VCR SCART ports. lf you need assistance in identifying your specific equipment configuration, contact your authorized dealer. Instructions: 1. Connect satellite input cable to Receiver’s “IF In.” 2. Connect cable from Receiver’s “TV SCART” to TV’s “SCART.” 3. Connect cable from Receiver’s “VCR SCART” to VCR’s “Video In” SCART.
RECEIVER CONNECTIONS 3.3 Connecting to TV and VCR using RCA Support Instructions: 1. Connect satellite input cable to Receiver’s “IF In.” 2. Match colors of three-plug RCA cable to Receiver’s RCA video and audio outputs and plug them in. Then connect cable to matching colors on TV’s video and audio inputs. 3. Match colors of three-plug RCA cable to TV’s video and audio outputs and plug them in. Then connect cable to matching colors on VCR’s video and audio inputs.
RECEIVER CONNECTIONS 3.4 Connecting to TV and VCR using RF Support and RCA Instructions: 1. Connect satellite input cable to Receiver’s “IF In.” 2. Connect cable from Receiver’s “Output to TV” to TV’s “RF In.” 3. Connect external TV antenna input cable into VCR’s “In From Antenna.” 4. Connect cable from VCR’s “Out to Antenna” to Receiver’s “Antenna In.” For safety reasons, keep equipment unplugged from power sources until all cables are properly connected. 3.
RECEIVER CONNECTIONS 3.5 Connecting to Second Receiver Note: These instructions apply to a Receiver with SCART ports. lf you need assistance in identifying your specific equipment configuration, contact your authorized dealer. Instructions: 1. Connect satellite input cable to Receiver’s “IF In.” 2. Connect cable from primary Receiver’s “TV SCART” to TV’s “SCART.” 3. Connect cable from primary Receiver’s “IF Out” to second Receiver’s “LNB In.” 4.
RECEIVER CONNECTIONS 3.6 Connecting DiSEqC Switch Box Instructions: 1. Connect up to four satellite input cables to DiSEqC Switch Box inputs. 2. Connect DiSEqC Switch Box output cable to Receiver’s “IF In.” For safety reasons, keep equipment unplugged from power sources until all cables are properly connected. 3.
RECEIVER CONNECTIONS 3.7 Connecting to Digital Amplifier Note: These instructions apply to a Receiver with both SCART and S/PDIF ports. lf you need assistance in identifying your specific equipment configuration, contact your authorized dealer. Instructions: 1. Connect satellite input cable to Receiver’s “IF In.” 2. Connect cable from Receiver’s “TV SCART” to TV’s “SCART.” 3. Connect cable from Receiver’s “S/PDIF” to digital audio converter or amplifier’s “S/PDIF.” 4.
MAIN MENU 4.1 Setting TV Channels Press the MENU button on your remote control to view the Main Menu on the screen. It has six categories: TV Channel, Radio Channel, Installation, System, Parental Control and Game. See figure below. Scroll up and down by using CH+/–. Pressing the OK button always confirms your selection and takes you to the next step. Go back to the previous step by pressing EXIT. Exit all menus to watch TV by pressing MENU.
MAIN MENU Edit Channels Scroll CH+/– until you select , then press OK. While you are watching TV, you can view the Channel List (shown in the figure below). You can also identify the satellite and transponder of the selected TV channel. A. Lock The Lock command lets you block a channel so it cannot be viewed. Select the Lock command by using VOL+/–. Once the channel is locked, you will be asked to enter a PIN code before you can view the program. a.
MAIN MENU C. Move The Move command allows you to place a channel in a different position on the channel list. After selecting this command, a small input box will appear on the screen. Input a number between 1 to the total number of the existing channels by using numeric keys on the remote control. After pressing OK, the selected channel will be moved to the new location specified by your input. a. Select “Move channel” icon by using VOL+/–. b. Select a channel you want to move by using CH+/–, and press OK.
MAIN MENU c. Press alphanumeric character key to rename channel. d. Press OK key to confirm it. Back space: Press VOL– to delete character one by one. Cancel: Press AUDIO to delete all added characters. e. Press EXIT to return to the previous menu. Note: Pressing “1” switches between capitalization and lower case of the alphabet. E. Modify PIDs This command allows you to modify the PID values of the selected channel. a. Select “Modify channel” icon by using VOL+/–. b.
MAIN MENU A. Movie a. Select the “Movie” icon by using VOL+/–, then press FAV. The sub-menu will appear as shown in the following figure. The operation to rename favorite channels is the same as “rename channel” (see page 19). b. Select your favorite channel by using CH+/–, and press OK. The channel will be marked with ª . To cancel your selection, press OK again. c. Press EXIT to return to the previous menu. d. Exit all menus, then press FAV button to view the favorite channels list. B.
MAIN MENU Sort By FTA Select by using CH+/–. Press OK to view the sub-menu as shown in the following figure. All the FTA channels are listed first, then the scrambled channels. Sort By Satellite Select by using CH+/–. Press OK to view the sub-menu, similar to the one shown in image above. Sort the channels by satellite sequence. Sort By Transponder Select by using CH+/–.
MAIN MENU 4.2 Setting Radio Channels Select by using CH+/– in . The result will be the sub-menu as shown in the following figure. The operation for radio channels is the same as TV channels. To switch between TV and radio modes, press TV/RADIO on the remote control. Increase or decrease the volume by using VOL+/– either on the remote control or on the Receiver’s front panel when watching TV or listening to the radio.
MAIN MENU 4.3 Installation Settings Select in by using CH+/–, press OK, you will see the sub-menu as shown in the following figure. It has four items: Satellite Search, Transponder Search, Satellite Setting and Transponder Setting. Satellite Search Select by using CH+/–. Press OK to view the sub-menu as shown in the following figure. A. Sat name Select , then press VOL+. Select satellite by using CH+/– or PGUP/PGDW. Press OK to confirm it. B.
MAIN MENU D. 22kHz If you are using two antennas connected to a 22kHz tone switch box, you can either supply 22kHz by setting “ON” or select antenna by setting “OFF.” If the LNB frequency is set to universal, the 22kHz will operate automatically. E. 0/12V If you are using two antennas connected to an antenna switch box. you can either pick up 12V by setting “ON” or select antenna by setting “OFF.” F. DiSEqC If the DiSEqC box is DiSEqC 1.
MAIN MENU 2. Continuously Move Select . Then select the direction by using VOL+/–. By pressing VOL+/–, the dish will move. The motor stops after releasing VOL+/–. 3. Step Size You can set the step size from 1 to 10 for move steps. 4. Move Steps Select the direction by using VOL+/–. The dish moves step by step. Adjust the dish to the best position. 5. Limit Set Select . Then select direction limit by using VOL+/–.
MAIN MENU J. MultiSat Search With DiSEqC1.0, you can scan up to four satellites that you have selected. a. Select by using CH+/–. b. Select satellites by using VOL+ to view the sub-menu as shown in the following figure. c. Select satellites by using CH+/– or PGUP/PGDW. Press OK to view the sub-menu as shown in the following figure. d. Press EXIT, then press OK to search the channels of four satellites continuously. 4.
MAIN MENU Transponder Search Check the transponder signal and search channels. Select by using CH+/–. Press OK to view the sub-menu as shown in the following figure. A. Sat name To select , press VOL+. Select satellite by using CH+/– or PGUP/PGDW, then press OK to confirm it. B. Frequency Select a valid transponder in the satellite or input the frequency (0-20000 MHz). C. Polarization Select the polarization of transponder between HOR and VER by using VOL+/–. D.
MAIN MENU Satellite Setting This menu consists of two parts, the top lists the satellite name and the bottom lists four command options (add, delete, rename and move) to use on the satellite selected in the top list. To scroll to the displayed satellite name, move the scroll bar on the right edge of the box by using CH+/– or PGUP/PGDW. Select a command option, then press OK to execute the command. Select by using CH+/–. Press OK to view the sub-menu as shown in the following figure. A.
MAIN MENU B. Delete This command allows you to delete one or more satellites from the satellite list. a. Select by using VOL+/–. b. Select a satellite you want to delete by using CH+/– or PGUP/PGDW. c. Press OK to view the sub-menu as shown in the following figure. d. Select by using VOL+/–. Press OK to delete the satellite, or else cancel the operation. C. Rename The Rename command lets you change the name of the satellite as it appears in the satellite list.
MAIN MENU D. Move The Move command allows you to place a satellite in a different position on the satellite list. After selecting this command, a small input box will appear on the screen. Input a number between 1 and the total number of the existing satellites by using numeric keys on the remote control. After pressing OK, the selected satellite will be moved to the new location specified by your input. a. Select by using VOL+/–. b. Select a satellite you want by using CH+/– or PGUP/PGDW. c.
MAIN MENU Transponder Setting Select by using CH+/–. Press OK to view the submenu as shown in the following figure. A. a. b. c. Select satellite Select “Select satellite” icon by using VOL+/–. Select a satellite you want by using CH+/– or PGUP/PGDW. Press EXIT to return to the previous menu. B. Add Transponder This command allows you to add one or more transponders for the selected satellite. a. Select a satellite for which you want to add a transponder by using CH+/– or PGUP/PGDW.
MAIN MENU C. Edit Transponder The Edit command lets you change the parameters of a transponder. Select the transponder item you want to edit from the list on the right side of the screen. a. Select “Edit Transponder” icon by using VOL+/–. b. Select a transponder you want to edit by using CH+/–. c. Press OK to view the sub-menu as shown in the following figure. d. Change the parameters, then press OK. D. Delete Transponder This command allows you to delete an existing transponder of the selected satellite.
MAIN MENU 4.4 System Settings Select in by using CH+/–. Press OK to view the submenu as shown in the following figure. It has six items: System, OSD (OnScreen Display), Time Adjust, Reset All, Reset Channels and About DVB. System Select by using CH+/–. Press OK to view the sub-menu as shown in the following figure. A. Menu Language System supports English, German, Polish, Farsi and Arabic. Press VOL+/– to select the desired language for menu. B.
MAIN MENU D. RF System The RF system is set at NTSC M. E. TV System Select your TV type between PAL, NTSC and SECAM by using VOL+/–. F. TV Screen Format Select your TV aspect ratio of output video either 4:3 or 16:9 by using VOL+/–. On-Screen Display (OSD) Select in by using CH+/–. Press OK to view the sub-menu as shown in the following figure. A. Menu Color Select your favorite color of the menu by using VOL+/–. B.
MAIN MENU Time Adjust Select
MAIN MENU Reset Channels Select . Press OK to view the sub-menu as shown in the following figure. Select by using VOL+/–. Press OK, and all revised channel data and settings will be lost. About DVB To check the information of your Receiver’s hardware and software, select in the by using CH+/–. View the sub-menu as shown in the following figure. Press EXIT to return to the previous menu. 4.
MAIN MENU 4.5 Parental Control Settings Select in the by using CH+/–. Press OK, and you will be asked to enter your password. Input your password to view the sub-menu as shown in the following figure. Note: Default password is 0000. If you forget the password you changed to, please check with your dealer. < < < < Password Lock: Select by using VOL+/–. Edit Channel Lock: Select by using VOL+/–. Installation Lock: Select by using VOL+/–.
MAIN MENU 4.6 Game Selections and Settings Select in the by using CH+/–. Press OK to view the sub-menu as shown in the following figure. It has 2 games: Tetris and Snake. Tetris Select in by using CH+/–. Press OK to view the sub-menu as shown in the following figure. Press OK or CH+ to change the direction of diamonds. Press EXIT to return to the previous menu. Snake Select in by using CH+/–.
MAIN MENU Press VOL+/– and CH+/– to make the snake move up, down, left and right. If the snake moves through a yellow icon, it adds length. If it moves through a blue icon, the game is over. Press EXIT to return to the previous menu. 5 General View Functions The following section describes the basic functions of your Receiver that can be accessed while watching satellite TV or listening to the radio. 5.
GENERAL VIEW FUNCTION 5.4 TV/Radio While watching the channel, switch between TV and radio modes by using TV/RADIO on the remote control. 5.5 SAT If you searched channels from more than one satellite and want to have a channel list for each satellite, press SAT key several times. The channel list of each satellite will be displayed. 5.6 Audio If a program is broadcast in more than one language, the desired language can be selected directly by using AUDIO on the remote control.
GENERAL VIEW FUNCTION 5.7 Info While watching the channel, press INFO on the remote control. The channel name appears along with the satellite name. Two dynamic bars reflecting signal strength and signal quality of the current channel also appear.
UPDATE SOFTWARE Updating Software (Receiver to Receiver) Note: These instructions apply to primary and secondary receivers with SCART ports. lf you need assistance in identifying your specific equipment configuration, contact your authorized dealer. a. b. c. d. e. f. g. Connect primary and second receivers with RS232C cable. Power on the primary Receiver so it remains in standby mode. After starting successfully, turn on second Receiver to begin update.
TROUBLESHOOTING PROBLEM POSSIBLE CAUSE WHAT TO DO The display on the front panel does not light up. Main cable is not connected. Check that the main cable is plugged into the power socket. No sound or picture. But the front panel red light is on. The unit is in standby mode. Press the standby button. No sound or picture The satellite dish is not pointing at the satellite. Adjust the dish. Check the signal level on the antenna setup menu. No signal or weak signal. Bad picture/ blocking error.
TROUBLESHOOTING PROBLEM No picture appears on the TV screen. There is interference on your digital satellite channels. The remote control is not working. POSSIBLE CAUSE The system is connected using RF leads. The system is connected using RF leads and the output channel of the Receiver interferes with an existing terrestrial channel or video signal. WHAT TO DO Check the UHF channel in your system and tune the UHF channel properly.
GLOSSARY Access Authorization to use the coding system to purchase/order TV programs. AGC Automatic Gain Control. A circuit that automatically adjusts signal levels. Audio system With digital satellite reception, the sound is transmitted in packages and is selected either in a special audio mode or pre-selected by using the installation setup. This makes it possible to select between several different languages in a film. The number of choices is dependent on what is available in the signal.
GLOSSARY PCR Program Clock Reference. Timing information corresponding to a particular satellite channel on a digital frequency. The PCR must be entered when adding new channels. Polarization Polarization allows several programs to be fit into the same frequency band. The signals from a satellite are transmitted either with linear (vertical or horizontal) polarization or circular (right or left) polarization. RF Radio frequency (known as HF in some countries).
TECHNICAL SPECIFICATIONS Note: The specifications for your Receiver may differ from those described below, depending on where you purchased your Receiver. lf you need assistance in identifying your specific equipment specifications, contact your authorized dealer.
TECHNICAL SPECIFICATIONS LNB CONTROL Power supply Polarized control DiSEqC control 13/18V (500mA max) polarization with short circuit protection 13/18V polarization (vertical/horizontal) DiSEqC 1.0 and DiSEqC 1.2 MISCELLANEOUS Supply voltage Power consumption Operating temperature Storage temperature Dimensions (WxDxH) Weight 100-240VAC 50-60Hz 30 watts max +5°C to +40°C -20°C to +70°C 290 x 190 x 40.5mm 2.
MENU STRUCTURE TV(Radio)Channel TV(Radio) Channel 1. Edit Channels 2. Set Favorites 3. Sort by FTA 4. Sort by Satellite 5. Sort by Transponder 6. Sort by Favorite 7. Sort by Alphabet Installation Installation 3. Satellite Setting Satellite Search 4. Transponder Setting 1. Start Search 2. MultiSatSearch System Parental Control Game 50 Set Favorites 2. Transponder Search Main Menu System 1. Play channel 2. Lock/Unlock channel 3. Delete/Undelete channel 4. Move channel 5. Rename channel 6.
Notes 51
355 Parkside Drive San Fernando, California 91340 Sales: 800-421-6511 Phone: 818-493-4300 Fax: 818-493-4433 www.picomacom.com sales@picomacom.