
Owner's Manual

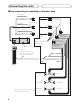
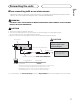

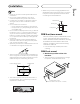

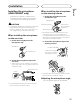


Table Of Contents
- Operation Manual
- Reset
- Clock Set
- Demo Mode
- Table of Contents
- Removing / Attaching Front Panel
- Parking Brake Interlock
- Touch Panel Calibration
- Parts & Controls
- Operation
- Basic Operation
- Tuner
- Playing Video
- Playing Audio
- Playing Still Images
- Bluetooth (130P5200BT)
- Introduction
- Calling a Number in the Phone Book
- Selecting a Number by Alphabet Search Mode
- Using the Missed, Received and Dialed Call Lists
- Setting Automatic Answering
- Adjusting the Other Party’s Listening Volume
- Ring Tone On / Off
- Using the Preset Dial Lists
- Making a Call by Entering Phone Number
- Setting the Private Mode
- Pairing from This Unit
- Using a Bluetooth Device to Pair
- Connecting to a Bluetooth Device Automatically
- Switching Visible Unit
- Displaying BD (Bluetooth Device) Address
- Entering PIN Code for Bluetooth Wireless Connection
- Registering a Connected Cellular Phone
- Bluetooth (130AVHP520 - Adapter Required)
- Introduction of Bluetooth Telephone Operations
- Bluetooth Audio Operations
- Setting Up for Bluetooth Audio
- Using the Missed, Received and Dialed Call Lists
- Setting Automatic Answering
- Switching the Ring Tone
- Using a Cellular Phone to Initiate a Connection
- Voice Recognition
- Connecting a Bluetooth Audio Player
- Connecting to a Bluetooth Device Automatically
- Displaying BD (Bluetooth Device) Address
- XM / SIRIUS Tuner
- HD Radio Tuner
- Using the AUX Sources
- Advanced Operations
- Tuner
- HD Radio
- iTunes Tagging
- Switching the Media File Type
- Operating the DVD Menu
- Operating This Unit’s iPod Function from your iPod
- Random
- Repeat
- Playing Videos from your iPod
- Browsing on the iPod
- DVD-Video Playback Options
- PBC Playback
- Selecting Tracks from the Track Title List
- Selecting Files from the File Name List
- Advanced Sound Retriever
- Audiobook Speed
- iPod Link Search
- DivX VOD Content
- Capture an Image in JPEG Files
- Changing the Wide Screen Mode
- XM / SIRIUS
- Changing the Picture Adjustment
- Setting Rear Monitor Output
- Touch Panel Calibration
- Using the AUX Sources
- Menu Operations
- Overview
- Common Menu Operations
- Audio Adjustments
- Setting Up the DVD Player
- System Settings
- AUX Source On / Off
- AV Input On / Off
- Rear Output & Subwoofer Controller
- Mute / Attenuation Settings
- Changing Languages for CAUTION
- Menu Language
- Clearing Bluetooth Memory (130P5200BT Only)
- Updating Bluetooth Connection Software (130P5200BT Only)
- Displaying the Bluetooth System Version (130P5200BT Only)
- Adjusting LCD Panel Slide Position
- Setting Automatic Open Function
- Switching the Warning Tone
- Rear View Camera
- Auto EQ
- Entertainment (Display) Settings
- Customizing Menus
- Troubleshooting
- Error Messages
- Specs
- Installation Manual
- Warranty

9
English
Installation
Note
• Check all connections and systems before final
installation.
• Do not use unauthorized parts. The use of
unauthorized parts may cause malfunctions.
• Consult with your dealer if installation requires
drilling of holes or other modifications of the
vehicle.
• Do not install this unit where:
— it may interfere with operation of the vehicle.
— it may cause injury to a passenger as a result
of a sudden stop.
• Do not install the display where it may (i) obstruct
the driver’s vision, (ii) impair the performance of
any of the vehicle’s operating systems or safety
features, including air bags, hazard lamp buttons
or (iii) impair the driver’s ability to safely operate
the vehicle.
• The semiconductor laser will be damaged if it
overheats. Install this unit away from hot places
such as near the heater outlet.
• Optimum performance is obtained when the unit
is installed at an angle of less than 30°.
• When installing, to ensure proper heat dispersal
when using this unit, make sure you leave ample
space behind the rear panel and wrap any loose
cables so they are not blocking the vents.
• The cords must not cover up the area shown in
the figure below. This is necessary to allow the
amplifires to radiate freely.
• Make sure you leave enough gap between the
dashboard and the LCD panel of this unit so the
LCD panel can be opened and closed without
contacting with the dashboard.
DIN front/rear-mount
This unit can be properly installed either from
“Front” (conventional DIN Front-mount) or
“Rear” (DIN Rear-mount installation, utilizing
threaded screw holes at the sides of unit
chassis). For details, refer to the following
installation methods.
• Use commercially available parts when
installing.
DIN Front-mount
1. Decide the position of the side
brackets.
• When installing in a shallow space, change
the position of side brackets (small).
Flush surface screw (5 mm × 6 mm)
Side bracket (small)
Leave ample space
Dashboard
Do not cover this area.
LCD panel
Leave gap
Dashboard