
Owner's Manual
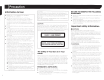
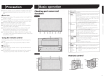
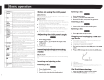
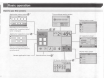
Table Of Contents
- Owners Manual
- Reset (Button #8)
- Bluetooth PIN (0000)
- Demo Mode
- Parking Brake Interlock
- First-Time Startup
- Table of Contents
- Parts & Controls
- Operation
- Basic Operation
- Front Panel Controls
- Remote Control
- Notes on LCD Panel Use
- Adjusting the LCD Panel Angle (X491BHS)
- Inserting / Ejecting / Connecting Media
- First-Time Startup
- How to Use the Screens
- Supported AV Sources
- Displaying the AV Operation Screen
- Selecting a Source
- Changing the Display Order of the Sources
- Using the Touch Panel
- Bluetooth Registration and Connection
- Hands-Free Phoning
- Setup for iPod / iPhone or Smartphone
- HD Radio
- Disc Operation
- Compressed Files
- iPod
- AppRadioOne
- Pandora
- Spotify
- Bluetooth Audio Player
- SiriusXM
- AUX In
- AV In
- MIXTRAX
- System Settings
- Audio Adjustments
- Theme Menu
- Setting Up the Video Player
- Favorite Menu
- Common Operations
- Other Functions
- Basic Operation
- System Settings
- Audio Adjustments
- Theme Menu
- Setting Up the Video Player
- Favorite Menu
- Common Operations
- Other Functions
- Connection / Installation
- Troubleshooting
- Messages
- Specs
- Warranty

1
2
3
4
5
6
7
8
9
10
11
12
8
Basic operation ·
Volume(+/-
)
MODE
Press
to
switch
between the Application
screen
and
the
AV
operation screen.
Press
and
hold to
switch
to the camera view
mode.
SRC
Press
to
cyc le
through
all the available
sou rces.
Press
and
hold to
turn
the source off.
TOP
Returns
to
the top
menu
during
DVD playback.
MENU
MENU
Displays the DVD
menu
during
DVD playback.
Thumb
Selects a
menu
on the DVD men
u.
pad
MUTE
AUDIO
Changes the audio language.
subtitle
Jan-
SUBTITLE
guage
o1·
vi
ewing angle
during
DVD playback.
ANGLE
BAND/
Selects
the
t
uner
band w hen
tuner
is
se
lected
ESC
as a sou rce.
Cancels
the
contro
l mode of
functions.
Swttches between
media
file types when play-
ing
the
data
of
Dtsc.
USB.
RETURN
Returns to the specified
point
and begins
playback
from
there.
.....
/11
Pauses
or
resumes playback.
~
or
For audio:
Press
and hold to
perform
fast
.....
revet-se or fast forward .
For
video: Pre
ss
to perform fast rever
se
or
fast
forward.
~
or
Press
to
return to the previous track (chapter)
~
or go to
the
next
track
(chapter).
Press
to
an swer or end a call.
•
Stops playback .
If
you
resume
playback, playback w
il
l start
from
the
point
where you stopped. Touch the
key
again to stop playback
com
pletel
y.
FOLDER/P.
Selects
th
e next or previous disc or folder.
CH
Recal ls radi o station
fr
equenc
i
es
assigned
to
preset
channel
keys.
Notes
·
on
usingthe•·•lcD panel
AWARNING
Do
not
use
with
the
LCD
pan
el
left open.
It
may
result
in
injury
rn
the event of an
accident.
ACAUTION
•
Keep
hands
and
fingers
clear
of
this
product
when
op
ening.
closin
g.
or
adjusting
the
LCD pane
l.
Be especially
cautious
of
children's
hands
and
fingers.
•
Do
not
open or
close
the
LCD panel by force.
It
ma
y
cause
a
ma
l
function.
• Do
not
operate
this
product
until
the
LCD
panel has
completely
opened
or
closed. The
LCD panel may
stop
at
that
angle
for
safety.
•
Do
not
place
a
glas
s
or
can
on
the
open
LCD panel.
Adjusting-
..
the
LCD
panel
angle
ijiji:Jiii
1 Press
the~
button.
2 Touch
1+~1[1
or
1-'-+[
I
to adjust the
angle
of the
LCD panel.
3 Touch
[X].
Returns to the previous screen .
lnse~ingfeje~ting/cOI1111Ctil19
media
ACAUTION
Do not in se rt
anythin
g
other
than
a disc i
nto
the disc-loadt ng
slot.
Inserting
and
ejecting
a disc
Inserting
a disc
Miji:Jiii
1 Press
the~
button.
2 Touch
IG~I
to open the LCD
panel.
3
Insert a disc into the
disc-loading slot.
Ejecting a disc
Mijii:Jiii
1 Press
the~
button.
2 Touch
IG~I
to open the LCD
panel.
3 Remove the disc, and press
the~
button.
Inserting
a disc
Qijii:Jiii
Insert
a disc into the
disc-loading slot.
Ejecting a disc
Ui!JI:Jiii
Press~
button to eject a disc.
Plugging
and
unplugging
a
USB
stor-
age
device
0
This
product
may not achieve
optimum
performance
with
some USB storage devices.
0
Connection
via a USB
hub
is not possible.
0
A USB cable
is
requ ired
for
conn
ectio
n.
Pull
out the
plug
from
the
USB
port
of
the
USB
cable.
2
Plug
a
USB
storage device into the USB cable.
CD
USB cab
le
0
USB storage device
fill
Check
that
no
data
is being accessed before pulling
ou
t
the
USB storage device.
On
first-time
startup
1
Start
the engine to boot up the system.
The
"Select
Program
language
"
screen appea
rs.