CD RDS RECEIVER REPRODUCTOR DE CD CON RECEPTOR RDS English Español DEH-4400HD DEH-44HD Owner’s Manual Manual de instrucciones
Section Before you start 01 Thank you for purchasing this PIONEER product To ensure proper use, please read through this manual before using this product. It is especially important that you read and observe WARNINGs and CAUTIONs in this manual. Please keep the manual in a safe and accessible place for future reference. This device complies with Part 15 of the FCC Rules.
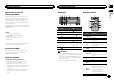
Section Before you start Operating this unit 01 02 Head unit 12 3 4 Please contact the dealer or distributor from where you purchased this unit for after-sales service (including warranty conditions) or any other information. In case the necessary information is not available, please contact the companies listed below: Please do not ship your unit to the companies at the addresses listed below for repair without advance contact.
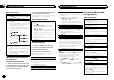
Section Operating this unit 02 Operating this unit 1 After installation of this unit, turn the ignition switch to ON. SET UP appears. Display indication 1 Basic operations ! 2 Turn M.C. to switch to YES. Press M.C. to select. 7 5 3 2 4 6 Indicator State Main display section ! Tuner: band and frequency ! Built-in CD, USB storage device and iPod: elapsed playback time and text information 2 (list) The list function is being operated.
Section Operating this unit Adjusting the volume 1 Turn M.C. to adjust the volume. CAUTION For safety reasons, park your vehicle when removing the front panel. Note When this unit’s blue/white lead is connected to the vehicle’s auto-antenna relay control terminal, the vehicle’s antenna extends when this unit’s source is turned on. To retract the antenna, turn the source off.
Section Operating this unit 02 Basic operations Selecting a band 1 Press BAND/ until the desired band (FM1, FM2,FM3 for FM or AM) is displayed. Manual tuning (step by step) 1 Press c or d. ! When an analog station is received, tuning down operation is conducted within the analog broadcasting. (6 d 2) ! If a digital broadcast is not yet received, tuning-up operation tunes in the next analog station.
Section Operating this unit Displaying text information Selecting the desired text information 1 Press . ! Depending on the version of iTunes used to write MP3 files to a disc or media file types, incompatible text stored within an audio file may be displayed incorrectly. ! Text information items that can be changed depend on the media. Selecting and playing files/ tracks from the name list 1 Press list mode. to switch to the file/track name 2 Use M.C. to select the desired file name (or folder name).
Section Operating this unit 02 Notes ! You can play playlists created with the PC application (MusicSphere). The application will be available on our website. ! Playlists that you created with the PC application (MusicSphere) are displayed in abbreviated form. 2 Turn M.C. to change the mode; press to select. Advanced operations using special buttons The selected song/album will be played after the currently playing song.
Section Operating this unit Audio adjustments Press M.C. to display the main menu. 2 Turn M.C. to change the menu option and press to select AUDIO. 3 Turn M.C. to select the audio function. After selecting, perform the following procedures to set the audio function. FAD/BAL (fader/balance adjustment) 1 Press M.C. to display the setting mode. 2 Press M.C. to cycle between fader (front/rear) and balance (left/right). 3 Turn M.C. to adjust speaker balance.
Section Operating this unit 02 The RCA outputs can be used for rear speaker or subwoofer connection. If you switch to SW, you can connect a rear speaker lead directly to a subwoofer without using an auxiliary amp. Initially, PREOUT is set for rear full-range speaker connection (SW). 1 Press M.C. to select the desired setting. SW—REA ! Even if you change this setting, there will be no output if you select OFF in SUB.W (Refer to SUB.W (subwoofer on/off setting) on the previous page).
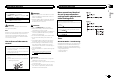
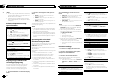
Section Installation Installation Connections Ground wire Other devices (Another electronic device in the car) POWER AMP Metal parts of car’s body F O N OF Important ! When installing this unit in a vehicle without an ACC (accessory) position on the ignition switch, failure to connect the red cable to the terminal that detects operation of the ignition key may result in battery drain. STAR T ACC position No ACC position — Disconnect the negative terminal of the battery before installation.
Section Installation 03 Installation j When using a subwoofer of 70 W (2 Ω), be sure to connect the subwoofer to the violet and violet/black leads of this unit. Do not connect anything to the green and green/ black leads. k Not used. l Subwoofer (4 Ω)× 2 Notes ! With a 2 speaker system, do not connect anything to the speaker leads that are not connected to speakers. ! Change the initial setting of this unit. Refer to REAR-SP (rear output setting) on page 9. Refer to PREOUT (preout setting) on page 9.
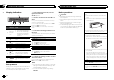
Section Installation Additional information Troubleshooting Symptom 3 Pull the unit out of the dashboard. Removing and re-attaching the front panel You can remove the front panel to protect your unit from theft. Press the detach button and push the front panel upward and pull it toward you. For details, refer to Removing the front panel to protect your unit from theft and Re-attaching the front panel on page 4. Securing the front panel The front panel can be secured with the supplied screw.
Appendix Additional information Message Cause Action Message Cause Action Message Cause Action Message Cause NO AUDIO The inserted disc does not contain any playable files. Replace the disc. SKIPPED Play an audio file not embedded with Windows Media DRM 9/10. CHECK USB The USB connector or USB cable has shortcircuited. The inserted disc contains DRM protected files. Replace the disc. Check that the USB connector or USB cable is not caught in something or damaged.
Appendix Additional information Cause Action NOT FOUND No related songs. Transfer songs to the iPod. Handling guidelines Discs and player Use only discs that feature either of the following two logos. To clean a CD, wipe the disc with a soft cloth outward from the center. Condensation may temporarily impair the player’s performance. Let it rest for about one hour to adjust to a warmer temperature. Also, wipe any damp discs off with a soft cloth.
Appendix Additional information Compatible ID3 tag version: 1.0, 1.1, 2.2, 2.3, 2.4 (ID3 tag Version 2.x is given priority over Version 1.x.) M3u playlist: Not compatible MP3i (MP3 interactive), mp3 PRO: Not compatible WAV Additional information Packet write data transfer: Not compatible Regardless of the length of blank sections between the songs from the original recording, compressed audio discs play with a short pause between songs. USB storage device File extension: .
Appendix Additional information Copyright and trademark iTunes Apple and iTunes are trademarks of Apple Inc., registered in the U.S. and other countries. MP3 Supply of this product only conveys a license for private, non-commercial use and does not convey a license nor imply any right to use this product in any commercial (i.e.
Appendix Additional information Signal-to-noise ratio ......... 62 dB (analog broadcasting) (IHF-A network) CEA2006 Specifications Power output ................... 14 W RMS × 4 Channels (4 W and ≦ 1 % THD+N) S/N ratio .......................... 91 dBA (reference: 1 W into 4 W) Note Specifications and the design are subject to modifications without notice.
English 19 En
Sección Antes de comenzar 01 Gracias por haber adquirido este producto PIONEER Lea con detenimiento este manual antes de utilizar el producto por primera vez para que pueda darle el mejor uso posible. Es muy importante que lea y cumpla con la información que aparece bajo los mensajes de ADVERTENCIA y PRECAUCIÓN en este manual. Una vez leído, guarde el manual en un lugar seguro y a mano para poder consultarlo en el futuro.
Sección Utilización de esta unidad Unidad principal 12 3 4 6 2 h (expulsar) Parte 8 9 c/d a BAND/ (control de iPod) 4 SRC/OFF b 1a6 5 Ranura de carga de discos c 7 Puerto USB (color) d e l g h i j m Parte Operación FUNCTION Pulse para seleccionar las funciones. LIST/ ENTER Pulse para visualizar la lista de título del disco, la lista de título de la pista, la lista de carpetas o la lista de archivos según la fuente. Pulse para visualizar la lista según la fuente de que se trate.
Sección Utilización de esta unidad 02 3 Siga los siguientes pasos para ajustar el menú: Para avanzar a la siguiente opción del menú debe confirmar primero su selección. CLOCK SET (ajuste del reloj) 1 2 3 4 Gire M.C. para ajustar la hora. Pulse M.C. para seleccionar los minutos. Gire M.C. para ajustar los minutos. Pulse M.C. para confirmar la selección.
Sección Utilización de esta unidad ! De producirse fugas en la pila, limpie completamente el mando a distancia e instale una pila nueva. ! Para desechar las pilas usadas, cumpla con los reglamentos gubernamentales o las normas ambientales pertinentes de las instituciones públicas aplicables en su país/zona. Sintonizador Acerca de la radiodifusión HD Radioä La emisión de HD Radioä consiste en servicios de audio y datos de alta calidad que las emisoras de FM/AM locales ponen a su disposición.
Sección Utilización de esta unidad 02 2 Gire M.C. para cambiar la opción de menú y pulse para seleccionar FUNCTION. 3 Gire M.C. para seleccionar la función. Una vez seleccionada, siga los siguientes pasos para ajustar la función: BSM (memoria de las mejores emisoras) BSM (memoria de las mejores emisoras) guarda automáticamente las seis emisoras más fuertes ordenadas por la intensidad de la señal. 1 Pulse M.C. para activar la función BSM. Para cancelar, vuelva a pulsar M.C.
Sección Utilización de esta unidad Operaciones avanzadas mediante el uso de botones especiales Reproducción de las pistas en orden aleatorio para activar o desactivar la repro1 Pulse 5/ ducción aleatoria. Las pistas de una gama de repetición seleccionada se reproducen en orden aleatorio. ! Para cambiar de canción durante la reproducción aleatoria, pulse d para pasar a la siguiente pista. Al pulsar c se vuelve a reproducir la pista actual desde el principio de la canción.
Sección Utilización de esta unidad 02 Operaciones avanzadas mediante el uso de botones especiales Reproducción de canciones relacionadas con la canción que se está reproduciendo Selección de una gama de repetición de reproducción 1 Pulse 6/ para desplazarse entre las siguientes opciones: ! OFF – Desactiva la repetición ! ONE – Repite la canción actual ! ALL – Repite todas las canciones de la lista seleccionada ! Si está seleccionado CTRL AUDIO, no podrá seleccionar la opción OFF.
Sección Utilización de esta unidad 1 Pulse M.C. para activar la función de reproducción aleatoria de todas las canciones (shuffle all). Para desactivarla, desactive SHUFFLE en el menú FUNCTION. LINK PLAY (reproducción de enlace) PAUSE (pausa) 1 Pulse M.C. para pausar o reanudar. AUDIO BOOK (velocidad del audiolibro) 1 Pulse M.C. para mostrar el modo de ajuste. 2 Gire M.C. para seleccionar su ajuste favorito.
Sección Utilización de esta unidad 02 USB PNP (plug and play) Este ajuste permite cambiar la fuente a USB/iPod automáticamente. 1 Pulse M.C. para activar o desactivar Plug and Play. ON – Si está conectado un dispositivo de almacenamiento USB o un iPod, y dependiendo del tipo de dispositivo, la fuente cambia automáticamente a USB/iPod al arrancar el motor. Si se desconecta el dispositivo de almacenamiento USB o el iPod, se apaga la fuente de la unidad.
Sección Utilización de esta unidad Instalación 02 03 % Mantenga pulsado . Uso de una fuente AUX 1 Inserte el miniconector estéreo en el conector de entrada AUX. . 2 Gire M.C. para visualizar KEY COLOR o DISP COLOR. Púlselo para realizar la selección. 3 Mantenga pulsado M.C. hasta que el ajuste de la iluminación personalizada aparezca en la pantalla. 4 Pulse M.C. para seleccionar el color primario. R (rojo)—G (verde)—B (azul) 5 Gire M.C. para ajustar el nivel de brillo.
Sección Instalación 03 Instalación — Utilice un fusible con la intensidad nominal indicada. — Nunca conecte el cable negativo de los altavoces directamente a tierra. — Nunca empalme los cables negativos de varios altavoces. ! Cuando se enciende esta unidad, se emite una señal de control a través del cable azul/ blanco. Conecte este cable al mando a distancia del sistema de un amplificador de potencia externo o al terminal de control del relé de la antena automática del vehículo (máx. 300 mA 12 V CC).
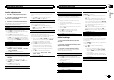
Sección Instalación Instalación ! El láser semiconductor se dañará si se sobrecalienta. Instale esta unidad alejada de zonas que alcancen altas temperaturas, como cerca de la salida del calefactor. ! Se logra un rendimiento óptimo si la unidad se instala en un ángulo inferior a 60°. 3 3 Salpicadero o consola ! Utilice tornillos de cabeza redonda (5 mm × 8 mm) o tornillos de cabeza embutida (5 mm × 9 mm), según los orificios roscados del soporte. Instale la unidad según la ilustración.
Apéndice Información adicional Solución de problemas Síntoma Causa Resolución La luz se Activado el apaga y enmodo de deciende aleato- mostración. riamente. Desactive el ajuste de la visualización de la demostración. () La pantalla vuelve automáticamente a la visualización normal. No ha realizado ninguna operación en aproximadamente 30 segundos. Realice la operación de nuevo. La gama de repetición de reproducción cambia de manera inesperada.
Apéndice Información adicional Información adicional Causa Resolución Mensaje Causa Resolución Mensaje Causa El conector USB o el cable USB está cortocircuitado. Compruebe que el conector USB o el cable USB no esté enganchado en algo ni dañado. ERROR-19 Error de comunicación. ERROR-16 La versión de Actualice la verfirmware del sión del iPod. iPod es antigua. El dispositivo de almacenamiento USB conectado consume más de 500 mA (corriente máxima permitida).
Apéndice Información adicional Al usar discos de superficie imprimible para etiquetas, lea primero las instrucciones y las advertencias de los discos. Es posible que algunos discos no puedan insertarse ni expulsarse. La utilización de este tipo de discos puede dañar el equipo. No pegue etiquetas compradas por separado ni otro tipo de material a los discos. ! Los discos podrían combarse y no podrán reproducirse.
Apéndice Información adicional Transferencia de datos en formato Packet Write: no compatible Dispositivo de almacenamiento USB Jerarquía de carpetas reproducibles: hasta ocho niveles (una jerarquía práctica de carpetas tiene menos de dos niveles). Carpetas reproducibles: hasta 500 Archivos reproducibles: hasta 15 000 Reproducción de archivos protegidos por derechos de autor: no compatible Dispositivo de almacenamiento USB particionado: sólo se puede reproducir la primera partición.
Apéndice Información adicional WMA Windows Media es una marca registrada o una marca de fábrica de Microsoft Corporation en los Estados Unidos y/u otros países. Este producto incluye tecnología propiedad de Microsoft Corporation, y no se puede usar ni distribuir sin una licencia de Microsoft Licensing, Inc. iPod y iPhone iPhone, iPod, iPod classic, iPod nano y iPod son marcas comerciales de Apple Inc., registradas en los EE.UU. y en otros países.
Apéndice Información adicional Relación de señal a ruido ................................... 72 dB (emisión analógica) (red IHF-A) Sintonizador de AM Español Gama de frecuencias ....... 530 kHz a 1 710 kHz Sensibilidad utilizable ...... 25 µV (señal/ruido: 20 dB) Relación de señal a ruido ................................... 80 dB (emisión digital) (red IHF-A) Relación de señal a ruido ...................................
Es
Español 39 Es
PIONEER CORPORATION 1-1, Shin-ogura, Saiwai-ku, Kawasaki-shi, Kanagawa 212-0031, JAPAN PIONEER ELECTRONICS (USA) INC. P.O. Box 1540, Long Beach, California 90801-1540, U.S.A. TEL: (800) 421-1404 PIONEER EUROPE NV Haven 1087, Keetberglaan 1, B-9120 Melsele, Belgium/Belgique TEL: (0) 3/570.05.11 PIONEER ELECTRONICS ASIACENTRE PTE. LTD. 253 Alexandra Road, #04-01, Singapore 159936 TEL: 65-6472-7555 PIONEER ELECTRONICS AUSTRALIA PTY. LTD.