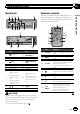
Operation Manual CD RDS RECEIVER DEH-80PRS English
Contents Thank you for purchasing this PIONEER product. To ensure proper use, please read through this manual before using this product. It is especially important that you read and observe WARNINGs and CAUTIONs in this manual. Please keep the manual in a safe and accessible place for future reference.
Section Before you start Information to User Alteration or modifications carried out without appropriate authorization may invalidate the user’s right to operate the equipment. Note This equipment has been tested and found to comply with the limits for a Class B digital device, pursuant to Part 15 of the FCC Rules. These limits are designed to provide reasonable protection against harmful interference in a residential installation.
Section 01 Before you start ESTABLISH A SAFE LEVEL: ! Set your volume control at a low setting. ! Slowly increase the sound until you can hear it comfortably and clearly, without distortion. ! Once you have established a comfortable sound level, set the dial and leave it there. BE SURE TO OBSERVE THE FOLLOWING GUIDELINES: ! Do not turn up the volume so high that you can’t hear what’s around you. ! Use caution or temporarily discontinue use in potentially hazardous situations.
Section Before you start ! Before using this unit for the first time after installation ! If the unit fails to operate properly ! When strange or incorrect messages appear on the display 1 Remove the front panel. For details, refer to Removing the front panel to protect your unit from theft on page 9. Before you start U.S.A. Pioneer Electronics (USA) Inc. CUSTOMER SUPPORT DIVISION P.O. Box 1760 Long Beach, CA 90801-1760 800-421-1404 CANADA Pioneer Electronics of Canada, Inc.
Section 01 Before you start 1 Use a thin, flathead screwdriver to change the DSP switch on the bottom of this unit. ! L (Low) - If inputting from the RCA output of a connected device ! H (High) - If inputting from the speaker output of a connected device Demo mode 2 Press RESET with a pen tip or other pointed instrument. Note This unit's audio settings will continue to remain in the memory even if the battery is disconnected or the microprocessor reset.
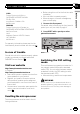
Section Operating this unit 02 Head unit Remote control 5 Remote controller buttons marked with the same numbers as on the unit operate in the same way as the corresponding unit button regardless of button name. g b a 98 7 6 h i j 9 m c l 3 a k f e d Part 1 9 BAND/ 2 LEVER a SRC/OFF /DISP b MULTI-CONTROL (M.C.) 4 (list) c Disc loading slot d h (eject) 6 AUX input jack (3.5 mm stereo jack) Auto TA and EQ microphone input jack Use to connect an auto TA and EQ microphone.
Section Operating this unit 02 Set up menu Demonstration (demo display setting) When you turn the ignition switch to ON after installation, set up menu appears on the display. You can set up the menu options below. 1 Turn M.C. to set the demo display to off. 2 Press M.C. to confirm the selection. Quit appears. 1 After installation of this unit, turn the ignition switch to ON. SET UP appears. 2 Turn M.C. to switch to YES. # If you do not operate for 30 seconds, the set up menu will not be displayed.
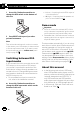
Section Operating this unit Re-attaching the front panel 1 Reattach the front panel by holding it upright to the unit and clipping it securely into the mounting hooks. communications for the USB storage device first before proceeding. ! If connecting both USB1 (USB storage device1)/iPod1 (iPod connected using USB input1) and USB2 (USB storage device2)/ iPod2 (iPod connected using USB input2) at the same time, use a Pioneer USB cable (CDU50E) in addition to the regular Pioneer USB cable.
Section 02 Operating this unit ! Remove the battery if the remote control is not used for a month or longer. ! There is a danger of explosion if the battery is incorrectly replaced. Replace only with the same or equivalent type. ! Do not handle the battery with metallic tools. ! Do not store the battery with metallic objects. ! If the battery leaks, wipe the remote control completely clean and install a new battery.
Section Operating this unit Selecting a band 1 Press BAND/ until the desired band (FM-1, FM2,FM-3 for FM or AM) is displayed. Manual tuning (step by step) 1 Turn LEVER. Seeking 1 Turn and hold down LEVER. ! While turning and holding down LEVER, you can skip stations. Seek tuning starts as soon as you release LEVER. Storing and recalling stations for each band 1 Press (list). The preset screen is displayed. 2 Use M.C. to store the selected frequency in the memory. Turn to change the preset number.
Section Operating this unit 02 Using radio text Displaying radio text You can display the currently received radio text and the three most recent radio texts. 1 Press and hold down (list) to display radio text. ! You can turn off radio text display by pressing /DISP, SRC/OFF or BAND/ . ! When no radio text is received, NO TEXT appears in the display. 2 Turn LEVER left or right to recall the three most recent radio texts. 3 Press or to scroll.
Section Operating this unit ! The level displayed on the voltage indicator may differ from the actual voltage level. Opening the front panel 1 Press the open button. Disc loading slot appears. Playing a CD/CD-R/CD-RW 1 Insert the disc into the disc loading slot with the label side up. Ejecting a CD/CD-R/CD-RW 1 Press h (eject). Playing songs on a USB storage device 1 Use a Pioneer USB cable to connect the USB storage device to the unit. ! Plug in the USB storage device using the USB cable.
Section Operating this unit 02 2 Use M.C. to select the desired file name (or folder name). Changing the file or folder name 1 Turn M.C. You can also perform this operation by turning LEVER. Playing 1 When a file or track is selected, press M.C. Viewing a list of the files (or folders) in the selected folder 1 When a folder is selected, press M.C. Playing a song in the selected folder 1 When a folder is selected, press and hold M.C.
Section Operating this unit 02 Pause (pause) 1 Press M.C. to pause or resume. Sound Retriever (sound retriever) Automatically enhances compressed audio and restores rich sound. 1 Press M.C. to select the desired setting. OFF (off)—1—2 1 is effective for low compression rates, and 2 is effective for high compression rates. Playing songs on an iPod 1 Connect an iPod to the USB cable using an iPod Dock Connector. Selecting a track (chapter) 1 Turn LEVER.
Section 02 Operating this unit Playing a song in the selected category 1 When a category is selected, press and hold M.C. Searching the list by alphabet 1 When a list for the selected category is displayed, press to switch to alphabet search mode. 2 Turn M.C. to select a letter. 3 Press M.C. to display the alphabetical list. Notes ! You can play playlists created with the PC application (MusicSphere). The application will be available on our website.
Section Operating this unit — Track up/down ! When the control mode is set to iPod/APP, only Pause, Tags transfer or Sound Retriever is available. ! The browse function cannot be operated from this unit. Shuffle all (shuffle all) 1 Press M.C. to turn shuffle all on. To turn off, set Shuffle mode in the FUNCTION menu to off. Link play (link play) 1 Press M.C. to display the setting mode. 2 Turn M.C. to change the mode; press to select.
Section 02 Operating this unit ! Ability of the Pioneer car audio/video products to access the Pandora service is subject to change without notice and could be affected by any of the following: compatibility issues with future firmware versions of iPhones; compatibility issues with future firmware versions of the Pandora application for the iPhone; changes to the Pandora music service by Pandora; discontinuation of the Pandora music service by Pandora.
Section Operating this unit 2 Use M.C. to select the QuickMix or desired station. Changing QuickMix or stations 1 Turn M.C. Playing 1 When QuickMix or the station is selected, press M.C. Function settings 1 Press M.C. to display the main menu. 2 Turn M.C. to change the menu option and press to select FUNCTION. 3 Turn M.C. to select the function. After selecting, perform the following procedures to set the function. Bookmark (bookmark) 1 Press M.C. to store track information. Pause (pause) 1 Press M.C.
Section Operating this unit 02 Adjusting the audio finely Introduction of audio adjustments By carrying out the following settings/adjustments in the order shown, you can effortlessly create a finely-tuned sound field. 1 Adjusting time alignment (TA1, TA2) 2 Adjusting network (NW 1, NW 2, NW 3, NW 4) 3 Adjusting equalizer curves (EQ 1) 4 Adjusting the 16-band graphic equalizer (EQ 2) 1 Audio display Standard mode 1 Adjusting the audio easily 2 Turn M.C.
Section Operating this unit 4 Press M.C. to display the setting mode. Notes ! If you do not operate the audio function within about 30 seconds, the display is automatically returned to the source display. ! EQ 2 (16-band graphic equalizer), TA2 (time alignment adjusting), NW 1 (network adjustment 1), NW 2 (network adjustment 2), NW 3 (network adjustment 3) and NW 4 (network adjustment 4) functions are not canceled automatically.
Section 02 Operating this unit Using fader/balance adjustment You can change the fader/balance setting to provide an ideal listening environment for all of the occupied seats. ! This function is only available in standard mode . 1 Use M.C. to select F/B. Refer to Introduction of audio adjustments on page 20. 2 Turn LEVER to adjust the front/rear speaker balance. Front 25 to Rear 25 is displayed as the front/ rear speaker balance moves from front to rear. # Select F/R 00 when only using two speakers.
Section Operating this unit Adjustable parameters The network function enables adjustment of the following parameters. Make adjustments in line with the reproduced frequency band and characteristics of each connected speaker unit. Level (dB) # You can adjust the distance for the other speakers in the same way. 7 Press BAND/ ment mode. Reproduced frequency band to cancel the time align- Operating this unit 6 Turn LEVER to adjust the distance between the selected speaker and the listening position.
Section 02 Operating this unit Phase You can switch phase (normal, reverse) for each speaker unit’s input signal. When the continuity of sound between speakers is imprecise, try switching phase. This may improve the continuity of sound between speakers. Points concerning network adjustments Cut-off frequency adjustment ! With the low-range speaker installed in the rear tray, if you set Low LPF cut-off frequency high, bass sound is separated so that it appears to come from the rear.
Section Operating this unit 3 Press /DISP to display the upper tier. 4 Use M.C. to select NW 2. Refer to Introduction of audio adjustments on page 20. 5 Turn M.C. to select the cut-off frequency (crossover frequency) of the selected speaker unit (filter). Low LPF: 25—31.5—40—50—63—80—100 —125—160—200—250 (Hz) Mid HPF: 25—31.5—40—50—63—80—100 —125—160—200—250 (Hz) Mid LPF: 1.25k—1.6k—2k—2.5k—3.15k— 4k—5k—6.3k—8k—10k—12.5k (Hz) HighHPF: 1.25k—1.6k—2k—2.5k—3.15k— 4k—5k—6.3k—8k—10k—12.
Section 02 Operating this unit Adjusting subwoofer settings Using the high pass filter The cut-off frequency and output level can be adjusted when the subwoofer output is on. When you do not want low sounds from the subwoofer output frequency range to play from the front or rear speakers, turn on the HPF (high pass filter). Only frequencies higher than those in the selected range are output from the front or rear speakers. ! This function is only available in standard mode . 1 Use M.C. to select SW 2.
Section Operating this unit 6 Turn LEVER to adjust the output level of the front speakers. 0 to –24 is displayed as the level is increased or decreased. Setting the high pass filter for rear speakers 1 Use M.C. to select R.HPF 1. Refer to Introduction of audio adjustments on page 20. 2 Turn LEVER to select slope. –12— –6—Pass (dB/oct.) # If you set the slope Pass (0 dB/oct.), the audio signal bypasses the filter, so the filter does not have an effect. 1 Use M.C. to select A.
Section Operating this unit 02 Adjusting equalizer curves The factory supplied equalizer curves, with the exception of Flat, can be adjusted to a fine degree (nuance control). 1 Use M.C. to select EQ 1. Refer to Introduction of audio adjustments on page 20. 2 Turn M.C. to select an equalizer curve. 3 Turn LEVER to adjust the equalizer curve. +6 to –6 is displayed as the equalizer curve is increased or decreased.
Section Operating this unit Notes ! The AM volume level can also be adjusted with this function. ! The USB/SD volume level can also be adjusted with this function. Using automatic sound levelizer During driving, noise in the car changes according to the driving speed and road conditions. The automatic sound levelizer (ASL) monitors such varying noise and automatically increases the volume level, if this noise becomes greater.
Section 02 Operating this unit ! When this unit is connected to a power amp with an LPF, turn this LPF off before performing auto TA and EQ. Also set the cut-off frequency for the built-in LPF of an active subwoofer to the highest frequency. ! The time alignment value resulting from auto TA and EQ has been calculated by a computer and is the optimum delay time that will give accurate results.
Section Operating this unit 7 Plug the microphone into the microphone input jack on this unit. 02 Using Bluetooth wireless technology 8 Press M.C. to start the auto TA and EQ. 9 When the 10-second countdown starts, get out of the car and close the door within 10 seconds. The measurement tone (noise) is outputted from the speakers, and auto TA and EQ begins. # When all speakers are connected, auto TA and EQ is completed in about six minutes. # To stop auto TA and EQ, press M.C. again.
Section 02 Operating this unit Canceling call waiting 1 Press . Device list (connecting or disconnecting a device from the device list) Adjusting the other party’s listening volume 1 Turn LEVER while talking on the phone. ! When private mode is on, this function is not available. ! Turning private mode on or off 1 Press BAND/ while talking on the phone. Switching the information display 1 Press /DISP while talking on the phone.
Section Operating this unit 02 Device INFO (Bluetooth device address display) Bluetooth devices that are difficult to establish a connection with are called special devices. If your Bluetooth device is listed as a special device, select the appropriate one. 1 Press M.C. to display the setting mode. ! If three devices are already paired, Device Full is displayed and it is not possible to perform this operation. In this case, delete a paired device first. 2 Turn M.C. to display a special device.
Section Operating this unit 02 Setting up for Bluetooth audio Play (play) Before you can use the Bluetooth audio function you must set up the unit for use with your Bluetooth audio player. This entails establishing a Bluetooth wireless connection between this unit and your Bluetooth audio player, and pairing your Bluetooth audio player with this unit. 1 Press M.C. to start playback. Stop (stop) 1 Press M.C. to stop the playback. Pause (pause) 1 Press M.C. to turn pause on.
Section Operating this unit ! 1 2 3 4 5 6 7 Phone Function (phone function) You can set Auto answer, Ring tone and PH.B. Name view from this menu. For details, refer to Function and operation on this page. Function and operation 1 Display Phone Function. Refer to Phone Function (phone function) on this page. 2 Press M.C. to display the function menu. Initial settings 1 1 Function display ! Shows the function status. 1 Press and hold SRC/OFF until the unit turns off.
Section 02 Operating this unit When operating external storage devices (USB, SD), you can select files from the list. 1 Press M.C. to select the setting. OFF—USB memory1—USB memory2—SD card Warning tone (warning tone setting) If the front panel is not detached from the head unit within four seconds of turning off the ignition, a warning tone sounds. You can turn off the warning tone. 1 Press M.C. to turn the warning tone on or off.
Section Operating this unit Software (updating the bluetooth software) Other functions Using AUX1 and AUX2 source About AUX1 and AUX2 There are two methods to connect auxiliary devices to this unit. AUX1 source When connecting auxiliary device using the front AUX input. ! You need to activate the AUX setting in the initial setting menu. Refer to AUX1 (front AUX input setting)/AUX2 (rear RCA input setting) on the previous page. 1 Insert the mini plug into the AUX input jack on this unit.
Section Operating this unit 02 2 Turn M.C. to change the menu option and press to select ENTERTAINMENT. 3 Turn M.C. to select the function. Select the clock setting. ! When CALM is selected, the system automatically cycles through the calm colors. ! When CUSTOM is selected, the customized color saved is selected. 4 Press M.C. to select the desired setting.
Section Operating this unit ! 27 preset colors (WHITE to ROSE) ! SCAN (cycle through all colors) ! Three sets of colors (WARM, AMBIENT, CALM) Notes ! You cannot select CUSTOM in this function. ! Once you select a color in this function, colors on the keys and display of this unit automatically switch to the color you selected. ! For details about colors on the list, refer to Selecting the key color from the illumination color list on the previous page.
Appendix Additional information Troubleshooting Symptom Symptom Cause Action The display automatically returns to the ordinary display. You did not per- Perform operation form any opera- again. tion within about 30 seconds. Select the repeat The repeat play Depending on play range again. range changes the repeat play unexpectedly. range, the selected range may change when another folder or track is being selected or during fast forwarding/ reversing. A subfolder is not played back.
Appendix Additional information Symptom Cause Action Message Cause Action NO DEVICE No USB storage device or iPod is connected. Connect a compatible USB storage device/iPod. FORMAT READ Sometimes there is a delay between the start of playback and when you start to hear any sound. Wait until the message disappears and you hear sound. NO AUDIO There are no songs. Transfer the audio files to the USB storage device and connect. The connected USB storage device has security enabled.
Appendix Additional information Message Cause Action Message Cause Action CHECK USB The USB connector or USB cable has shortcircuited. Check that the USB connector or USB cable is not caught in something or damaged. ERROR-23 USB storage device was not formatted with FAT12, FAT16 or FAT32. USB storage device should be formatted with FAT12, FAT16 or FAT32. The connected USB storage device consumes more than maximum allowable current. Disconnect the USB storage device and do not use it.
Appendix Additional information Message Cause Action Try again later. ERR:Outside Noise The surrounding noise level is too high. Skip limit reached Skip limit reached. Do not exceed the skip limit. ! Stop your car in a place that is quiet, and switch off the engine, air conditioner and heater. ! Set the microphone correctly. Check Application This version of the Pandora application is not supported. Connect an iPod/ iPhone that has a compatible version of the Pandora application installed.
Appendix Additional information Condensation may temporarily impair the player’s performance. Let it rest for about one hour to adjust to a warmer temperature. Also, wipe any damp discs off with a soft cloth. Playback of discs may not be possible because of disc characteristics, disc format, recorded application, playback environment, storage conditions, and so on. Road shocks may interrupt disc playback.
Appendix Additional information DualDiscs File extension: .wav Quantization bits: 8 and 16 (LPCM), 4 (MS ADPCM) Sampling frequency: 16 kHz to 48 kHz (LPCM), 22.05 kHz and 44.1 kHz (MS ADPCM) Additional information DualDiscs are two-sided discs that have a recordable CD for audio on one side and a recordable DVD for video on the other. Since the CD side of DualDiscs is not physically compatible with the general CD standard, it may not be possible to play the CD side with this unit.
Appendix Additional information External storage device (USB, SD) Playable folder hierarchy: up to eight tiers (A practical hierarchy is less than two tiers). Playable folders: up to 1 500 Playable files: up to 15 000 Playback of copyright-protected files: Not compatible Partitioned external storage device (USB, SD): Only the first playable partition can be played. There may be a slight delay when starting playback of audio files on a USB storage device with numerous folder hierarchies.
Appendix Additional information Example of a hierarchy 01 02 04 05 Level 1 Level 2 Level 3 Level 4 : Folder : Compressed audio file 01 to 05: Folder number 1 to 6: Playback sequence Disc Folder selection sequence or other operation may differ depending on the encoding or writing software. External storage device (USB, SD) The playback sequence is the same as the recorded sequence in the external storage device (USB, SD).
Appendix Additional information miniSD Logo is a trademark of SD-3C, LLC. microSD Logo is a trademark of SD-3C, LLC. SDHC Logo is a trademark of SD-3C, LLC. iPod & iPhone iPhone, iPod, iPod classic, iPod nano, and iPod touch are trademarks of Apple Inc., registered in the U.S. and other countries.
Appendix Additional information Specifications General Audio Maximum power output ....... 50 W × 4 Continuous power output ... 22 W × 4 (50 Hz to 15 000 Hz, 5 % THD, 4 W load, both channels driven) Load impedance ...................... 4 W to 8 W × 4 Preout maximum output level ..................................................... 5.0 V Loudness contour ................... +10 dB (100 Hz), +6.5 dB (10 kHz) (volume: –30 dB) Equalizer (Left/Right independent 16-Band Graphic Equalizer): Frequency ...........
Appendix Additional information Gain ............................ +6 dB to –24 dB/Mute (1 dB step) Phase ........................ Normal/Reverse Usable sensitivity ..................... 9 dBf (0.8 µV/75 W, mono, S/N: 30 dB) Signal-to-noise ratio ............... 72 dB (IHF-A network) CD player AM tuner System .......................................... Compact disc audio system Usable discs .............................. Compact disc Signal-to-noise ratio ...............
En 51
PIONEER CORPORATION 1-1, Shin-ogura, Saiwai-ku, Kawasaki-shi, Kanagawa 212-0031, JAPAN PIONEER ELECTRONICS (USA) INC. P.O. Box 1540, Long Beach, California 90801-1540, U.S.A. TEL: (800) 421-1404 PIONEER EUROPE NV Haven 1087, Keetberglaan 1, B-9120 Melsele, Belgium/Belgique TEL: (0) 3/570.05.11 PIONEER ELECTRONICS ASIACENTRE PTE. LTD. 253 Alexandra Road, #04-01, Singapore 159936 TEL: 65-6472-7555 PIONEER ELECTRONICS AUSTRALIA PTY. LTD.