AUTORADIO CD DEH-P500UB Français CD RECEIVER English Operation Manual Mode d’emploi
Contents Thank you for buying this Pioneer product. Please read through these operating instructions so you will know how to operate your model properly. After you have finished reading the instructions, keep this manual in a safe place for future reference.
Contents English – Recalling equalizer curves 24 – Adjusting equalizer curves 24 – Fine-adjusting equalizer curve 24 Adjusting loudness 25 Using subwoofer output 25 – Adjusting subwoofer settings 25 Using the high pass filter 26 Boosting the bass 26 Adjusting source levels 26 Initial Settings Adjusting initial settings 27 Setting the clock 27 Switching the warning tone 27 Switching the auxiliary setting 27 Switching the dimmer setting 27 Setting the rear output and subwoofer controller 28 Setting the inter
Contents – Using the Call History 40 – Making a call by entering phone number 40 – Clearing memory 40 – Setting automatic rejecting 41 – Setting automatic answering 41 – Switching the ring tone 41 – Echo canceling and noise reduction 41 XM tuner 41 – Listening to XM Satellite Radio 41 – Switching the XM display 41 – Storing and recalling broadcast stations 41 – Switching the XM channel select mode 42 – Displaying the Radio ID 42 SIRIUS Satellite Radio tuner 42 – Listening to SIRIUS Satellite Radio 42 – Swi
Section Before You Start 01 Alteration or modifications carried out without appropriate authorization may invalidate the user’s right to operate the equipment. ! ! ! ! For Canadian model This Class B digital apparatus complies with Canadian ICES-003. About this unit The tuner frequencies on this unit are allocated for use in North America. Use in other areas may result in poor reception. Also, damage to this unit, smoke, and overheating could result from contact with liquids.
Section 01 Before You Start About MP3 Supply of this product only conveys a license for private, non-commercial use and does not convey a license nor imply any right to use this product in any commercial (i.e. revenuegenerating) real time broadcasting (terrestrial, satellite, cable and/or any other media), broadcasting/streaming via internet, intranets and/ or other networks or in other electronic content distribution systems, such as pay-audio or audio-on-demand applications.
Section Before You Start Please contact the dealer or distributor from where you purchased this unit for after-sales service (including warranty conditions) or any other information. In case the necessary information is not available, please contact the companies listed below: Please do not ship your unit to the companies at the addresses listed below for repair without advance contact. U.S.A. Pioneer Electronics (USA) Inc. CUSTOMER SUPPORT DIVISION P.O.
Section 01 Before You Start Attaching the front panel % Reattach the front panel by holding it upright to the unit and clipping it securely into the mounting hooks. WARNING Keep the battery out of the reach of children. Should the battery be swallowed, consult a doctor immediately. CAUTION About the demo mode This unit features the feature demo mode. Important The red lead (ACC) of this unit should be connected to a terminal coupled with ignition switch on/off operations.
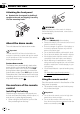
Section Operating this unit 3 4 English 1 2 02 5 b a 9 8 7 What’s What Head unit 1 SRC/OFF button This unit is turned on by selecting a source. Press to cycle through all the available sources. 2 DISP/BACK/SCROLL button Press to select different displays. Press and hold to scroll the text information. Press to return to the previous display when operating the menu. Press and hold to return to the main menu when operating the menu.
Section 02 Operating this unit j LIST/ENTER button Press to display the disc title list, track title list, folder list, file list or preset channel list depending on the source. While in the operating menu, press to control functions. 1 2 4 6 7 89 35 a b c d e b BAND/ESC button Press to select among three FM bands and one AM band. Press to return to the ordinary display when operating menu. Remote control Operation is the same as when using the buttons on the head unit.
Section Operating this unit (song) indicator Appears when the track (song) name is displayed on the main display section. Appears when song search refinement on iPod browsing function is operated. 9 LOC indicator Appears when local seek tuning is on. English 8 02 Basic Operations Power ON/OFF Turning the unit on % Press SRC to turn the unit on. Turning the unit off a 5 (stereo) indicator Appears when the selected frequency is being broadcast in stereo. % Press OFF and hold until the unit turns off.
Section 02 Operating this unit ! Charging the portable audio player using car’s DC power source while connecting it to AUX input may generate noise. In this case, stop charging. ! External unit refers to a Pioneer product (such as ones available in the future) that, although incompatible as a source, enables control of basic functions with this unit. Two external units can be controlled with this unit.
Section Operating this unit 1 Press MULTI-CONTROL to display the main menu. 2 Use MULTI-CONTROL to select FUNCTION. Turn to change the menu option. Press to select. 3 Turn MULTI-CONTROL to select the function. BSM (best stations memory)—LOCAL (local seek tuning) % Press RPT repeatedly to select the desired setting.
Section 02 Operating this unit # This operation is available only when playing CD-EXTRA or MIXED-MODE CDs. # If you have switched between compressed audio and CD-DA, playback starts at the first track on the disc. Built-in CD Player Basic Operations % Open the front panel Press OPEN . Disc loading slot appears. Notes Disc loading slot EJECT button # When loading a disc, face the label side of a disc up.
Section Operating this unit Notes ! You can scroll to the left of the title by pressing and holding DISP. ! Audio CD that contains certain information such as text and/or number is CD TEXT. ! If specific information is not recorded on a disc, title or name is not displayed. ! Depending on the version of iTunes® used to write MP3 files onto a disc, comment information may not be correctly displayed. — iTunes is a registered trademark of Apple Inc.
Section 02 Operating this unit Introduction of advanced operations 1 Press MULTI-CONTROL to display the main menu. # When FOLDER (folder repeat) is selected, it is not possible to play back a subfolder of that folder. Note 2 Use MULTI-CONTROL to select FUNCTION. Turn to change the menu option. Press to select. You can also perform this operation in the menu that appears by using MULTI-CONTROL. 3 Turn MULTI-CONTROL to select the function.
Section Operating this unit You can also turn this function on or off in the menu that appears by using MULTI-CONTROL. Using Sound Retriever Sound Retriever function automatically enhances compressed audio and restores rich sound. % Press S.Rtrv/SAT MODE repeatedly to select the desired setting. OFF (off)—1—2 # 2 is more effective than 1. 6 After entering the title, press and hold MULTI-CONTROL to store it in memory.
Section 02 Operating this unit Playing songs on USB portable audio player/USB memory Displaying text information of an audio file For details about the supported device, refer to Portable audio player compatibility on page 6. % Press DISP to select the desired text information.
Section Operating this unit 3 Turn MULTI-CONTROL to select the function. REPEAT (repeat play)—RANDOM (random play)—SCAN (scan play)—PAUSE (pause)— SOUND RETRIEVER (advanced sound retriever) ! To return to the ordinary display, press BAND/ESC. ! If you select another folder during repeat play, the repeat play range changes to ALL. ! If you perform track search or fast forward/reverse during TRACK, the repeat play range changes to FOLDER.
Section 02 Operating this unit Playing songs on iPod For details about the supported iPod, refer to iPod® compatibility on page 6. Basic Operations % Fast forward or reverse Push and hold MULTI-CONTROL left or right for about one second and release. % Select a track (chapter) Push MULTI-CONTROL left or right. Notes ! When using an iPod, iPod Dock Connector to USB Cable is required. ! Read the precautions for iPod on page 54.
Section Operating this unit Function name Operation REPEAT Refer to Selecting a repeat play range on page 16. However, the repeat play ranges you can select are different from that of the built-in CD player. The repeat play ranges of the iPod are: ! ONE – Repeat the current song ! ALL – Repeat all songs in the selected list PAUSE Refer to Pausing playback on page 16. SOUND RETRIEVER Refer to Using Sound Retriever on page 17.
Section 02 Operating this unit ! ALBUMS – Play back songs from a randomly selected album in order. ! OFF – Cancel random play. Playing all songs in a random order (shuffle all) % Press iPod to turn shuffle all on. All songs on the iPod play randomly. # To turn shuffle all off, set SHUFFLE in the FUNCTION menu to off. Note You can also turn this function on in the menu that appears by using MULTI-CONTROL.
Section Audio Adjustments ! If you do not operate functions within about 30 seconds, the display automatically returns to the ordinary display. English Introduction of audio adjustments 03 1 Press MULTI-CONTROL to display the main menu. 2 Use MULTI-CONTROL to select AUDIO. Turn to change the menu option. Press to select. 3 Turn MULTI-CONTROL to select the audio function. Turn MULTI-CONTROL to switch between the audio functions in the following order.
Section 03 Audio Adjustments Recalling equalizer curves There are six stored equalizer curves which you can easily recall at any time. Here is a list of the equalizer curves. Display Equalizer curve POWERFUL Powerful NATURAL Natural VOCAL Vocal CUSTOM Custom FLAT Flat SUPER BASS Super bass ! CUSTOM is an adjusted equalizer curve that you create. If you make adjustments to an equalizer curve, the equalizer curve setting is memorized in CUSTOM.
Section Audio Adjustments # You can also perform the same operations by pushing MULTI-CONTROL up or down. Note A separate CUSTOM curve can be created for each source. (The built-in CD player and the multi-CD player are set to the same equalizer adjustment setting automatically.) If you make adjustments, the equalizer curve settings are memorized in CUSTOM.
Section Audio Adjustments 03 # You can also perform the same operations by pushing MULTI-CONTROL up or down. Note You can also switch to this setting mode in the menu that appears by using MULTI-CONTROL. Using the high pass filter When you do not want low sounds from the subwoofer output frequency range to play from the front or rear speakers, turn on the HPF (high pass filter). Only frequencies higher than those in the selected range are output from the front or rear speakers.
Section Initial Settings 1 Press SRC and hold until the unit turns off. 2 Press MULTI-CONTROL and hold until CLOCK SET appears in the display. 3 Turn MULTI-CONTROL to select one of the initial settings.
Section 04 Initial Settings 2 Press MULTI-CONTROL to turn dimmer on. # To turn dimmer off, press MULTI-CONTROL again. Setting the rear output and subwoofer controller This unit’s rear output (rear speaker leads output) can be used for full-range speaker (FULL) or subwoofer (SUB W) connection. If you switch the rear output setting to SUB W, you can connect a rear speaker lead directly to a subwoofer without using an auxiliary amp. Initially, the unit is set for rear full-range speaker connection (FULL).
Section Initial Settings When Ever Scroll is set to ON, recorded text information scrolls continuously in the display. Set to OFF if you prefer the information to scroll just once. 1 Use MULTI-CONTROL to select EVER SCROLL. 2 Press MULTI-CONTROL to turn the Ever Scroll on. # To turn the Ever Scroll off, press MULTI-CONTROL again. 1 Use MULTI-CONTROL to select PIN CODE INPUT. 2 Press MULTI-CONTROL to display the setting mode.
Section 05 Other Functions Using the AUX source Selecting AUX as the source Up to two auxiliary devices such as VCR or portable devices (sold separately) can be connected to this unit. When connected, auxiliary devices are automatically read as AUX sources and assigned to AUX1 or AUX2. The relationship between AUX1 and AUX2 sources is explained below. % Press SRC to select AUX as the source. About AUX1 and AUX2 Setting the AUX title The title displayed for the AUX1 or AUX2 source can be changed.
Section Other Functions Using the external unit External unit refers to a Pioneer product (such as ones available in the future) that, although incompatible as a source, enables control of basic functions with this unit. Two external units can be controlled with this unit. When two external units are connected, the external unit is automatically allocated to external unit 1 or external unit 2 by this unit. Basic operations of the external unit are explained below.
Section 06 Available accessories Playing songs on iPod Basic operation You can use this unit to control an interface adapter for iPod, which is sold separately. PLAYLISTS (playlists)—ARTISTS (artists)— ALBUMS (albums)—SONGS (songs)— GENRES (genres) Function and operation % Fast forward or reverse Push and hold MULTI-CONTROL left or right for about one second and release. 1 Press MULTI-CONTROL to display the main menu. % Select a track Push MULTI-CONTROL left or right.
Section Available accessories % Press RDM repeatedly to select the desired setting. ! SONGS – Play back songs in the selected list in random order. ! ALBUMS – Play back songs from a randomly selected album in order. ! OFF – Cancel random play. # To turn shuffle off, press RDM again. Note You can also perform this operation in the menu that appears by using MULTI-CONTROL. your cellular phone as much as possible.
Section 06 Available accessories 3 Turn MULTI-CONTROL to select the function. CONNECTION OPEN (connection open)— DISCONNECT AUDIO (disconnect audio)— PLAY (Play)—STOP (Stop)—PAUSE (pause)— DEVICE INFO (device information) PAUSE is the same as that of the built-in CD player. (Refer to Pausing playback on page 16.) # You can also perform the same operations by pushing MULTI-CONTROL up or down. Notes ! You can also select the function by pressing FUNCTION on the remote control.
Section Available accessories 1 Use MULTI-CONTROL to select DEVICE INFO in the function menu. The device name (PIONEER BT UNIT) of this unit appears in the display. 2 Press MULTI-CONTROL to display the setting mode. 3 Use MULTI-CONTROL to select the desired setting. Turn to change the setting. DEVICE NAME (Device name)—BD ADDRESS (BD (Bluetooth Device) address) Bluetooth Telephone Basic Operations If you use a Bluetooth adapter (e.g.
Section Available accessories 06 Making a phone call Voice recognition 1 Press BAND/ESC and hold until VOICE DIAL appears in the display. VOICE DIAL appears in the display. When VOICE DIAL ON is displayed, voice recognition function is now ready. # If your cellular phone does not feature voice recognition function, NO VOICE DIAL appears in the display and opearation is not available. 2 Pronounce the name of your contact. Taking a phone call % End all calls Push MULTI-CONTROL down.
Section Available accessories DISCONNECT (disconnect phone) SET PHONE (registering phone) CLEAR MEMORY (clear memory) NUMBER DIAL (call by entering number) If connected but not registered yet The following functions cannot be operated. ! ! ! ! SEARCH PHONE (search and connect) CONNECTION OPEN (connection open) CONNECT PHONE (connect phone) CLEAR MEMORY (clear memory) If already connected and registered The following functions cannot be operated.
Section 06 Available accessories Disconnecting a cellular phone Deleting a registered phone 1 Use MULTI-CONTROL to select DISCONNECT PHONE in the function menu. Device name of the connected phone appears in the display. 1 Use MULTI-CONTROL to select DELETE PHONE in the function menu. 2 Press MULTI-CONTROL to disconnect a cellular phone from this unit. After disconnection is completed, DISCONNECTED is displayed.
Section Available accessories 4 Press MULTI-CONTROL to connect the selected cellular phone. While connecting, CONNECTING is displayed. After the connection is completed, CONNECTED is displayed. Connecting to a registered phone automatically 1 Use MULTI-CONTROL to select AUTO CONNECT in the function menu. 2 Press MULTI-CONTROL to turn automatic connection on. If your cellular phone is ready for Bluetooth wireless connection, connection to this unit is automatically established.
Section Available accessories 06 Using the Call History Important Be sure to park your vehicle and apply the parking brake when performing this operation. The 12 most recent calls made (dialled), received and missed, are stored in the Call History. You can browse the Call History and call numbers from it. 1 Press LIST to display the list. 2 Turn MULTI-CONTROL to select a list.
Section Available accessories Setting automatic rejecting 1 Use MULTI-CONTROL to select REFUSE CALLS in the function menu. 2 Press MULTI-CONTROL to turn automatic call rejection on. # To turn automatic call rejection off, press MULTI-CONTROL again. Setting automatic answering 1 Use MULTI-CONTROL to select AUTO ANSWER in the function menu. 2 Press MULTI-CONTROL to turn automatic answering on. # To turn automatic answering function off, press MULTI-CONTROL again.
Section 06 Available accessories 2 Use MULTI-CONTROL to store the selected station in memory. Turn to change the preset number. Press and hold to store. The XM preset number you have selected will flash and then remain lit. The selected station has been stored in memory. 3 Use MULTI-CONTROL to select the desired station. Turn to change the station; press to select. # You can also change the station by pushing MULTI-CONTROL up or down.
Section Available accessories # If you push and hold MULTI-CONTROL left or right, you can increase or decrease channel number continuously. # You can also perform tuning from a desired channel category. (Refer to Selecting a channel in the channel category on the next page.) Note It may take a few seconds before you can hear anything while this unit acquires and processes the satellite signal when you change the source to SIRIUS tuner or select a channel.
Section 06 Available accessories Selecting the SIRIUS channel select mode 2 Press MULTI-CONTROL to display the setting mode. You have two methods for selecting a channel: by number and by category. When selecting by number, channels in any category can be selected. Select by category to narrow your search down to only channels in a particular category. 3 Press MULTI-CONTROL to select a desired league. % Press SAT MODE repeatedly to select the desired channel select setting.
Section Available accessories Displaying game information If games of your selected teams are currently playing, you can display information of the games and tune to the broadcast channel. You can display information of the games while enjoying the sound from currently tuning station. You can also tune to the broadcast channel when you wish to. 1 Use MULTI-CONTROL to select GAME INFO in the function menu. The game information of your selected team is displayed.
Section 06 Available accessories 1 Press MULTI-CONTROL to display the main menu. 2 Use MULTI-CONTROL to select FUNCTION. Turn to change the menu option. Press to select. 3 Turn MULTI-CONTROL to select the function. Turn MULTI-CONTROL to switch between the functions in the following order.
Section Available accessories 06 1 ITS (instant track selection) lets you make a playlist of favorite tracks from the multi-CD player magazine. After you have added your favorite tracks to the playlist, you can turn on ITS play and play just those selections. You can use ITS to enter and play back up to 99 tracks per disc from up to 100 discs (with the disc titles). (With multi-CD players sold before the CDX-P1250 and CDX-P650, up to 24 tracks can be stored in the playlist.
Section Available accessories 06 Erasing a CD from your ITS playlist Selecting discs from the disc title list You can delete all tracks of a CD from your ITS playlist if ITS play is off. Disc title list lets you see the list of disc titles entered in the multi-CD player and select one of them to play back. 1 Play the CD that you want to delete. 2 Use MULTI-CONTROL to select ITS MEMORY in the function menu. 3 Press MULTI-CONTROL to display the setting mode. 4 Press MULTI-CONTROL to select DELETE.
Section Available accessories Notes ! Band can be selected from TV-1 or TV-2. ! You can cancel seek tuning by pushing MULTI-CONTROL left or right. ! If you push and hold MULTI-CONTROL left or right, you can skip stations. Seek tuning starts as soon as you release MULTI-CONTROL. Storing and recalling broadcast stations You can easily store up to 12 broadcast stations for later recall. ! 12 stations for each band can be stored in memory. 1 Press LIST. Preset screen is displayed.
Appendix Additional Information Error messages When you contact your dealer or your nearest Pioneer Service Center, be sure to have the error message recorded. The connected USB portable audio player/ USB memory contains WMA files that are protected by Windows Media DRM 9/10 Play an audio file not protected by Windows Media DRM 9/10.
Appendix Additional Information Message Cause Action ERROR-19 Communication failure Disconnect the cable from iPod. Once iPod main menu is displayed, connect the cable again. Reset the iPod. iPod failure Disconnect the cable from iPod. Once iPod main menu is displayed, connect the cable again. Reset the iPod. N/A USB Old version of iPod Update the iPod version. iPod failure Reset the iPod. Old version of iPod Update the iPod version. iPod failure Disconnect the cable from iPod.
Appendix Additional Information Dual Discs ! Dual Discs are two-sided discs that have a recordable CD for audio on one side and a recordable DVD for video on the other. ! Since the CD side of Dual Discs is not physically compatible with the general CD standard, it may not be possible to play the CD side with this unit. ! Frequent loading and ejecting of a Dual Disc may result in scratches on the disc. Serious scratches can lead to playback problems on this unit.
Appendix Additional Information ! Do not leave the USB portable audio player/USB memory in direct sunlight for extended amounts of time. Extended exposure to direct sunlight can result in USB portable audio player/USB memory malfunction due to the resulting high temperature. ! Do not leave the USB portable audio player/USB memory in high temperature. ! Firmly secure the USB portable audio player/USB memory when driving.
Appendix Additional Information iPod About handling the iPod ! Do not leave the iPod in direct sunlight for extended amounts of time. Extended exposure to direct sunlight can result in iPod malfunction due to the resulting high temperature. ! Do not leave the iPod in a high temperature. ! Connect directly the dock connector cable to the iPod so that this unit works properly. ! Firmly secure the iPod when driving.
Appendix Additional Information General Power source ............................. 14.4 V DC (10.8 V to 15.1 V allowable) Grounding system ................... Negative type Max. current consumption ..................................................... 10.0 A Dimensions (W × H × D): DIN Chassis ..................... 178 × 50 × 162 mm (7 × 2 × 6-3/8 in.) Nose ........................... 188 × 58 × 14 mm (7-3/8 × 2-1/4 × 1/2 in.) D Chassis ..................... 178 × 50 × 162 mm (7 × 2 × 6-3/8 in.) Nose ....
Appendix Additional Information CEA2006 Specifications Power output ............................. 14 W RMS × 4 Channels (4 W and ≦ 1 % THD+N) S/N ratio ....................................... 91 dBA (reference: 1 W into 4 W) Note Specifications and the design are subject to modifications without notice due to improvements.
Table des matières Nous vous remercions d’avoir acheté cet appareil Pioneer. Afin d’utiliser votre appareil correctement, veuillez lire ce mode d’emploi entièrement. Après avoir lu ce mode d’emploi, conservez-le dans un endroit sûr pour pouvoir vous y référer ultérieurement.
Table des matières – Réglage fin de la courbe d’égalisation 82 Réglage de la correction physiologique 82 Utilisation de la sortie haut-parleur d’extrêmes graves 82 – Réglages du haut-parleur d’extrêmes graves 83 Utilisation du filtre passe-haut 83 Accentuation des graves 83 Ajustement des niveaux des sources 84 Mise en service ou hors service de l’affichage de l’horloge 89 Silencieux 90 Utilisation comme source extérieure 90 – Choix de la source extérieure comme source 90 – Utilisation de base 90 – Utilis
Table des matières – Opérations de base 107 – Utilisation des fonctions CD TEXT 108 – Introduction aux opérations avancées 108 – Utilisation de la compression et de l’accentuation dynamique des graves 109 – Utilisation des listes ITS 109 – Utilisation des fonctions de titre de disque 111 Syntoniseur TV 112 – Opérations de base 112 – Mise en mémoire et rappel des stations d’émission 112 – Mise en mémoire séquentielle des stations les plus fortes 112 Français – Enregistrement d’un téléphone cellulaire conn
Section 01 Avant de commencer Pour le modèle canadien Cet appareil numérique de la classe B est conforme à la norme NMB-003 du Canada. Quelques mots sur cet appareil Les fréquences du syntoniseur de cet appareil sont attribuées pour une utilisation en Amérique du Nord. Son utilisation dans d’autres régions peut se traduire par une réception de mauvaise qualité. PRÉCAUTION ! Ne laissez pas cet appareil entrer en contact avec des liquides. Cela pourrait provoquer une électrocution.
Section Avant de commencer 01 Pour bénéficier de performances optimales, nous vous recommandons d’utiliser la dernière version du logiciel iPod. ! Quand vous utilisez un iPod, un câble iPod Dock Connector vers USB est requis. ! Cet appareil peut contrôler les versions antérieures des modèles iPod avec un adaptateur iPod Pioneer (par exemple, CDIB100N). Dans ce cas, la plupart des fonctions sont essentiellement les mêmes que celles d’un iPod connecté à l’interface USB de cet appareil.
Section 01 Avant de commencer Visitez notre site Web Consultez notre site : http://www.pioneerelectronics.com 1 Enregistrez votre produit. Nous conserverons les détails de votre achat dans nos fichiers pour vous aider à faire référence à ces informations pour une déclaration d’assurance en cas de perte ou de vol. 2 Recevez les mises à jour sur les derniers produits et les plus récentes technologies.
Section Avant de commencer Utilisation et soin de la télécommande Installation de la pile Sortez le porte-pile en le faisant glisser par l’arrière de la télécommande et insérez la pile en respectant les polarités (+) et (–). ! Lors de la première utilisation, retirez le film qui dépasse du porte-pile. ! Si la pile fuit, nettoyez soigneusement la télécommande, puis insérez une pile neuve.
Section 02 Utilisation de l’appareil 1 2 3 4 5 b a 9 8 7 Description de l’appareil Appareil central 1 Touche SRC/OFF Cet appareil est mis en service en sélectionnant une source. Appuyez sur cette touche pour parcourir les différentes sources disponibles. 2 Touche DISP/BACK/SCROLL Appuyez sur cette touche pour choisir un affichage différent. Appuyez de façon prolongée sur pour faire défiler les informations textuelles.
Section Utilisation de l’appareil c Touches VOLUME Appuyez sur ces touches pour augmenter ou diminuer le niveau sonore. 1 b c d e 9 Touche RPT/LOCAL Appuyez sur cette touche pour changer l’étendue de répétition lors de l’utilisation d’un CD, d’un périphérique USB ou d’un iPod. Appuyez sur cette touche pour mettre en service ou hors service la fonction locale quand le syntoniseur est utilisé comme source.
Section 02 Utilisation de l’appareil La gamme et la fréquence de réception sont affichées. ! Lecteur de CD intégré, USB, iPod Le temps de lecture écoulé et les informations littérales sont affichés. ! Syntoniseur XM et syntoniseur SIRIUS Les catégories de canaux, les numéros de canaux et d’autres informations textuelles sont affichées. 2 Indicateur S.Rtrv Apparaît lorsque la fonction Sound Retriever est en service. 3 Indicateur c Apparaît lorsqu’un niveau supérieur de dossier ou de menu existe.
Section Utilisation de l’appareil Opérations de base Mise en service, mise hors service Mise en service de l’appareil % Appuyez sur SRC pour mettre en service l’appareil. % Maintenez la pression sur OFF jusqu’à ce que l’appareil soit mis hors tension. Choix d’une source Vous pouvez sélectionner la source que vous voulez écouter. Pour basculer sur le lecteur de CD intégré, chargez un disque dans l’appareil (reportez-vous à la page 69).
Section 02 Utilisation de l’appareil Syntoniseur Opérations de base % Sélection d’une bande Appuyez sur BAND/ESC. # La gamme peut être sélectionnée parmi FM1, FM2, FM3 ou AM. % Accord manuel (pas par pas) Poussez MULTI-CONTROL vers la gauche ou vers la droite. % Accord automatique Poussez MULTI-CONTROL vers la gauche ou vers la droite et maintenez la pression pendant environ une seconde puis relâchez. # Vous pouvez annuler l’accord automatique en poussant MULTI-CONTROL vers la gauche ou vers la droite.
Section Utilisation de l’appareil Mise en mémoire des fréquences les plus puissantes La fonction BSM (Mémoire des meilleures stations) vous permet d’enregistrer automatiquement les six fréquences d’émission les plus puissantes. Lecteur de CD intégré Opérations de base % Ouvrir la face avant Appuyez sur OPEN. Le logement pour disque apparaît. Fente de chargement des disques Français 1 Utilisez MULTI-CONTROL pour sélectionner BSM dans le menu des fonctions.
Section 02 Utilisation de l’appareil % Basculer entre les modes audio compression et CD-DA Appuyez sur BAND/ESC. # Cette opération n’est disponible que lors de la lecture de CD CD-EXTRA ou MIXED-MODE. # Si vous avez basculé entre la lecture d’audio compressé et celle de données audio (CD-DA), la lecture commence à la première plage du disque. Remarques ! Le lecteur de CD intégré peut lire un CD audio et de l’audio compressé enregistré sur un CDROM.
Section Utilisation de l’appareil ! Quand la fonction Ever Scroll est mise en service lors du réglage initial, les informations textuelles défilent en permanence. Reportezvous à la page 87, Mise en service ou hors service de la fonction Ever Scroll (défilement permanent). La liste des titres de plages vous permet de voir les titres de plages sur un CD TEXT et d’en choisir une pour la lire. 1 Appuyez sur LIST pour passer en mode liste des titres des plages.
Section 02 Utilisation de l’appareil Remarques Écoute des plages musicales dans un ordre aléatoire ! Vous pouvez aussi sélectionner la fonction en appuyant sur FUNCTION de la télécommande. ! Appuyez sur BACK pour revenir à l’affichage précédent. ! Pour revenir au menu principal, appuyez de façon prolongée sur BACK. ! Appuyez sur BAND/ESC pour revenir à l’affichage ordinaire.
Section Utilisation de l’appareil Remarque 02 4 Tournez MULTI-CONTROL pour choisir une lettre de l’alphabet. # Vous pouvez effectuer les mêmes opérations en poussant MULTI-CONTROL vers le haut ou vers les bas. Utilisation du Sound Retriever 5 Appuyez sur MULTI-CONTROL pour placer le curseur sur la position suivante. La fonction Sound Retriever améliore automatiquement l’audio compressé et restaure un son riche. % Appuyez de manière répétée sur S.Rtrv/SAT MODE pour sélectionner le réglage désiré.
Section 02 Utilisation de l’appareil Lecture de plages musicales sur le lecteur audio portable USB/la mémoire USB Pour des détails sur l’appareil supporté, reportez-vous à la page 60, Compatibilité avec un lecteur audio portable. Opérations de base % Sélection d’un dossier Poussez MULTI-CONTROL vers le haut ou vers le bas. % Avance ou retour rapide Poussez MULTI-CONTROL vers la gauche ou vers la droite et maintenez la pression pendant environ une seconde puis relâchez.
Section Utilisation de l’appareil Choix des fichiers à partir de la liste des noms de fichiers 02 Utilisation REPEAT Reportez-vous à la page 72, Sélection d’une étendue de répétition de lecture. Cependant, les étendues de répétition de la lecture que vous pouvez sélectionner diffèrent de celles du lecteur de CD intégré.
Section 02 Utilisation de l’appareil ! Quand FOLDER est sélectionné, il n’est pas possible de jouer un sous-dossier de ce dossier. ! Lorsque l’examen des fichiers ou des dossiers est terminé, la lecture normale des fichiers reprend. Lecture de plages musicales sur l’iPod Pour des détails sur l’iPod supporté, reportezvous à la page 60, Compatibilité iPod®.
Section Utilisation de l’appareil Recherche d’une plage musicale 1 Appuyez sur LIST pour passer au menu principal de la recherche par liste. 2 Utilisez MULTI-CONTROL pour sélectionner une catégorie. Tournez pour changer de catégorie, appuyez pour sélectionner. PLAYLISTS (listes de lecture)—ARTISTS (interprètes)—ALBUMS (albums)—SONGS (plages musicales)—PODCASTS (podcasts)— GENRES (genres)—COMPOSERS (compositeurs)—AUDIOBOOKS (livres audio) La liste pour la catégorie sélectionnée est affichée.
Section 02 Utilisation de l’appareil 3 Tourner MULTI-CONTROL pour sélectionner la fonction. REPEAT (répétition de la lecture)—SHUFFLE (lecture aléatoire)—SHUFFLE ALL (lecture aléatoire de toutes les plages)—LINK SEARCH (recherche de liaison)—CONTROL (mode de commande)—PAUSE (pause)— AUDIOBOOKS SPEED (vitesse du livre audio) —SOUND RETRIEVER (sound retriever) ! Si vous n’utilisez aucune fonction pendant environ 30 secondes, l’écran revient automatiquement à l’affichage ordinaire.
Section Utilisation de l’appareil Sélection de plages dans la liste d’albums de l’interprète en cours de lecture 1 Maintenez la pression sur LIST pour mettre la fonction recherche de liaison en service. Recherche les albums de l’interprète et en affiche la liste. 2 Utilisez MULTI-CONTROL pour sélectionner un album ou une plage musicale dans la liste. Pour plus de détails sur l’opération de sélection, reportez-vous à l’étape 2 de la page 77, Recherche d’une plage musicale.
Section Réglages sonores 03 Introduction aux réglages sonores 1 Appuyez sur MULTI-CONTROL pour afficher le menu principal. 2 Utilisez MULTI-CONTROL pour choisir AUDIO. Tournez pour changer l’option de menu. Appuyez pour sélectionner. 3 Tourner MULTI-CONTROL pour sélectionner la fonction audio. Tournez MULTI-CONTROL pour parcourir les fonctions audio dans l’ordre suivant.
Section Réglages sonores # Si le réglage de la sortie arrière est SUB W, il n’est pas possible de régler l’équilibre des hautparleurs avant-arrière. Reportez-vous à la page 86, Réglage de la sortie arrière et du contrôleur de haut-parleur d’extrêmes graves. L’égaliseur vous permet de corriger les caractéristiques sonores de l’intérieur du véhicule en fonction de vos goûts. Rappel d’une courbe d’égalisation Six courbes d’égalisation sont enregistrées et vous pouvez les rappeler à n’importe quel moment.
Section 03 Réglages sonores Réglage fin de la courbe d’égalisation Vous pouvez ajuster la fréquence centrale et le facteur Q (caractéristiques de la courbe) de chacune des gammes de fréquence actuellement sélectionnée (LOW/MID/HI). Niveau (dB) Q=2N Q=2W Fréquence centrale Fréquence (Hz) 1 Utilisez MULTI-CONTROL pour choisir EQ SETTING 2. 2 Appuyez sur MULTI-CONTROL pour afficher le mode de paramétrage. 3 Appuyez sur MULTI-CONTROL pour sélectionner le segment que vous voulez régler.
Section Réglages sonores 2 Sélectionnez le mode de réglage SW SETTING 1. # Vous pouvez effectuer les mêmes opérations en poussant MULTI-CONTROL vers le haut ou vers les bas. 4 Tournez MULTI-CONTROL pour régler le segment sélectionné. Fréquence de coupure 50HZ—63HZ—80HZ—100HZ—125HZ Niveau Les valeurs +6 à –24 s’affichent tandis que le niveau augmente ou diminue. # Vous pouvez effectuer les mêmes opérations en poussant MULTI-CONTROL vers le haut ou vers les bas.
Section 03 Réglages sonores 1 Appuyez de façon prolongée sur BASS pour afficher le mode de réglage BASS BOOST. 2 Tournez MULTI-CONTROL pour régler le niveau. Les valeurs 0 à +6 s’affichent tandis que le niveau augmente ou diminue. # Vous pouvez effectuer les mêmes opérations en poussant MULTI-CONTROL vers le haut ou vers les bas. Remarque Vous pouvez aussi passer à ce mode de réglage dans le menu qui s’affiche en utilisant MULTI-CONTROL.
Section Réglages initiaux Ajustement des réglages initiaux 1 Maintenez la pression sur SRC jusqu’à ce que l’appareil soit mis hors tension. 3 Tournez MULTI-CONTROL pour choisir un des réglages initiaux.
Section 04 Réglages initiaux 1 Utilisez MULTI-CONTROL pour choisir AUX1/AUX2. 1 Utilisez MULTI-CONTROL pour choisir SW CONTROL. 2 Appuyez sur MULTI-CONTROL pour mettre en service AUX1/AUX2. 2 Appuyez sur MULTI-CONTROL pour afficher le mode de paramétrage. # Appuyez à nouveau sur MULTI-CONTROL pour mettre la fonction AUX hors service. # Appuyez sur BACK pour revenir à l’affichage précédent.
Section Réglages initiaux Réglage de l’amplificateur de puissance interne 1 Utilisez MULTI-CONTROL pour choisir BUILT-IN AMP. 2 Appuyez sur MULTI-CONTROL pour mettre l’amplificateur interne en service. # Pour mettre l’amplificateur interne hors service, appuyez à nouveau sur MULTI-CONTROL.
Section 04 Réglages initiaux 2 Appuyez sur MULTI-CONTROL pour mettre la source BT AUDIO en service. # Pour mettre la source BT AUDIO hors service, appuyez à nouveau sur MULTI-CONTROL. Saisie du code PIN pour la connexion sans fil Bluetooth Pour connecter votre téléphone cellulaire à cet appareil via la technologie sans fil Bluetooth, vous devez entrer le code PIN sur votre téléphone pour vérifier la connexion. Le code par défaut est 0000, mais vous pouvez le modifier en utilisant cette fonction.
Section Autres fonctions Utilisation de la source AUX Quelques mots sur AUX1 et AUX2 Deux méthodes permettent de connecter des dispositifs auxiliaires à cet appareil. Source AUX1 : Lors de la connexion d’équipement auxiliaire avec un câble à mini prise stéréo % Insérez la mini prise stéréo dans le jack d’entrée de cet appareil. Pour avoir plus de détails, reportez-vous au manuel d’installation. Ce dispositif auxiliaire est automatiquement réglé sur AUX1.
Section 05 Autres fonctions Silencieux Le son de cet appareil est coupé automatiquement dans les cas suivants : ! Quand un appel est effectué ou reçu sur un téléphone cellulaire connecté à cet appareil. ! Quand le guidage vocal est émis par un équipement de navigation Pioneer connecté à cet appareil. Le son est coupé, MUTE est affiché et aucun réglage audio n’est possible sauf le contrôle du volume. Le fonctionnement retourne à la normale quand la connexion téléphonique ou le guidage vocal est terminé.
Section Autres fonctions 05 ! Vous pouvez également mettre FUNC2 en service ou hors service en appuyant sur RDM/iPod. ! Vous pouvez également mettre FUNC3 en service ou hors service en appuyant sur RPT/LOCAL. Français Remarques ! Vous pouvez aussi sélectionner la fonction en appuyant sur FUNCTION de la télécommande. ! Appuyez sur BACK pour revenir à l’affichage précédent. ! Pour revenir au menu principal, appuyez de façon prolongée sur BACK. ! Appuyez sur BAND/ESC pour revenir à l’affichage ordinaire.
Section 06 Accessoires disponibles Lecture de plages musicales sur l’iPod Utilisation de base Vous pouvez utiliser cet appareil pour commander un adaptateur interface pour iPod, vendu séparément. % Avance ou retour rapide Poussez MULTI-CONTROL vers la gauche ou vers la droite et maintenez la pression pendant environ une seconde puis relâchez. % Sélectionner une plage Poussez MULTI-CONTROL vers la gauche ou vers la droite. Remarques ! Lisez les précautions relatives à l’iPod sur la page 118.
Section Accessoires disponibles ! Lecture des plages musicales dans un ordre aléatoire (shuffle) % Appuyez répétitivement sur RDM pour choisir le réglage désiré. ! SONGS – Lecture des plages musicales dans un ordre aléatoire à l’intérieur de la liste sélectionnée. ! ALBUMS – Lecture dans l’ordre de plages musicales à partir d’un album sélectionné au hasard. ! OFF – Annulation de la lecture aléatoire. # Pour mettre la lecture aléatoire hors service, appuyez à nouveau sur RDM.
Section 06 Accessoires disponibles Remarques ! Pour avoir des détails sur le mode de fonctionnement, reportez-vous au mode d’emploi de l’adaptateur Bluetooth. Cette section donne de brèves informations sur le fonctionnement du lecteur audio Bluetooth avec cet appareil, qui diffèrent légèrement ou sont plus courtes que celles figurant dans le mode d’emploi de l’adaptateur Bluetooth.
Section Accessoires disponibles Remarque Lecture de plages musicales sur un lecteur audio Bluetooth 1 Utilisez MULTI-CONTROL pour sélectionner PLAY dans le menu des fonctions. 2 Appuyez sur MULTI-CONTROL pour commencer la lecture. Affichage de l’adresse BD (Bluetooth Device) 1 Utilisez MULTI-CONTROL pour sélectionner DEVICE INFO dans le menu des fonctions. Le nom d’appareil (PIONEER BT UNIT) de cet appareil apparaît sur l’afficheur. 2 Appuyez sur MULTI-CONTROL pour afficher le mode de paramétrage.
Section 06 Accessoires disponibles ! Quand vous sélectionnez la source téléphone, vous pouvez utiliser seulement FADER/BALANCE (réglage de l’équilibre sonore) dans le menu audio. le volume. Si le volume est réglé sur silencieux (niveau zéro) sur votre téléphone cellulaire, ce volume reste sur silencieux après la déconnexion de votre téléphone cellulaire.
Section Accessoires disponibles Fonctionnement d’un appel en attente % Réponse à un appel en attente Quand un appel arrive, appuyez sur MULTI-CONTROL. # Vous pouvez aussi effectuer cette opération en poussant MULTI-CONTROL vers le haut. % Basculer entre les appelants en attente Appuyez sur MULTI-CONTROL. # Vous pouvez aussi effectuer cette opération en poussant MULTI-CONTROL vers le haut. % Rejet d’un appel en attente Poussez MULTI-CONTROL vers le bas.
Section 06 Accessoires disponibles ! La fonction DEVICE INFO est identique à celle du lecteur audio Bluetooth. (Reportez-vous à la page 95, Affichage de l’adresse BD (Bluetooth Device).) ! Si un téléphone cellulaire est connecté à cet appareil via la technologie sans fil Bluetooth avec HSP (Head Set Profile), les fonctions CLEAR MEMORY et NUMBER DIAL ne peuvent pas être sélectionnées.
Section Accessoires disponibles Déconnexion d’un téléphone cellulaire 2 Appuyez sur MULTI-CONTROL pour déconnecter un téléphone cellulaire de cet appareil. Quand la déconnexion est réalisée, DISCONNECTED s’affiche. Enregistrement d’un téléphone cellulaire connecté 1 Utilisez MULTI-CONTROL pour sélectionner SET PHONE dans le menu des fonctions. 2 Appuyez sur MULTI-CONTROL pour afficher le mode de paramétrage. 3 Tournez MULTI-CONTROL pour sélectionner une affectation d’enregistrement.
Section 06 Accessoires disponibles Connexion à un téléphone cellulaire enregistré Utilisation de l’Annuaire Connexion manuelle à un téléphone enregistré L’Annuaire peut contenir jusqu’à 500 entrées. 300 pour l’Utilisateur 1, 150 pour l’Utilisateur 2 et 50 pour l’Utilisateur 3. 1 Utilisez MULTI-CONTROL pour sélectionner CONNECT PHONE dans le menu des fonctions. 2 Appuyez sur MULTI-CONTROL pour afficher le mode de paramétrage. 3 Tournez MULTI-CONTROL pour sélectionner une affectation d’enregistrement.
Section Accessoires disponibles 3 Poussez MULTI-CONTROL pour sélectionner la première lettre du nom que vous recherchez. 2 Tournez MULTI-CONTROL pour sélectionner une liste. Annuaire—MISSED CALLS (appel manqué)— DIALED CALLS (appel composé)— RECEIVED CALLS (appel reçu) # Pour plus de détails sur la liste de l’Annuaire, reportez-vous à la page précédente, Utilisation de l’Annuaire. # Si aucun numéro de téléphone n’est stocké dans la liste sélectionnée, NO DATA s’affiche.
Section 06 Accessoires disponibles 3 Tournez MULTI-CONTROL pour sélectionner un numéro. # Vous pouvez effectuer les mêmes opérations en poussant MULTI-CONTROL vers le haut ou vers les bas. 4 Appuyez sur MULTI-CONTROL pour placer le curseur sur la position suivante. # Vous pouvez entrer un maximum de 24 chiffres. 5 Quand vous avez terminé la saisie du numéro, appuyez sur MULTI-CONTROL de façon prolongée pour passer l’appel. La confirmation de l’appel s’affiche.
Section Accessoires disponibles Annulation d’écho et réduction de bruit 1 Utilisez MULTI-CONTROL pour sélectionner ECHO CANCEL dans le menu des fonctions. Changement de l’affichage XM % Appuyez sur DISP pour changer l’affichage XM. # Vous pouvez faire défiler l’information textuelle vers la gauche en appuyant de façon prolongée sur DISP. # Appuyez à nouveau sur MULTI-CONTROL pour mettre l’annulation d’écho hors service.
Section 06 Accessoires disponibles Changement du mode de sélection du canal XM Vous disposez de deux méthodes pour sélectionner un canal : par numéro et par catégorie. Quand vous sélectionnez par numéro, des canaux appartenant à n’importe quelle catégorie peuvent être sélectionnés. Sélectionnez par catégorie pour restreindre votre recherche aux seuls canaux d’une catégorie particulière. % Appuyez de façon répétée sur SAT MODE pour choisir le réglage de sélection du canal désiré.
Section Accessoires disponibles # Vous pouvez aussi effectuer un accord dans une catégorie de canaux désirée. (Reportez-vous à la page suivante, Sélection d’un canal dans la catégorie de canal.) Remarque Changement de l’affichage SIRIUS % Appuyez sur DISP pour changer d’affichage SIRIUS.
Section 06 Accessoires disponibles ! Pour revenir au menu principal, appuyez de façon prolongée sur BACK. ! Appuyez sur BAND/ESC pour revenir à l’affichage ordinaire. Choix du mode de sélection du canal SIRIUS Vous disposez de deux méthodes pour sélectionner un canal : par numéro et par catégorie. Quand vous sélectionnez par numéro, des canaux appartenant à n’importe quelle catégorie peuvent être sélectionnés.
Section Accessoires disponibles Mise en service ou hors service de l’Alerte Match 1 Utilisez MULTI-CONTROL pour sélectionner GAME ALERT dans le menu des fonctions. 2 Appuyez sur MULTI-CONTROL pour activer l’Alerte Match. La fonction Alerte Match est maintenant en service. # Appuyez à nouveau sur MULTI-CONTROL pour mettre la fonction Alerte Match hors service.
Section 06 Accessoires disponibles ! Seules les fonctions mentionnées dans ce mode d’emploi sont prises en compte par les lecteurs de CD à chargeur 50 disques. ! Cet appareil n’est pas conçu pour utiliser les fonctions de liste des titres de disques avec un lecteur de CD à chargeur de 50 disques. Pour des informations sur les fonctions de listes des titres de disques, reportez-vous à la page 111, Choix d’un disque à partir de la liste des titres de disques.
Section Accessoires disponibles Utilisation REPEAT Reportez-vous à la page 72, Sélection d’une étendue de répétition de lecture. Cependant, les étendues de répétition de la lecture que vous pouvez sélectionner diffèrent de celles du lecteur de CD intégré.
Section Accessoires disponibles 06 Création d’une liste de lecture avec la sélection instantanée des plages ITS 1 Jouez un CD que vous voulez programmer. Poussez MULTI-CONTROL vers le haut ou vers le bas pour choisir le CD. 2 Utilisez MULTI-CONTROL pour sélectionner ITS MEMORY dans le menu des fonctions. 3 Appuyez sur MULTI-CONTROL pour afficher le mode de paramétrage. 4 Appuyez sur MULTI-CONTROL pour choisir TRK. 5 Tournez MULTI-CONTROL pour choisir le titre de plage désiré.
Section Accessoires disponibles # S’il n’existe aucune plage incluse dans votre liste ITS dans l’étendue de répétition en cours, EMPTY s’affiche et la lecture normale reprend. 06 veau disque écrasent les données les plus anciennes. Affichage du titre d’un disque Suppression d’un CD de votre liste ITS 1 Jouez le CD que vous voulez supprimer. 2 Utilisez MULTI-CONTROL pour sélectionner ITS MEMORY dans le menu des fonctions. 3 Appuyez sur MULTI-CONTROL pour afficher le mode de paramétrage.
Section 06 Accessoires disponibles Syntoniseur TV Opérations de base Vous pouvez utiliser cet appareil pour commander un syntoniseur TV, vendu séparément. Pour avoir des détails sur ce mode de fonctionnement, reportez-vous au mode d’emploi du syntoniseur TV. Cette section donne des informations sur les opérations TV qui diffèrent sur cet appareil de celles qui sont décrites dans le mode d’emploi du syntoniseur TV. % Sélection d’une bande Appuyez sur BAND/ESC.
Section Accessoires disponibles 06 Français # Vous pouvez aussi changer de station en poussant MULTI-CONTROL vers le haut ou vers le bas. # Appuyez sur BAND/ESC pour revenir à l’affichage ordinaire. # Si vous ne réglez aucun paramètre de la liste pendant environ 30 secondes, l’écran revient automatiquement à l’affichage ordinaire.
Annexe Informations complémentaires Messages d’erreur Lecteur audio USB/mémoire USB Quand vous contactez votre distributeur ou le Service d’entretien agréé par Pioneer le plus proche, n’oubliez pas de noter le message d’erreur. Message Causes possibles Action corrective NO AUDIO Aucune plage musicale Transférez les fichiers audio au lecteur audio portable USB ou à la mémoire USB et effectuez la connexion.
Annexe Informations complémentaires CHECK USB Vérifiez que le connecteur USB ou le câble USB n’est pas coincé ou endommagé. Le lecteur audio portable USB/la mémoire USB connecté(e) consomme plus de 500 mA (courant maximum autorisé). Déconnectez le lecteur audio portable USB ou la mémoire USB et ne l’utilisez pas. Mettez le contact sur OFF, puis sur ACC ou ON, puis connectez le lecteur audio portable USB ou la mémoire USB compatible.
Annexe Informations complémentaires ! La lecture de disques CD-R/CD-RW non finalisés n’est pas possible. ! Ne touchez pas la surface enregistrée des disques. ! Rangez les disques dans leur coffret dès que vous ne les écoutez plus. ! Évitez de laisser les disques dans des environnements trop chauds, en particulier à la lumière directe du soleil. ! Ne posez aucune étiquette à la surface des disques, n’écrivez pas sur un disque, n’appliquez aucun agent chimique sur un disque.
Annexe Informations complémentaires WAV ! Format compatible : PCM Linéaire (LPCM), MS ADPCM ! Bits de quantification : 8 et 16 (LPCM), 4 (MS ADPCM) ! Fréquence d’échantillonnage : 16 kHz à 48 kHz (LPCM), 22,05 kHz à 44,1 kHz (MS ADPCM) Lecteur audio USB/mémoire USB Compatibilité du lecteur audio USB/de la mémoire USB ! Version USB : 2.0, 1.1 et 1.
Annexe Informations complémentaires ! Le nombre maximum de fichiers pouvant être lus sur un lecteur audio portable USB ou une mémoire USB est 15 000. ! Le nombre maximum de dossiers pouvant être lus sur un lecteur audio portable USB ou une mémoire USB est 500. ! Le nombre maximum de niveaux de répertoires pouvant être lus sur un lecteur audio portable USB ou une mémoire USB est de huit.
Annexe Informations complémentaires Quelques mots sur les réglages de l’iPod Fichiers audio compressés sur un disque ! Selon la version de Windows Media Player utilisée pour encoder les fichiers WMA, les noms d’album et les autres informations textuelles peuvent ne pas s’afficher correctement. ! Il peut se produire un léger retard lors du démarrage de la lecture de fichiers WMA/ AAC encodés avec des données image. ! Conforme à ISO 9660 Niveau 1 et 2.
Annexe Informations complémentaires Caractéristiques techniques Généralités Tension d’alimentation ......... 14,4 V CC (10,8 V à 15,1 V acceptable) Mise à la masse ....................... Pôle négatif Consommation max. en courant ..................................................... 10,0 A Dimensions (L × H × P) : DIN Châssis ..................... 178 × 50 × 162 mm Panneau avant ...... 188 × 58 × 14 mm D Châssis ..................... 178 × 50 × 162 mm Panneau avant ...... 170 × 46 × 14 mm Poids ...........
Annexe Informations complémentaires Caractéristiques CEA2006 Français Puissance de sortie ................ 14 W RMS x 4 Canaux (4 W et ≦ 1 % DHT+B) Rapport S/B ................................ 91 dBA (référence : 1 W dans 4 W) Remarque Les caractéristiques et la présentation peuvent être modifiées sans avis préalable à fin d’amélioration.
PIONEER CORPORATION 4-1, MEGURO 1-CHOME, MEGURO-KU TOKYO 153-8654, JAPAN PIONEER ELECTRONICS (USA) INC. P.O. Box 1540, Long Beach, California 90801-1540, U.S.A. TEL: (800) 421-1404 PIONEER EUROPE NV Haven 1087, Keetberglaan 1, B-9120 Melsele, Belgium TEL: (0) 3/570.05.11 PIONEER ELECTRONICS ASIACENTRE PTE. LTD. 253 Alexandra Road, #04-01, Singapore 159936 TEL: 65-6472-7555 PIONEER ELECTRONICS AUSTRALIA PTY. LTD.