COMPACT DISC PLAYER CDJ-1000 Operating Instructions
NOTE: THE NO USER-SERVICEABLE PARTS COMPARTMENT WARNING IS LOCATED ON THE APPLIANCE BOTTOM.
[For U.S. model] IMPORTANT NOTICE H006AEn The serial number for this equipment is located in the rear panel. Please write this serial number on your enclosed warranty card and keep it in a secure area. This is for your security.
BEFORE OPERATIONS Thank you for buying this Pioneer product. Please read through these operating instructions so you will know how to operate your model properly. After you have finished reading the instructions, put them away in a safe place for future reference. In some countries or regions, the shape of the power plug and power outlet may sometimes differ from that shown in the explanatory drawings. However the method K015 En of connecting and operating the unit is the same.
BEFORE OPERATIONS: CAUTIONS REGARDING HANDLING FORCED DISC EJECTION Storing discs ÷ Discs are made of the same kinds of plastic used for conventional analog audio records. Be careful not to allow discs to warp. Always store discs in their cases vertically, avoiding locations with high heat, humidity, or extremely low temperatures. Avoid leaving discs in cars; the interior of a car in direct sunlight can become extremely hot. ÷ Always read and abide by the precautionary notes listed on disc labels.
BEFORE OPERATIONS FEATURES The CDJ-1000 compact disc player is designed for use by DJs providing all the functions and performance required in disco clubs while offering performance, sound quality and functionality superior to any analog player. JOG DIAL The large 206 mm diameter Jog dial enables better handling than an analog turntable. PITCH BEND This function changes the music tempo depending on direction of Jog dial rotation and speed of movement.
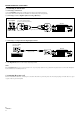
BEFORE OPERATIONS CONNECTIONS ÷ Before making or changing the connections, switch off the power and disconnect the power cord from the AC outlet. 1. Connecting to a DJ mixer (DJM-300, DJM-500, DJM-600) (sound output and control terminal connection) Use the supplied audio cables. Connect the white plug to the L (left) terminal and the red plug to the R (right) terminal. Connect the supplied control cord to enable control of the unit from the mixer to allow fader start play and back cue.
BEFORE OPERATIONS: CONNECTIONS 3. Connecting to other devices A Connecting to other mixers Connect the AUDIO OUT terminal on the unit with the Line In terminal or AUX terminal on the mixer. (Do not use the Phono terminal. Otherwise the sound will become distorted and prevent normal playback.) B Connecting to a stereo amplifier (when not using a DJ mixer) Stereo amplifier Connect to the AUX input terminal. (Do not use the Phono input terminal.
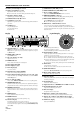
BEFORE OPERATIONS PANEL FACILITIES Top Panel Buttons indicated by * cannot be used in digital mode. 11 Digital Mode switch (ON/OFF) ☞ P. 8 This switch is located on the rear panel of the unit. Set to ON when the digital output is to be used. When set to On, the DJ functions do not function. (Functions marked * do not operate in this mode.) And the muted pause mode is used instead of the audible pause mode. 12 CUE/LOOP DELETE button (*) ☞ P.
BEFORE OPERATIONS: PANEL FACILITIES 29 Memory Card Loading Slot ☞ P.16 30 Memory Card indicator ☞ P.16 Lights when the MMC card is being accessed. ¶ Do not remove the card or turn off the power when this lamp is on. 31 Play/Pause indicator (6) Lights during play and flashes during pause. 32 PLAY/PAUSE button (6) ☞ P.11 33 CUE indicator (*) ☞ P.12 Lights when a Cue point is set and a search is not being performed. Flashes in pause mode. 34 CUE button (*) Cue point settings ☞ P.12 Cue point sampler ☞ P.
BASIC OPERATION DISC LOADING/UNLOADING ¶ Only one disc can be loaded at a time. Never attempt to load more than one disc at the same time, or attempt to load a second disc when one disc has already been loaded. ¶ When loading a disc, do not placing any twisting force on the disc, or try to force the disc into the slot. Also, do not attempt to interrupt or defeat the motion of the disc when the player begins to draw a disc into the slot or to eject a disc, since damage to the disc or player could occur.
BASIC OPERATION: DJ PLAYER OPERATION 3. If auto cueing is off, playback will begin automatically from the first track. ¶ When auto cueing is off, playback will continue after the first track has been played, with all subsequent tracks being played in sequence. ¶ When playback of the final track is complete, playback will automatically come to an end. ÷ When you stop turning the Jog dial, the unit returns to playback mode. ÷ Release the SEARCH button to exit this mode.
BASIC OPERATION: DJ PLAYER OPERATION [Amending the Cue point] 1. During playback, press the CUE button. ¶ This will take you back to the set track position. 2. In the VINYL mode, to set the Cue point, go through steps 2 and 3 as mentioned above. 7 Real-time cue During playback, press the LOOP IN/REALTIME CUE button at the desired Cue point. ¶ This point will then be recorded as the new Cue point. 7 Checking cue points (Cue point sampler) After specifying a cueing point, press the CUE button.
ADVANCED OPERATIONS 7 Fader start play Using the cross fader start function of the DJM-600, DJM-500 or DJM-300, step 10 above can be eliminated for even simpler mixing. In addition, when the ADVANCED OPERATIONS LOOP IN/REALTIME CUE (IN ADJUST) LOOP OUT (OUT ADJUST) Buttons indicated by * cannot be used when the Digital Mode switch is set to on (and the digital output terminal is used).
ADVANCED OPERATIONS 7 Changing the loop out point 1. Press the LOOP OUT (OUT ADJUST) button in loop play. ¶ The time of the out point is shown in the display, the LOOP OUT button starts to flash rapidly and the LOOP IN/REALTIME CUE button goes off. DISPLAY WAVE SEARCH(ZOOM)2 /CD TEXT DISC CD TEXT/WAVE WAVE SEARCH(ZOOM) 3 ZOOM /CD TEXT TRACK 2. Press the forward or reverse SEARCH button (1, ¡) or turn the Jog dial. ¶ The loop end point will be shifted forward or backward in 1-frame units.
ADVANCED OPERATIONS USING CUE POINTS/LOOP POINTS MEMORY This unit can store Cue points and Loop points for each disc in internal or on a Multimedia Card (MMC). CUE/LOOP MEMORY CUE/LOOP DELETE CUE/LOOP CALL 2, 3 7 Deleting stored Cue/Loop points When Cue/Loop points are stored, the calendar display and the playback address display lights in red. 1. Press the CUE/LOOP CALL button.
ADVANCED OPERATIONS: USING CUE POINTS/LOOP POINTS MEMORY 7 Storing CUE points Insert a Multimedia Card in the card insertion slot and perform the same procedure as when the internal memory is used. ☞ P.16 CUE/LOOP MEMORY 7 Storing Loop points CUE/LOOP DELETE Insert a Multimedia Card in the card insertion slot and perform the same procedure as when the internal memory is used. ☞ P.
OTHERS TROUBLESHOOTING Incorrect operations can be mistaken as malfunctions. If you believe the unit is not operating correctly, consult the chart below. Sometimes incorrect operation may be due to a malfunction in another component. If the problem is not fixed, check the other components used with the player. If the problem still persists, contact your nearest Pioneer authorized service center or dealer for service. Symptom Cause Remedy Disc doesn’t eject even when EJECT button (0) is pressed.
OTHERS: TROUBLESHOOTING Error message display When the CDJ-1000 CD player is unable to operate properly, an error code is displayed on the display panel. Check the error code displayed against the following table and take the recommended action to correct the error.
OTHERS SPECIFICATIONS 1. General 3. Accessories System ................................................................. Compact disc digital audio system Power requirements ........................................................................... AC 120 V, 60 Hz Power consumption ............................................................................................ 33 W Operating temperature ........................................................................