COMPACT DISC PLAYER CMX-3000 Operating Instructions
Read before use Thank you for buying this Pioneer product. Please read through these operating instructions so you will know how to operate your model properly. After you have finished reading the instructions, put them away in a safe place for future reference. In some countries or regions, the shape of the power plug and power outlet may sometimes differ from that shown in the explanatory drawings. However the method of connecting and operating the unit is the same.
Read before use IMPORTANT NOTICE The serial number for this equipment is located on the rear panel. Please write this serial number on your enclosed warranty card and keep it in a secure area. This is for your security.
Read before use CAUTIONS REGARDING HANDLING Location Installing the CMX-3000 in an EIA rack Install the player in a well-ventilated location where it will not be exposed to high temperatures or humidity. Do not install the player in a location which is exposed to direct sunlight, or near stoves or radiators. Excessive heat can adversely affect the cabinet and internal components. Installation of the player in a damp or dusty environment may aiso result in a malfunction and can be hazardous.
Read before use Cleaning and handling compact discs ÷ The presence of fingerprints or smudges on the surface of the disc will not directly affect the recorded signals, but, depending on the degree of contamination, the brightness of the light reflected from the signal surfaces may be reduced causing degradation of sound quality. Always keep your discs clean by wiping them gently with a soft cloth from the inner edge toward the outer edge.
Read before use CONTENTS Read before use CAUTIONS REGARDING HANDLING .......................... 4 SPECIFICATIONS.......................................................... 6 FEATURES .................................................................... 7 PANEL FACILITIES ....................................................... 8 Player ....................................................................... 8 Remote Control Unit ................................................ 8 CONNECTIONS ...................
Read before use FEATURES The Pioneer CMX-3000 is a twin CD player designed for use by DJs which provides not only the features and performance required in a discotheque sound system in a CD player but also provides new features only possible in a CD player. JOG DIAL REAL TIME SEAMLESS LOOP The large 110 mm diameter Jog dial enables better handling than an analog turntable. This function simplifies setting and releasing loops. This function lets you set a loop while you are playing a track.
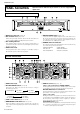
Read before use PANEL FACILITIES Operation buttons indicated by an asterisk (*) are not supported in digital mode. Player 1 Manual ejection hole (see p. 5) 2 Disc insertion slot (see p. 11) 5 DIGITAL MODE switch (see p. 11) When using 3 inch/8 cm discs, discs must be inserted in the commercially available CD adapter before insertion. 3 Disc loading indicator This indicator flashes when a disc is being inserted into or ejected from the disc insertion slot and lights up when a disc has been inserted.
Read before use (Panel facilities) 6 Time mode/Auto cueing button (*) (TIME MODE/AUTO CUE) TIME MODE: Pressing this button causes the elapsed time and remaining time (REMAIN) of the current track to be displayed in succession on the time display of the display unit. AUTO CUE: (see p. 12) 7 TRACK SEARCH button (4, ¢) (see p. 12) 8 SEARCH button (1, ¡) (see p. 13) 9 CUE button and indicator (*) Cueing point settings (see p. 13) Cueing point sampler (see p. 13) Back cueing (see p.
Read before use CONNECTIONS Before connecting or disconnecting any cables, be sure to first turn off the power switch and remove the power cord from its socket. The CD player may be damaged if cables are connected when the power is on. 1. Connecting the player to the remote control unit First connect the CD player to the remote control unit. Remote control unit Specialized connection cable Player 2.
Read before use (Connections) B Connecting the CMX-3000 to stereo amplifiers (when not using a DJ mixer) Stereo amplifier Connect audio cable to CD or AUX input jacks. (Do not connect to PHONO input jacks.
Basic Operation DJ PLAYER OPERATION Playing discs on Player A (Operation identical for Player B) Remote control unit JOG MODE PITCH MASTER TEMPO LOOP IN/ TIME EJECT REALTIME CUE BEND TEMPO RANGE MODE /AUTO CUE TRACK SEARCH (4,¢) SEARCH (1,¡) CUE PLAY/ PAUSE (3 8) Jog dial Tempo control slide Disc insertion slot EJECT Operations indicated by * cannot be used when the DIGITAL MODE switch is set to on (and the digital output terminal is used).
Basic Operation (DJ player operation) 7 Super-fast track searching Turn the jog dial while pressing either TRACK SEARCH button (4, ¢). ¶ Turning the jog dial in the direction you wish to skip while pressing the forward or reverse TRACK SEARCH button (4, ¢) will cause the player to enter high-speed skipping mode, with the speed being adjusted in accordance with the degree to which the jog dial is turned. ¶ Tracks will be skipped in the same direction as that in which the jog dial is rotated.
Basic Operation (DJ player operation) JOG MODE Remote control unit TRACK SEARCH (4,¢) SEARCH (1,¡) CUE PLAY/ PAUSE (3 8) Jog dial Jog Dial Functions (*) 1. Using the jog dial during playback (Pitch bend) ÷ Rotating the jog dial during playback causes the speed to be accelerated (when rotated in the FWD+ direction) or slowed down (when rotated in the REV– direction) in accordance with the degree to which the dial is turned.
Applications ADVANCED OPERATIONS Remote control unit JOG MODE HOT CUE REC PLAY/ PAUSE (3 8) Jog dial HOT CUE 1,2,3 Scratch Play (*) When the jog mode is set to SCRATCH, rotating the jog dial causes the disc to play in the direction and speed corresponding to the direction and speed in which the jog dial is turned. 1. Press the JOG MODE button. ÷ The SCRATCH indicator will flash and data is stored in the memory. When all data is stored in the memory, the SCRATCH indicator lights steadily.
Applications (Advanced operations) Remote control unit LOOP OUT EXIT/ EMERGENCY LOOP IN/ REALTIME CUE /OUT ADJ RELOOP LOOP 7 To program Loop play information Loop play information can be programmed into a HOT CUE button to allow one-touch loop play. See the section “Hot Cue” (p. 15). 7 To automatically set loop end (Emergency Loop) SEARCH (1,¡) PLAY/ PAUSE (3 8) Jog dial Loop Playback (*) 7 Defining a loop 1. Press the PLAY/PAUSE button (3 8) to begin playback. 2.
Applications (Advanced operations) Remote control unit RELAY PLAY PITCH BEND+,– MASTER TEMPO BPM SYNC TRACK SEARCH (4,¢) CUE PLAY/ PAUSE 9. Adjust the speed of track B to the speed (BPM= beats per minute) of track A. Adjust the Player B tempo control slide so that the number of BPM displayed for track B is the same as the number of BPM displayed for track A. ¶ If you do not wish to change the pitch or key of track B, press the Player B MASTER TEMPO button before adjusting the tempo control slide.
Applications (Advanced operations) Remote control unit RELAY PLAY PITCH BEND+,– MASTER TEMPO BPM SYNC ÷ Set both player’s auto cue function to ON (the A. CUE indicators will light in the displays). ÷ Set your DJ mixer’s fader control to its center position. TRACK SEARCH (4,¢) CUE PLAY/ PAUSE (3 8) Jog dial Tempo control slide Press the BPM SYNC button. ¶ The BPM SYNC button will flash and the player enters the BPM synchro playback mode.
Appendix TROUBLESHOOTING If you believe your CD player is failing to work properly, check the following troubleshooting table for tips. Sometimes simple mistakes in setup or operation may appear like serious problems. There are also times when the problem in question may be caused by something else other than your CD player, and at times like these you should check any other electronic devices being used at the same time.
Appendix (Troubleshooting) ÷ There may be times when the CMX-3000 fails to operate properly as a result of static electricity or some other form of interference from an outside source. If any such problem occurs, turn off the power to the CMX-3000, wait for the currently inserted disc to come to a full stop, and then turn on the power again to see if that fixes the problem in question. ÷ The CMX-3000 cannot be used to replay partially-written CD-R or CD-RW discs.