STEREO DOUBLE CASSETTE DECK CT-W208R Operating Instructions
Thank you for buying this Pioneer product. Please read through these operating instructions so you will know how to operate your unit properly. After you have finished reading the instructions, keep them in a safe place for future reference. In some countries or regions, the shape of the power plug and power outlet may sometimes differ from that shown in the explanatory drawings. However, the method of connecting and operating the unit is the same. IMPORTANT NOTICE [For U.S.
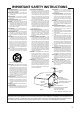
IMPORTANT SAFETY INSTRUCTIONS READ INSTRUCTIONS — All the safety and operating instructions should be read before the product is operated. RETAIN INSTRUCTIONS — The safety and operating instructions should be retained for future reference. HEED WARNINGS — All warnings on the product and in the operating instructions should be adhered to. FOLLOW INSTRUCTIONS — All operating and use instructions should be followed. CLEANING — Unplug this product from the wall outlet before cleaning.
I ND Selecting fine audio equipment such as the unit you’ve just purchased is only the start of your musical enjoyment. Now it’s time to consider how you can maximize the fun and excitement your equipment offers. This manufacturer and the Electronic Industries Association’s Consumer Electronics Group want you to get the most out of your equipment by playing it at a safe level.
MAINTENANCE DEMAGNETIZING THE HEADS Erase head Capstan Pinch roller Rec/play head Capstan Pinch roller CLEANING THE HEADS, PINCH ROLLERS AND CAPSTANS The heads, pinch rollers and capstans are likely to get dirty quite easily. If these parts, particularly the heads, get dirty, the high frequency components of a recording will not be reproduced and the stereo balance will be impaired, resulting in a deterioration of the playback sound. It is therefore recommended that the head section be cleaned regularly.
HANDLING CASSETTE TAPES For erasure prevention remove B A Tab for Side A Turn the pencil to take up the tape slack Tab for Side B C Cover prevention adhesive tape D Erasure prevention tabs Sensor holes Sensor holes TYPE IV (Metal) tape CHECK CASSETTE BEFORE USE Check the following items before loading a cassette tape: Is the tape loose, or is some of the tape outside the cassette? If some of the tape is loose or projecting outside the cassette shell, the tape may not load properly between the cap
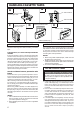
CONNECTIONS LINE INPUT REC OUTPUT PLAY L CONTROL IN OUT R R L R L Power cord Concerning about the control cable be sure to use the item included in the package. Control cable Recording connection cord R TAPE L R L Playback connection cord REC PLAY L CONTROL IN OUT R Stereo Amplifier TAPE REC/PLAY jacks 7 Before making or changing the connections, switch off the power switch and disconnect the power cord from the AC outlet.
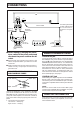
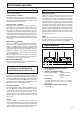
FRONT PANEL FACILITIES 1 STEREO DOUBLE CASSETTE DECK 2 34 Ωı¿ˆ
FRONT PANEL FACILITIES REVERSE MODE SWITCH (REV MODE) DOLBY NR There are three settings: 7 Dolby NR System One way mode O position When the switch is set to this position, playback or recording is performed on one side of the tape only. When the tape reaches the end of the side, it stops automatically (auto stop function). Dolby NR systems are designed to reduce the amount of tape hiss, mainly in the treble components.
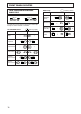
FRONT PANEL FACILITIES TAPE TRANSPORTATION MODE INDICATORS PLAY REC FWD REV PLAY Flashing slowly Forward mode DECK @II DECK I REV DECK II only FWD Playback pause Recording PLAY REC Reverse mode FWD PLAY REV FWD REC REV The indicators shown below indicate the current tape transport status of DECK I or DECK II.
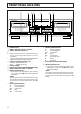
PLAYBACK SINGLE PLAYBACK (Either DECK I or DECK II) BLANK SKIP REV MODE Opπ 3 2 RELAY/SKIP STEREO DOUBLE CASSETTE DECK Ωı¿ˆ
PLAYBACK RELAY PLAYBACK When relay playback mode is selected, continuous playback can be performed. When the tape in the first deck reaches its end and stops, the other deck will automatically begin playback. 1. 2. Load prerecorded tapes in DECK I and DECK II. Set the DOLBY NR switch. ÷ Always set the switch to the same positions that was used for recording. 3. Set the REV MODE switch to (See table entitled "PLAYBACK SEQUENCE WITH REV MODE SWITCH SETTING" on this page). 4.
PLAYBACK Selecting songs during skip operations MUSIC SEARCH To change songs to be skipped, press the MS + and MS – buttons during skip operations. (Skipping forward or backward to playback a desired selection) The music search function detects blanks (longer than 4 seconds) between selections, advances the tape in the forward or reverse direction to find the beginning of the desired selection and auto matically starts playback.
RECORDING NOTES: ÷ The optimal recording level may differ somewhat depending on the audio source and type of tape used. In order to obtain the best possible results, set the recording level after actual testing. Listen to your recordings, and adjust the level as necessary. ÷ The level meter may react differently during recording and playback of the same tape. This is due to differences in tape sensitivity, and creates no problem.
TAPE COPYING (from DECK I to DECK II) 4 STEREO DOUBLE CASSETTE DECK Ωı¿ˆ
TROUBLESHOOTlNG Icorrect operations are often mistaken for trouble and malfunctions. If you think that there is something wrong with this component,check the points below. Sometimes the trouble may lie in another component. Investigate the other components and electrical appliances being used. If the trouble cannot be rectified even after exercising the checks listed below, ask your nearest PIONEER authorized service center or your dealer to carry out repair work.
TROUBLESHOOTING Cause Symptom Remedy POOR SOUND QUALITY Unstable or interrupted sound. No high frequencies. High frequencies are emphasized. Sound from previous recordings remains when rerecording a tape. The sound is distorted. Too much noise. ÷ The head, pinch rollers and capstans are dirty. ÷ The tape is not uniformly wound. ÷ Clean the head (see page 5). ÷ A tape recorded without Dolby NR is being played back with the DOLBY NR switch in the B or C position. ÷ The head is dirty.
SPECIFICATIONS System ................... 4-track, 2-channel stereoHeads ”Hard Permalloy” recording/playback head x 1 “Hard Permalloy” playback head x 1 “Ferrite” erasing head x 1 Motor ......................................... DC servo motor x 2 Wow and Flutter ............................... 0.09% (WRMS) ±0.19% (DIN) Fast Winding Time Approximately 100 seconds (C-60 tape) Frequency Response –20 dB recording: TYPE IV (Metal) tape ...................... 20 to 16,500 Hz TYPE II (High/CrO2) tape .............