English Français DDJ-SP1 DJ Controller Contrôleur pour DJ DJ Controller DJ Controller DJ Controller Deutsch Italiano The Pioneer website shown above offers FAQs, information on software and various other types of information and services to allow you to use your product in greater comfort. The contents of the warranty for the United States and Canada are provided on the last pages of the instructions in English and French. For the latest version of the Serato DJ software, access Serato.
This product is for general household purposes. Any failure due to use for other than household purposes (such as long-term use for business purposes in a restaurant or use in a car or ship) and which requires repair will be charged for even during the warranty period.
English Before start How to read this manual ! Thank you for buying this Pioneer product. Be sure to read this booklet and the “Operating Instructions (Advanced Edition)” provided on the Pioneer DJ support site. Both include important information that should be fully understood before using this product. After you have finished reading the instructions, put them away in a safe place for future reference.
Deck section Part names and functions The typical functions of the buttons and controls when using Serato DJ are described below. For the functions and details of buttons and controls not described here, see the Operating Instructions (Advanced Edition). 1 2 3 4 PANEL SELECT AUTO LOOP SLIP CENSOR PARAM.1 REL. INT. PARAM.
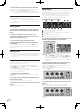
Browser section 3 1 4 PANEL SELECT English 1 System setup example When using in combination with a DJ mixer 2 USB cable SYNC 5 4 • BACK — UTILITY LOAD PREPARE VIEW AREA LOAD LOAD 3 USB cable 4 Computer DDJ-SP1 SHIFT Audio cable 1 DECK button Press: Selects the deck to be used. The [DECK] button lights when deck 3 or deck 4 is selected. It does not light when deck 1 or deck 2 is selected. [SHIFT] + press: Selects and opens the [REC] panel, [DJ-FX] panel or [SP-6] panel.
5 Connect this unit to your computer via a USB cable. When this unit and Serato DJ are properly connected, this unit’s pad mode button (by default the [HOT CUE] mode button) lights. ! This unit operates with the operating system’s standard driver. There is no need to install separate driver software for this unit. Importing tracks Operate the Serato DJ software to add tracks to the library.
Switching the effect’s tempo mode Operate the effect parameter 2 control to adjust the parameter of the second effect. Operate the effect parameter 3 control to adjust the parameter of the third effect. With Serato DJ effects, there are two ways to set the effect’s tempo: with the “auto tempo mode” and the “manual tempo mode”. ! By default, the auto tempo mode is set. English 4 Operate the effect parameter 1 control to adjust the parameter of the first effect.
Setting preferences Name of selected item Flashing button Parameter Sampler velocity mode velocity curve selection1 FX1 effect parameter 1 button ([A] on diagram) Pad 1: Curve 1* Pad 2: Curve 2 Pad 3: Curve 3 Pad 4: Curve 4 Sampler velocity mode aftertouch setting2 FX1 effect parameter 2 button ([B] on diagram) Pad 1: After-touch disabled* Pad 2: After-touch enabled Setting of method to enter sampler velocity mode FX1 effect parameter 3 button ([C] on diagram) Pad 1: Switch to sampler velocity m
English Additional information Troubleshooting ! Incorrect operation is often mistaken for trouble or malfunction. If you think that there is something wrong with this component, check the points below and the [FAQ] for the [DDJ-SP1] on the Pioneer DJ support site. http://pioneerdj.com/support/ Sometimes the problem may lie in another component. Inspect the other components and electrical appliances being used.
Using as a controller for other DJ software Specifications The DDJ-SP1 also outputs the operating data for the buttons and controls in MIDI format. If you connect a computer with a built-in MIDIcompatible DJ software via a USB cable, you can operate the DJ software on this unit. To use as a controller to operate DJ software other than the Serato DJ software, switch to the setting for using software other than the Serato DJ software in the utilities mode. Also, make the DJ software’s MIDIrelated settings.
English PIONEER ELECTRONICS (USA) INC. LIMITED WARRANTY WARRANTY VALID ONLY IN THE U.S.A. AND CANADA WARRANTY Pioneer Electronics (USA) Inc. (PUSA) warrants that products distributed by PUSA in the U.S.A.
Ce produit est destiné à une utilisation domestique générale. Toute panne due à une utilisation autre qu'à des fins privées (comme une utilisation à des fins commerciales dans un restaurant, dans un autocar ou sur un bateau) et qui nécessite une réparation sera aux frais du client, même pendant la période de garantie.
Informations préliminaires Comment lire ce manuel Ce manuel contient essentiellement les descriptions des fonctions de cet appareil. Pour les instructions détaillées sur le fonctionnement du logiciel Serato DJ, reportez-vous au mode d’emploi du logiciel Serato DJ et pour les instructions sur le fonctionnement des appareils certifiés Serato DJ, reportez-vous au mode d’emploi des appareils concernés.
5 Touches de paramétrage d’effet Acquisition Serato Video Accédez au site de support DJ de Pioneer. http://pioneerdj.com/support/ Les instructions sur l’acquisition de Serato Video se trouvent sur la page de support de cet appareil. Pour des instructions plus détaillées sur le fonctionnement de Serato Video, une description de ses fonctions et des informations sur les codecs utilisables, reportez-vous au mode d’emploi de Serato Video. Pression : Active et désactive les effets ou change les paramètres.
8 Pads performance 2 Fente de sécurité Kensington Utilisé pour la lecture de repère instantané, boucle instantanée, loop roll, boucle automatique, slicer, boucle manuelle et échantillonneur. Section d’exploration 3 1 4 PANEL SELECT 2 5 4 • BACK — UTILITY LOAD PREPARE VIEW AREA LOAD LOAD 3 4 SHIFT ON : Règle la luminosité de la LED sur sombre. OFF : Règle la luminosité de la LED sur lumineux. ! La consommation d’énergie peut être réduite en réglant la luminosité de la LED sur sombre.
Fonctionnement Ouverture du système L’ordinateur et le contrôleur DJ ou la table de mixage DJ certifié Serato DJ doivent être raccordés au préalable. ! Pour les instructions sur le fonctionnement du logiciel Serato DJ et de la table de mixage DJ ou du contrôleur DJ certifié Serato DJ, reportez-vous à leur mode d’emploi. 1 Raccordez la table de mixage DJ ou le contrôleur DJ certifié Serato DJ à l’ordinateur avec un câble USB. 2 Allumez l’ordinateur.
1 Appuyez sur la touche [FX ASSIGN] sur le côté gauche pour sélectionner la platine à laquelle l’effet est affecté. 1 1 ON 1 1 2 2 3 4 4 Actionnez la commande 1 de paramétrage d’effet pour ajuster le paramètre du premier effet. Actionnez la commande 2 de paramétrage d’effet pour ajuster le paramètre du second effet. Actionnez la commande 3 de paramétrage d’effet pour ajuster le paramètre du troisième effet.
Changement des réglages de cet appareil Changement de mode pour modifier les réglages de cet appareil (mode utilitaires) Appuyez plus de 1 seconde sur la touche [BACK]. Cet appareil passe au mode utilitaires et la touche 1 de paramétrage d’effet FX1 ([A] sur le schéma) clignote. Sélection d’un paramètre et changement du réglage 1 Tournez le sélecteur rotatif. Lorsque le sélecteur rotatif est tourné, le paramètre change.
2 Appuyez sur le pad de performance sur la gauche. Le paramètre est sélectionné ou activé et désactivé. ! Lorsque le paramètre est activé et désactivé, il s’active et se désactive chaque fois que le pad 1 est pressé. Quand il est activé, le pad 1 est allumé. ! Pour sélectionner un des nombreux paramètres, sélectionnez et appuyez sur un des pads allumés. Le pad sur lequel une pression a été exercée clignote.
Informations supplémentaires En cas de panne ! Une erreur de commande est souvent prise pour une anomalie de fonctionnement ou une panne. S’il vous semble que quelque chose est anormal avec cet appareil, vérifiez les points suivants et les [FAQ] du [DDJ-SP1] sur le site de support DJ de Pioneer. http://pioneerdj.com/support/ Parfois, le problème peut provenir d’un autre composant. Examinez les autres composants et les appareils électriques utilisés.
Utilisation comme contrôleur pour un autre logiciel DJ Spécifications Le DDJ-SP1 fournit aussi les données de fonctionnement des touches et commandes dans le format MIDI. Si vous raccordez un ordinateur contenant un logiciel DJ compatible MIDI avec un câble USB, vous pourrez utiliser le logiciel DJ depuis cet appareil.
PIONEER ELECTRONICS (USA) INC. GARANTIE LIMITÉE GARANTIE VALABLE UNIQUEMENT AUX ÉTATS-UNIS ET AU CANADA GARANTIE Pioneer Electronics (USA) Inc.
Mischen Sie dieses Produkt, wenn Sie es entsorgen wollen, nicht mit gewöhnlichen Haushaltsabfällen. Es gibt ein getrenntes Sammelsystem für gebrauchte elektronische Produkte, über das die richtige Behandlung, Rückgewinnung und Wiederverwertung gemäß der bestehenden Gesetzgebung gewährleistet wird.
Vor der Inbetriebnahme Zum Lesen dieser Anleitung Diese Anleitung besteht im Wesentlichen aus Beschreibungen der Funktionen dieser Einheit als Hardware. Einzelheiten über die Bedienung der Serato DJ-Software finden Sie in der Anleitung der Serato DJ-Software, und Anweisungen zur Bedienung von Serato DJ-zertifizierten Geräten finden Sie in den Bedienungsanleitungen der betreffenden Geräte.
Effekt-Sektion Über die Serato Video-Software Serato Video ist ein Software Plug-In für Serato DJ, der DJ-Auftritte mit Sound und Video erlaubt. 1 2 3 Minimale Betriebsumgebung 1 Windows Mac Betriebssystem Microsoft Windows 7 Mac OS X: 10.8, 10.7 und 10.
3 LOAD PREPARE (AREA)-Taste 2 SLIP-Taste Drücken Sie: Schaltet den Slip-Modus ein und aus. [SHIFT] + drücken: Stellt Serato DJ auf den Relativ-Modus ein. 3 CENSOR-Taste Drücken Sie: Wenn der Track in Reverse-Richtung abgespielt wird, während die [CENSOR]-Taste gedrückt wird, und normale Wiedergabe wird fortgesetzt, wenn die Taste losgelassen wird. [SHIFT] + drücken: Stellt Serato DJ auf den Intern-Modus ein. 4 PARAM.1/PARAM.2-Taste 5 AUTO LOOP-Regler Drehen: Wählt den Auto Loop Beat.
4 Starten Sie Serato DJ. Beispiel für System-Setup Bei Verwendung in Kombination mit einem DJ-Mixer USB-Kabel ! Bei Verwendung von Windows 7 Klicken Sie aus dem Windows [Start]-Menü auf das Icon [Serato DJ] unter [Alle Programme] > [Serato] > [Serato DJ]. ! Für Mac OS X Im Finder öffnen Sie den Ordner [Applications], und klicken Sie dann auf das Icon [Serato DJ]. SYNC USB-Kabel Computer DDJ-SP1 Audiokabel Audiokabel 5 Schließen Sie dieses Gerät über ein USB-Kabel an Ihren Computer an.
3 Drücken Sie das Auftritt-Pad, bei dem der Hot-CuePunkt gesetzt wurde. 3 Drücken Sie die Effektparameter-Taste 1, um den ersten Effekt einzuschalten. Die Wiedergabe startet ab dem Hot-Cue-Punkt. Drücken Sie die Effektparameter-Taste 2, um den zweiten Effekt einzuschalten. Drücken Sie die Effektparameter-Taste 3, um den dritten Effekt einzuschalten. Verwenden von Effekten Serato DJ enthält zwei Effekteinheiten, FX1 und FX2.
Umschalten auf Manuell-Tempo-Modus Umschalten des Effekt-Tempo-Modus Im Auto-Tempo-Modus drücken Sie die [TAP]-Taste dreimal. Bei Serato DJ-Effekten kann das Effekt-Tempo auf zwei Weisen eingestellt werden: mit dem „Auto-Tempo-Modus“ und dem „Manuell-Tempo-Modus“. ! Als Standard ist der Auto-Tempo-Modus eingestellt. ! Wenn die [TAP]-Taste länger als 1 Sekunde lang im Manuell-TempoModus gedrückt wird, schaltet der Modus auf den Auto-TempoModus um.
Bevorzugte Einstellungen Blinkende Taste Parameter Sampler-Velocity-Modus Wahl der Velocity-Kurve1 FX1-Effektparameter-Taste 1 ([A] im Diagramm) Pad 1: Kurve 1* Pad 2: Kurve 2 Pad 3: Kurve 3 Pad 4: Kurve 4 Sampler-Velocity-Modus nach Touch-Einstellung2 FX1-Effektparameter-Taste 2 ([B] im Diagramm) Pad 1: After-Touch deaktiviert* Pad 2: After-Touch aktiviert Einstellungsverfahren zur Eingabe des Sampler-Velocity-Modus FX1-Effektparameter-Taste 3 ([C] im Diagramm) Pad 1: Auf Sampler-Velocity-Modus
Zusätzliche Informationen Störungssuche ! Bedienungsfehler werden oft irrtümlich für Störungen oder Ausfälle gehalten. Wenn Sie den Eindruck haben, dass diese Komponente nicht ordnungsgemäß funktioniert, überprüfen Sie bitte die Punkte unten und [FAQ] für [DDJ-SP1] auf der Pioneer DJ-Support-Website. http://pioneerdj.com/support/ Manchmal wird das Problem auch durch ein externes Gerät verursacht. Überprüfen Sie die anderen verwendeten Komponenten und elektrischen Geräte.
Verwendung als Controller für andere DJ-Software Der DDJ-SP1 gibt auch die Betriebsdaten für die Tasten und Regler im MIDI-Format aus. Wenn Sie einen Computer mit einer eingebauten MIDI-kompatiblen DJ-Software über ein USB-Kabel anschließen, können Sie die DJ-Software auf dieser Einheit bedienen. Zum Verwenden als Controller zum Bedienen anderer DJ-Software als der Serato DJ-Software schalten Sie auf die Einstellung zur Verwendung anderer Software als der Serato DJ-Software im Utility-Modus um.
Se si vuole eliminare questo prodotto, non gettarlo insieme ai rifiuti domestici. Esiste un sistema di raccolta differenziata in conformità alle leggi che richiedono appositi trattamenti, recupero e riciclo. I privati cittadini dei paesi membri dell’UE, di Svizzera e Norvegia, possono restituire senza alcun costo i loro prodotti elettronici usati ad appositi servizi di raccolta o a un rivenditore (se si desidera acquistarne uno simile).
Prima di cominciare Come leggere questo manuale Questo manuale consiste principalmente della descrizione delle funzioni dell’hardware di questa unità. Per dettagli sull’uso di Serato DJ consultarne il manuale e, per istruzioni sull’uso di dispositivi con certifica Serato DJ, consultare le rispettive istruzioni per l’uso. 2 Nel sito di supporto DJ Pioneer, fare clic su “Manuals” in “DDJ-SP1”. 3 Nella pagina di download, fare clic sulla lingua desiderata. Il download delle istruzioni per l’uso inizia.
5 Pulsanti dei parametri di effetto Acquisizione di Serato Video Andare al sito di supporto DJ di Pioneer. http://pioneerdj.com/support/ Le istruzioni per acquisire Serato Video sono date nella pagina di supporto di questa unità. Per dettagli sull’uso di Serato Video, una descrizione delle sue funzioni ed informazioni sui codec utilizzabili, vedere le istruzioni per l’uso di Serato Video. Premere: Attivano o disattivano un effetto o cambiano parametro. [SHIFT] + premere: Cambia il tipo di effetto.
8 Performance pad 3 Interruttore DIMMER Usato per la riproduzione hot cue, hot loop, loop roll, auto loop, slicer, manual loop e sampler. Sezione browser 1 3 1 4 PANEL SELECT 2 5 4 • BACK — UTILITY LOAD PREPARE VIEW AREA LOAD 3 4 LOAD ON: Diminuisce la luminosità del LED. OFF: Aumenta la luminosità del LED. ! Diminuendo la luminosità del LED si diminuisce il consumo energetico.
Impiego Avvio del sistema Il computer ed il DJ controller o DJ mixer con certifica Serato DJ devono essere già collegati. ! Per istruzioni sull’uso di Serato DJ e del DJ mixer o DJ controller con certifica Serato DJ, vederne le istruzioni per l’uso. 1 Collegare il DJ mixer o DJ controller con certifica Serato DJ al computer via cavo USB. 2 Accendere il computer. 3 Accendere il DJ mixer o DJ controller con certifica Serato DJ. 4 Lanciare Serato DJ.
2 Premere il pulsante del parametro di effetto 1 mentre si preme il pulsante [SHIFT] per scegliere il primo tipo di effetto. Cambiamento della modalità di tempo di un effetto Per scegliere il secondo tipo di effetto, premere il pulsante del parametro di effetto 2 mentre si preme quello [SHIFT]. Per scegliere il terzo tipo di effetto, premere il pulsante del parametro di effetto 3 mentre si preme quello [SHIFT].
Cambiamento delle impostazioni di questa unità Impostazione della modalità di modifica delle impostazioni di questa unità (modalità utility) Premere il pulsante [BACK] per più di 1 secondi. Questa unità passa alla modalità utility ed il pulsante del parametro 1 di effetto FX1 ([A] nel diagramma) lampeggia. Scelta della voce da impostare e modifica del parametro 1 Ruotare la manopola selettrice. Girando la manopola selettrice, la voce da impostare cambia.
2 Premere il performance pad sul lato sinistro. Sceglie un parametro o lo accende o spegne. ! Quando questo comando attiva e disattiva il parametro, questo si attiva o disattivia ad ogni pressione del pad 1. Se è attivato, il pad 1 si accende. ! Per scegliere uno fra vari parametri, scegliere e premere uno dei pad accesi. Il pad premuto lampeggia.
Informazioni aggiuntive Diagnostica ! L’uso scorretto dell’apparecchio viene spesso scambiato per un guasto. Se si ritiene che questa unità abbia qualche guasto, controllare i punti seguenti e le [FAQ] del [DDJ-SP1] sul sito di supporto DJ di Pioneer. http://pioneerdj.com/support/ A volte il problema risiede in un altro componente. Controllare tutti i componenti ed apparecchi elettronici usati.
Uso come controller per altro software DJ Dati tecnici Il modello DDJ-SP1 emette anche dati operativi dei pulsanti e manopole in formato MIDI. Collegandosi ad un computer dotato di software DJ MIDI compatibile attraverso un cavo USB è possibile usare il software per DJ per controllare questa unità. Per farne uso come controller per software DJ diverso da Serato DJ, passare alla impostazione di uso di software DJ diverso da Serato DJ in modalità utility.
Deponeer dit product niet bij het gewone huishoudelijk afval wanneer u het wilt verwijderen. Er bestaat een speciaal wettelijk voorgeschreven verzamelsysteem voor de juiste behandeling, het opnieuw bruikbaar maken en de recycling van gebruikte elektronische producten.
Alvorens te beginnen Opmerkingen over deze handleiding ! Hartelijk dank voor uw aankoop van dit Pioneer product. Lees dit boekwerkje en de “Handleiding (geavanceerde editie)” die beschikbaar is op de Pioneer DJ-ondersteuningssite goed door. Beide bevatten belangrijke informatie die u volledig moet begrijpen voor u dit product gaat gebruiken. Na het doorlezen van de gebruiksaanwijzing dient u deze te bewaren op een veilige plaats, voor latere naslag.
5 Toetsen effectparameters Verkrijgen van Serato Video Open de Pioneer DJ-ondersteuningssite hieronder. http://pioneerdj.com/support/ Instructies over het verkrijgen van Serato Video worden gegeven op de ondersteuningspagina voor dit toestel. Zie voor gedetailleerde instructies over het bedienen van Serato Video en een omschrijving van de functies en informatie over bruikbare codecs de handleiding van Serato Video. Druk op: Deze schakelen de effecten in en uit of schakelen over naar andere parameters.
7 SAMPLER VOLUME-fader 1 USB-poort Past het algehele geluidsniveau van de sampler aan. 8 Uitvoeringsvlakken Gebruikt voor de hot-cue, hot-lus, lus-roll, automatische lus, slicer, handmatige lus en sampler weergave. Bladergedeelte 1 3 1 4 PANEL SELECT 2 5 4 • BACK — UTILITY LOAD PREPARE VIEW AREA LOAD LOAD Voor aansluiten van een computer. ! USB-verdeelhubs zijn niet bruikbaar. 2 Kensington-beveiligingsgleuf 3 DIMMER-schakelaar ON (aan): Stelt de helderheid van de LED in op gedimd.
Bediening Opstarten van het systeem De computer en de Serato DJ-gecertificeerde DJ-controller of het DJ-mengpaneel moeten van tevoren op elkaar worden aangesloten. ! Zie voor instructies over het bedienen van de Serato DJ-software en het Serato DJ-gecertificeerde DJ-mengpaneel of DJ-controller de bijbehorende handleidingen. Bedien de DJ-speler, analoge speler, DJ-controller enz. om het muziekstuk af te spelen.
1 Druk op de [FX ASSIGN]-toets aan de linkerkant om het deck te selecteren waaraan het effect toegewezen moet worden. 1 1 ON 1 1 2 2 3 4 ON SLIP 3 SYNC 2 ON FX SELECT ON FX SELECT FX SELECT 2 4 Druk op [FX ASSIGN] 1 om het effect toe te wijzen aan deck 1, of op [FX ASSIGN] 2 om het effect toe te wijzen aan deck 2.
Veranderen van de instellingen van dit toestel Overschakelen naar de stand voor het veranderen van de instellingen van dit toestel (hulpprogrammastand) Houd de [BACK] toets tenminste 1 seconden ingedrukt. Dit toestel schakelt over naar de hulpprogrammastand en de effectparametertoets 1 FX1 ([A] op de afbeelding) gaat knipperen. Selecteren van het in te stellen item en veranderen van de parameter 1 Draai aan de draaiknop.
2 Druk op de performance-pad aan de linkerkant. Hiermee selecteert u de parameter of zet u de parameter aan of uit. ! Wanneer hiermee de parameter aan of uit wordt gezet, gaat de paramater aan of uit met elke druk op tijd-pad 1. Indien ingeschakeld, zal pad 1 oplichten. ! Om een parameter te selecteren uit meerdere parameters, moet u één van de oplichtende pads selecteren en indrukken. De ingedrukte pad gaat knipperen.
Aanvullende informatie Verhelpen van storingen ! Verkeerde bediening kan vaak de oorzaak zijn van een schijnbare storing of foutieve werking. Als u denkt dat er iets mis is met deze apparatuur, moet u de punten hieronder controleren en de [FAQ] voor de [DDJ-SP1] op de Pioneer DJ-ondersteuningssite. http://pioneerdj.com/support/ Soms ligt de oorzaak van het probleem bij een ander apparaat. Controleer daarom ook de andere componenten en elektrische apparatuur die gebruikt wordt.
Gebruik als bedieningspaneel voor andere DJ-software Waarschuwingen betreffende auteursrechten De DDJ-SP1 geeft ook de bedieningsgegevens voor de toetsen en instellingen door in het MIDI-formaat. Door via een USB-kabel een computer met ingebouwde MIDI-geschikte DJ-software aan te sluiten, kunt u de DJ-software bedienen via dit apparaat.
To register your product, find the nearest authorized service location, to purchase replacement parts, operating instructions, or accessories, please go to one of following URLs : Pour enregistrer votre produit, trouver le service après-vente agréé le plus proche et pour acheter des pièces de rechange, des modes d’emploi ou des accessoires, reportez-vous aux URL suivantes : In the USA & Canada/Aux Etats-Unis & Canada http://www.pioneerelectronics.com S018_B1_EnFr_PSV © 2013 PIONEER CORPORATION.