Español Deutsch Français DEH-1120MP DEH-1100MPB DEH-1100MP English CD RDS RECEIVER REPRODUCTOR DE CD CON RECEPTOR RDS CD RDS-EMPFÄNGER AUTORADIO CD RDS SINTOLETTORE CD RDS CD RDS-ONTVANGER CD RDS ПРИЕМНИК Italiano Nederlands Русский Operation Manual Manual de instrucciones Bedienungsanleitung Mode d’emploi Manuale d’istruzioni Bedieningshandleiding Руководство по эксплуатации
Contents Thank you for purchasing this PIONEER product. Please read through this manual before using the product for the first time, to ensure proper use. After reading, please keep the manual in a safe and accessible place for future reference.
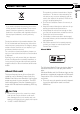
Section Before You Start 01 If you want to dispose this product, do not mix it with general household waste. There is a separate collection system for used electronic products in accordance with legislation that requires proper treatment, recovery and recycling. Private households in the member states of the EU, in Switzerland and Norway may return their used electronic products free of charge to designated collection facilities or to a retailer (if you purchase a similar new one).
Section 01 Before You Start About MP3 Supply of this product only conveys a license for private, non-commercial use and does not convey a license nor imply any right to use this product in any commercial (i.e. revenuegenerating) real time broadcasting (terrestrial, satellite, cable and/or any other media), broadcasting/streaming via internet, intranets and/ or other networks or in other electronic content distribution systems, such as pay-audio or audio-on-demand applications.
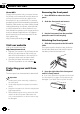
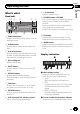
Section Operating this unit 02 Head unit 12 3 dc 4 b 5 a 6 b SOURCE button, VOLUME This unit is turned on by selecting a source. Press to cycle through all the available sources. Press and hold to recall the initial setting menu when the sources are off. Rotate it to increase or decrease the volume. English a 1 to 6 buttons Press for preset tuning. What’s what 98 7 1 FUNCTION button Press to recall the function menu when operating a source.
Section 02 Operating this unit ! If a track number 100 or more is selected, d on the left of the track number indicator will light. 3 AF indicator Appears when AF (alternative frequencies search) function is on. 4 TP indicator Appears when a TP station is tuned in. 5 TA indicator Appears when TA (traffic announcement standby) function is on. 6 MP3/WMA indicator Shows the type of the currently playing disc. 7 RPT indicator Shows when repeat play is turned on. 8 LOUD indicator Appears when loudness is on.
Section Operating this unit Storing and recalling broadcast frequencies % When you find a frequency that you want to store in memory, press one of preset tuning buttons 1 to 6 and hold until the preset number stops flashing. Memorized radio station frequency can be recalled by pressing the preset tuning button. # Up to 12 FM stations, 6 for each of the two FM bands, and 6 MW/LW stations can be stored in memory. # Press a or b to recall radio station frequencies.
Section 02 Operating this unit L.
Section Operating this unit 02 Built-in Player TA (traffic announcement standby) lets you receive traffic announcements automatically, no matter what source you are listening to. TA can be activated for both a TP station (a station that broadcasts traffic information) or an enhanced other network’s TP station (a station carrying information which cross-references TP stations). Playing a disc 1 Tune in a TP or enhanced other network’s TP station. TP indicator lights.
Section Operating this unit 02 ! The built-in CD player can play back compressed audio recorded on CD-ROM. (Please see the following section for files that can be played back. Refer to page 16.) ! When playing back VBR (variable bit rate) recorded files, elapsed play time may not be displayed correctly. ! When playing compressed audio, there is no sound on fast forward or reverse. Repeating play Repeat play plays the same track/folder within the selected repeat play range.
Section Operating this unit For WAV Play time—FOLDER (folder name)—FILE (file name)—Sampling frequency # To return to the normal display, press BAND. Searching every 10 tracks in the current disc or folder You can switch the search method between fast forward/reverse and searching every 10 tracks. Selecting ROUGH enables you to search every 10 tracks. 1 Press FUNCTION to select FF/REV. # If the search method ROUGH has been previously selected, ROUGH will be displayed. 2 Press d to select ROUGH.
Section Operating this unit 02 Using the equalizer Adjusting source levels There are six stored equalizer settings such as DYNAMIC, VOCAL, NATURAL, CUSTOM, FLAT and POWERFUL that can easily be recalled at any time. ! CUSTOM is an adjusted equalizer curve that you create. ! When FLAT is selected no supplement or correction is made to the sound. SLA (source level adjustment) lets you adjust the volume level of each source to prevent radical changes in volume when switching between sources.
Section Operating this unit 02 Selecting AUX as the source Normally the FM tuning step employed by seek tuning is 50 kHz. When AF or TA is on, the tuning step automatically changes to 100 kHz. It may be preferable to set the tuning step to 50 kHz when AF is on. ! The tuning step remains at 50 kHz during manual tuning. % Press SOURCE to select AUX as the source. 1 Press FUNCTION to select FM. Refer to Adjusting initial settings on the previous page. 2 Press c or d to select the FM tuning step.
Section 02 Operating this unit 2 Press c or d to select the language. EUR (European language)—RUS (Russian language) Sound muting Sound from this unit is muted automatically in the following cases: ! When a call is made or received using a cellular telephone connected to this unit. ! When the voice guidance is output from a Pioneer navigation unit connected to this unit. The sound is turned off, MUTE is displayed and no audio adjustments, except volume control, are possible.
Appendix Additional Information When you contact your dealer or your nearest Pioneer Service Center, be sure to have the error message recorded. Message Cause Handling guideline of discs and player ! Use only discs featuring either of following two logos. English Error messages Action ERROR-11, 12, Dirty disc 17, 30 Clean disc. ERROR-11, 12, Scratched disc 17, 30 Replace disc.
Appendix Additional Information ! Text information may not be correctly displayed depending on the recorded environment. ! Road shocks may interrupt disc playback. ! Read the precautions for discs before using them. Dual Discs ! Dual Discs are two-sided discs that have a recordable CD for audio on one side and a recordable DVD for video on the other. ! Since the CD side of Dual Discs is not physically compatible with the general CD standard, it may not be possible to play the CD side with this unit.
Appendix Additional Information WMA ! Compatible format: WMA encoded by Windows Media Player ! File extension: .wma ! Bit rate: 48 kbps to 320 kbps (CBR), 48 kbps to 384 kbps (VBR) ! Sampling frequency: 32 kHz to 48 kHz ! Windows Media Audio 9 Professional, Lossless, Voice: No Х Ц Ч Ш, Щ Ъ Ы Ь Э Ю Я English Compressed audio compatibility MP3 ! File extension: .mp3 ! Bit rate: 8 kbps to 320 kbps ! Sampling frequency: 16 kHz to 48 kHz (32, 44.
Appendix Additional Information Specifications General Power source ............................. 14.4 V DC (10.8 V to 15.1 V allowable) Grounding system ................... Negative type Max. current consumption ..................................................... 10.0 A Dimensions (W × H × D): DIN Chassis ..................... 178 mm × 50 mm × 162 mm Nose ........................... 188 mm × 58 mm × 15 mm D Chassis ..................... 178 mm × 50 mm × 162 mm Nose ...........................
Contenido Gracias por haber comprado este producto PIONEER. Lea con detenimiento este manual antes de utilizar el producto por primera vez, para que pueda darle el mejor uso posible. Una vez leído, guarde este manual en un lugar seguro y a mano para consultarlo en el futuro.
Sección 01 Antes de comenzar PRECAUCIÓN Si desea deshacerse de este producto, no lo mezcle con los residuos generales de su hogar. De conformidad con la legislación vigente, existe un sistema de recogida distinto para los productos electrónicos que requieren un procedimiento adecuado de tratamiento, recuperación y reciclado.
Sección Antes de comenzar Acerca de MP3 La venta de este producto sólo otorga una licencia para su uso privado, no comercial.
Sección 01 Antes de comenzar 2 Presione el lado derecho de la carátula hasta que asiente firmemente. # Si no puede fijar con éxito la carátula a la unidad principal, inténtelo de nuevo. Si aplica fuerza excesiva para fijar la carátula, ésta puede dañarse.
Sección Utilización de esta unidad Qué es cada cosa Unidad principal 12 3 4 5 6 02 9 Conector de entrada AUX (conector estéreo de 3,5 mm) Utilícelo para conectar un dispositivo auxiliar. a Botones 1 a 6 Presione para la sintonización preajustada. b a 98 7 1 Botón FUNCTION Presione este botón para acceder al menú de funciones al utilizar una fuente. 2 Botón AUDIO Presione este botón para seleccionar los diversos controles de calidad del sonido.
Sección 02 Utilización de esta unidad Se muestra el nombre del servicio del programa, información PTY y otro tipo de información de texto. ! Reproductor de CD incorporado Se muestra el tiempo de reproducción transcurrido e información de texto. 2 Indicador del número de presintonía/ número de pista Muestra el número de pista o el número de presintonía. ! Si se selecciona un número de pista 100 o superior, d se iluminará a la izquierda del indicador de número de pista.
Sección Utilización de esta unidad 02 Sintonizador Sintonización de señales fuertes Para escuchar la radio La sintonización por búsqueda local le permite sintonizar sólo las emisoras de radio con señales lo suficientemente fuertes como para asegurar una buena recepción. 1 Presione SOURCE para seleccionar el sintonizador. 3 Para utilizar la sintonización manual, presione brevemente c o d.
Sección 02 Utilización de esta unidad Cambio de la visualización RDS LEISURE RDS (sistema de datos de radio) contiene información inaudible que ayudan a buscar emisoras de radio. ! Es posible que no todas las emisoras suministren el servicio RDS. ! Las funciones RDS como AF y TA sólo se activan cuando la radio está sintonizada en una emisora RDS. DOCUMENT % Presione DISPLAY.
Sección Utilización de esta unidad 02 nal que es diferente de la emisora almacenada originalmente. ! La función regional se puede activar o desactivar en forma independiente por cada banda FM. Uso de la búsqueda PI Recepción de anuncios de tráfico Si el sintonizador no puede encontrar una emisora adecuada o el estado de la recepción empeora, la unidad buscará automáticamente otra emisora con la misma programación. Durante la búsqueda aparece PI SEEK y la salida se silencia.
Sección 02 Utilización de esta unidad ! Sólo se sintonizan las emisoras TP y las emisoras TP de otra red realzada durante la sintonización por búsqueda o BSM cuando la función TA está activada. Reproductor incorporado Reproducción de un disco 1 Introduzca un CD (CD-ROM) por la ranura de carga de discos. La reproducción comenzará automáticamente. # Asegúrese de que el lado de la etiqueta del disco esté hacia arriba.
Sección Utilización de esta unidad Reproducción de las pistas en orden aleatorio Las pistas de una gama de repetición seleccionada se reproducen en orden aleatorio. 1 Seleccione la gama de repetición. Consulte Repetición de reproducción en la página anterior. 2 Presione FUNCTION para seleccionar RDM. 3 Presione a o b para activar o desactivar la reproducción aleatoria. Cuando la repetición aleatoria está activada, en el display aparece RDM.
Sección Utilización de esta unidad 02 Búsqueda cada 10 pistas en el disco o carpeta actual Se puede cambiar el método de búsqueda entre las opciones de avance rápido/retroceso y búsqueda cada 10 pistas. Seleccionar ROUGH le permite realizar la búsqueda cada 10 pistas. 1 Presione FUNCTION para seleccionar FF/REV. # Si se seleccionó anteriormente el método de búsqueda ROUGH, se visualizará ROUGH. 2 Presione d para seleccionar ROUGH.
Sección Utilización de esta unidad 3 Presione c o d para ajustar el balance entre los altavoces izquierdos/derechos. Aparece BAL L15 a BAL R15. # Para volver a la visualización normal, presione BAND. 02 Ajuste de la sonoridad La sonoridad compensa las deficiencias en las gamas de sonido bajas y altas cuando se escucha a un volumen bajo. 1 Hay seis ajustes de ecualización almacenados, a saber: DYNAMIC, VOCAL, NATURAL, CUSTOM, FLAT y POWERFUL, que se pueden utilizar con facilidad en cualquier momento.
Sección 02 Utilización de esta unidad Otras funciones Configuración de los ajustes iniciales Utilizando los ajustes iniciales, puede personalizar varios ajustes del sistema para lograr un funcionamiento óptimo de esta unidad. 1 Mantenga presionado SOURCE hasta que se apague la unidad. 2 Mantenga presionado SOURCE hasta que el nombre de la función aparezca en el display. 3 Presione FUNCTION para seleccionar uno de los ajustes iniciales.
Sección Utilización de esta unidad Ahorro del consumo de la batería La activación de esta función le permite ahorrar consumo de la batería. ! Cuando esta función está activada, no se permiten operaciones que no sean sintonizar la fuente. Si la batería del vehículo está desconectada, se cancela el modo de Ahorro de Energía. Active de nuevo el Ahorro de Energía cuando vuelva a conectar la batería.
Apéndice Información adicional Mensajes de error Cuando contacte con su proveedor o con el servicio técnico Pioneer más cercano, asegúrese de haber anotado el mensaje de error. Mensaje Causa Limpie el disco. ERROR-11, 12, Disco rayado 17, 30 Reemplace el disco. ERROR-15 Reemplace el El disco insertado no contiene disco. datos ERROR-22, 23 No se puede reproducir el formato del CD NO AUDIO Reemplace el El disco que se ha colocado no disco.
Apéndice Información adicional Discos dobles ! Los discos dobles son discos de dos caras que incluyen CD grabable de audio en una cara y DVD grabable de vídeo en la otra cara. ! Debido a que la cara CD de los discos dobles no es físicamente compatible con el estándar CD general, es posible que no se pueda reproducir la cara CD en esta unidad. ! La carga y expulsión frecuente de un disco doble puede producir rayaduras en el disco.
Apéndice Información adicional Ejemplo de una jerarquía : Carpeta : Archivo de audio comprimido 1 2 3 5 6 Nivel 1 Nivel 2 4 Nivel 3 Nivel 4 ! Esta unidad asigna los números de carpetas. El usuario no puede asignarlos. ! La secuencia de selección de carpetas u otras operaciones pueden cambiar, dependiendo del código de codificación o escritura. ! Se permite una jerarquía de carpetas de hasta ocho niveles. Sin embargo, la jerarquía práctica de carpetas es de menos de dos niveles.
Apéndice Información adicional Especificaciones Generales Audio Potencia de salida máxima ..................................................... 50 W × 4 Potencia de salida continua ..................................................... 22 W × 4 (50 a 15 000 Hz, 5% THD, 4 W de carga, ambos canales activados) Impedancia de carga ............. 4 W (4 W a 8 W permisible) Nivel de salida máx. del preamplificador (Pre-out) .....................................................
Inhalt Vielen Dank, dass Sie sich für dieses PIONEER-Produkt entschieden haben. Bitte lesen Sie diese Bedienungsanleitung vor der erstmaligen Verwendung des Produkts, um seinen ordnungsgemäßen Betrieb zu gewährleisten. Bewahren Sie die Bedienungsanleitung nach dem Lesen zur zukünftigen Bezugnahme sicher auf.
Abschnitt Bevor Sie beginnen Privathaushalte in den Mitgliedstaaten der EU, in der Schweiz und in Norwegen können ihre gebrauchten elektronischen Produkte kostenfrei bei speziell dafür eingerichteten Sammelstellen abgeben oder zu einem Fachhändler zurückbringen (sofern sie ein vergleichbares neues Produkt kaufen). In den Ländern, die hier nicht aufgeführt sind, wenden Sie sich hinsichtlich der zu beachtenden Entsorgungsweise bitte an die zuständige Gemeindeverwaltung.
Abschnitt 01 Bevor Sie beginnen Zu WMA Datei, sodass wir Ihnen diese Informationen bei Verlust oder Diebstahl des Produkts jederzeit für Ihre Versicherung bereitstellen können. ! Auf unserer Website finden Sie die jeweils neuesten Informationen der Pioneer Corporation. Das auf der Verpackung ausgewiesene Logo Windows Media™ verweist darauf, dass dieses Gerät die Wiedergabe von WMA-Daten unterstützt.
Abschnitt Bevor Sie beginnen 01 Anbringen der Frontplatte 1 Schieben Sie die Frontplatte nach links, bis sie einrastet. Die Frontplatte und das Hauptgerät sind an der linken Seite miteinander verbunden. Stellen Sie sicher, dass die Frontplatte fest an das Hauptgerät angefügt wurde. Deutsch 2 Drücken Sie dann die rechte Seite der Frontplatte, bis sie sicher einrastet. # Sollten Sie die Frontplatte nicht erfolgreich mit dem Hauptgerät verbinden können, versuchen Sie es erneut.
Abschnitt 02 Bedienung des Geräts a Tasten 1 bis 6 Zum Ausführen der Vorwahlabstimmung (Stationsspeicher). Die einzelnen Teile Hauptgerät 12 3 dc b 4 5 a 6 98 7 1 Taste FUNCTION Drücken Sie diese Taste, um bei der Auswahl einer Programmquelle das Funktionsmenü abzurufen. 2 Taste AUDIO Drücken Sie diese Taste, um verschiedene Klangregler zu wählen. 3 Tasten a/b/c/d Für manuelle Suchlaufabstimmung, Schnellvorlauf, Rücklauf und Titelsuchlauf. Dieser Knopf dient auch zur Steuerung von Funktionen.
Abschnitt Bedienung des Geräts 2 Stations-/Titelnummernanzeige Zeigt die Titel- oder die Stationsnummer an. ! Bei der Auswahl einer Titelnummer größer oder gleich 100 leuchtet links neben der Titelnummer die Anzeige d auf. 3 AF-Anzeige Erscheint, wenn die AF-Funktion (Alternativfrequenz-Suchlauf) eingeschaltet ist. 4 TP-Anzeige Erscheint, wenn eine TP-Station abgestimmt ist. 6 MP3/WMA-Anzeige Zeigt den Typ der momentan spielenden Disc an.
Abschnitt 02 Bedienung des Geräts 4 Für die Suchlaufabstimmung drücken Sie c oder d etwa eine Sekunde lang. Der Tuner durchläuft den Frequenzbereich, bis er einen Sender mit akzeptablem Empfang gefunden hat. # Durch kurzes Drücken von c oder d kann die Suchlaufabstimmung aufgehoben werden. # Durch Drücken und Halten von c oder d können Sender übersprungen werden. Die Suchlaufabstimmung beginnt, sobald c bzw. d losgelassen wird.
Abschnitt Bedienung des Geräts Wählen alternativer Frequenzen PTY-Liste Spezifisch NEWS AFFAIRS INFO SPORT WEATHER FINANCE CULTURE SCIENCE VARIED CHILDREN SOCIAL RELIGION PHONE IN TOURING LEISURE DOCUMENT Programmtyp Nachrichten Tagesereignisse Allgemeine Informationen und Tipps Sport Wetterberichte/Wetterinformationen Börsenberichte, Wirtschaft, Handel usw.
Abschnitt 02 Bedienung des Geräts ! Standardmäßig ist der automatische PISuchlauf ausgeschaltet. Siehe Umschalten des Auto-PI-Suchlaufs auf Seite 52. 2 Drücken Sie TA, um die Verkehrsdurchsagebereitschaft einzuschalten. Begrenzen von Stationen auf regionale Programme 3 Mit VOLUME können Sie die TA-Lautstärke einstellen, wenn eine Verkehrsdurchsage startet. Die neu eingestellte Lautstärke wird gespeichert und für nachfolgende Verkehrsmeldungen abgerufen.
Abschnitt Bedienung des Geräts 2 Drücken Sie a oder b, um einen Ordner zu wählen, wenn Dateien im komprimierten Audio-Format wiedergegeben werden sollen. # Ordner, in denen keine komprimierten AudioDateien enthalten sind, können nicht gewählt werden. # Um zu Ordner 01 (ROOT) zurückzukehren, halten Sie BAND gedrückt. Sollte Ordner 01 (ROOT) keine Dateien enthalten, dann beginnt die Wiedergabe mit Ordner 02. 02 ggf. nicht der richtige Wert für die abgelaufene Spielzeit angezeigt.
Abschnitt 02 Bedienung des Geräts Wiederholwiedergabe Mithilfe der Wiederholwiedergabe kann ein Titel/Ordner innerhalb des gewählten Wiederholwiedergabebereichs mehrfach abgespielt werden. 1 Drücken Sie FUNCTION, um RPT zu wählen. 2 Drücken Sie c oder d, um einen Wiederholbereich zu wählen.
Abschnitt Bedienung des Geräts 02 Anhalten der Disc-Wiedergabe # Drücken Sie c, um FF/REV zu wählen. Die Disc-Wiedergabe kann vorübergehend gestoppt werden. 3 Zum Zurückschalten auf die Wiedergabeanzeige drücken Sie BAND. 1 Drücken Sie FUNCTION, um PAUSE zu wählen. 4 Drücken und halten Sie c oder d gedrückt, um beim Suchlauf direkt zu jedem 10. Titel auf der Disc (im Ordner) zu springen. 2 Drücken Sie a oder b, um die Pause ein- oder auszuschalten.
Abschnitt Bedienung des Geräts 02 ! Bei der Wiedergabe von im VBR-Modus (Variable Bitrate) aufgezeichneten WMA-Dateien wird die durchschnittliche Bitrate angezeigt. ! Bei der Wiedergabe von im VBR-Modus (variable Bitrate) aufgezeichneten MP3-Dateien erscheint an Stelle der Bitrate die Angabe VBR im Display. ! Je nach der für das Schreiben der MP3-Dateien auf eine Disc verwendeten Version von iTunes werden die Textinformationen ggf. nicht richtig angezeigt.
Abschnitt Bedienung des Geräts 2 Drücken Sie a oder b, um die Loudness-Funktion ein- oder auszuschalten. # Sie können auch EQ drücken und gedrückt halten, um Loudness ein- oder auszuschalten. 3 Drücken Sie c oder d, um den Pegel wunschgemäß einzustellen. LOW (Niedrig)—HI (Hoch) # Zum Zurückschalten zur normalen Anzeige drücken Sie BAND. Einstellen der Programmquellenpegel 1 Vergleichen Sie die UKW-Lautstärke mit dem Lautstärkepegel der Programmquelle, die Sie einstellen möchten.
Abschnitt 02 Bedienung des Geräts Umschalten des Auto-PI-Suchlaufs Das System kann automatisch nach einer anderen Station mit derselben Programmierung suchen, selbst bei einem Stationsabruf. 1 Drücken Sie FUNCTION, um A-PI zu wählen. Siehe Anpassen der Grundeinstellungen auf Seite 51. 2 Drücken Sie a oder b, um den Auto-PISuchlauf ein- oder auszuschalten. Umschalten der AUX-Einstellung Mit diesem Gerät können auch Zusatzgeräte verwendet werden.
Abschnitt Bedienung des Geräts 02 Abschalten des Tons Deutsch In folgenden Fällen wird dieses Gerät automatisch stummgeschaltet: ! Wenn mit einem an dieses Gerät angeschlossenen Mobiltelefon ein Telefonanruf empfangen oder getätigt wird. ! Wenn von einem an dieses Gerät angeschlossenen Pioneer-Navigationsgerät die Sprachführung ausgegeben wird. Der Ton wird abgeschaltet, im Display erscheint MUTE und sämtliche Audio-Einstellungen, mit Ausnahme der Lautstärkeregelung, sind blockiert.
Anhang Zusätzliche Informationen Fehlermeldungen Vor der Kontaktaufnahme mit Ihrem Händler oder der nächstgelegenen Pioneer-Kundendienststelle sollten Sie sich die angezeigte Fehlermeldung notieren. Meldung Ursache Richtlinien für die Handhabung von Discs und Player ! Verwenden Sie ausschließlich Discs, die eines der folgenden zwei Logos aufweisen: Abhilfemaßnahme ERROR-11, 12, Disc verschmutzt Reinigen Sie die 17, 30 Disc. 54 ERROR-11, 12, Disc verkratzt 17, 30 Wechseln Sie die Disc aus.
Anhang Zusätzliche Informationen Dual-Discs ! Dual-Discs sind doppelseitige Discs, die eine beschreibbare CD-Seite für Audiodaten und eine beschreibbare DVD-Seite für Videodaten bereitstellen. ! Da die CD-Seite von Dual-Discs physikalisch nicht mit dem allgemeinen CD-Standard kompatibel ist, ist eine Wiedergabe der CD-Seite mit diesem Gerät ggf. nicht möglich.
Anhang Zusätzliche Informationen Beispiel einer Disc-Struktur : Ordner : Komprimierte Audio-Datei 1 2 3 5 6 Stufe 1 Stufe 2 4 Stufe 3 Stufe 4 ! Dieses Gerät weist Ordnernummern zu. Der Benutzer selbst hat keine Möglichkeit, Ordnernummern zuzuweisen. ! Die bei der Ordnerauswahl oder einem anderen Bedienvorgang angewendete Reihenfolge hängt von der jeweiligen Codierungs- bzw. Schreibsoftware ab. ! Die Ordnerstruktur kann bis zu acht Ebenen umfassen.
Anhang Zusätzliche Informationen Technische Daten Allgemein Audio Max. Ausgangsleistung ....... 50 W × 4 Dauer-Ausgangsleistung ..... 22 W × 4 (50 Hz bis 15 000 Hz, 5% THD, bei 4-WLast, beide Kanäle betrieben) Lastimpedanz ............................ 4 W (4 W bis 8 W zulässig) Max. Preout-Ausgangspegel ..................................................... 2,0 V Klangregler: Bass Frequenz .................. 100 Hz Verstärkung ............ ±13 dB Mittel Frequenz .................. 1 KHz Verstärkung .......
Table des matières Nous vous remercions d’avoir acheté cet appareil Pioneer. Lisez bien ce manuel avant d’utiliser l’appareil pour la première fois, afin de garantir une utilisation correcte. Conservez-le dans un endroit sûr et facilement accessible pour toute consultation ultérieure.
Section Avant de commencer 01 ! Si vous souhaitez vous débarrasser de cet appareil, ne le mettez pas à la poubelle avec vos ordures ménagères. Il existe un système de collecte séparé pour les appareils électroniques usagés, qui doivent être récupérés, traités et recyclés conformément à la législation.
Section 01 Avant de commencer Quelques mots sur MP3 La fourniture de ce produit comporte seulement une licence d’utilisation privée, non commerciale, et ne comporte pas de licence ni n’implique aucun droit d’utilisation de ce produit pour une diffusion commerciale (c’està-dire générant des revenus) en temps réel (terrestre, par satellite, câble et/ou tout autre média), diffusion/streaming via internet, des intranets et/ou d’autres systèmes électroniques de distribution de contenu, telles que les applicati
Section Utilisation de l’appareil 02 8 Touche DETACH Appuyez sur cette touche pour retirer la face avant de l’appareil central. Description de l’appareil Appareil central 12 3 4 5 6 9 Jack d’entrée AUX (jack stéréo 3,5 mm) Utilisez ce jack pour connecter un appareil auxiliaire. a Touches 1 à 6 Touches de présélection. 3 Touches a/b/c/d Appuyez sur ces touches pour exécuter les commandes d’accord automatique, avance rapide, retour rapide et recherche de plage musicale.
Section 02 Utilisation de l’appareil 1 Section d’affichage principal Elle indique des informations diverses telles que la gamme de réception, le temps de lecture, et d’autres réglages. ! Syntoniseur La gamme et la fréquence de réception sont affichées. ! RDS Le nom du service de programme, les informations PTY et d’autres informations textuelles sont affichées. ! Lecteur de CD intégré Le temps de lecture écoulé et les informations littérales sont affichés.
Section Utilisation de l’appareil ! Si le fil bleu/blanc de l’appareil est relié à la prise de commande du relais de l’antenne motorisée du véhicule, celle-ci se déploie lorsque la source est mise en service. Pour rétracter l’antenne, mettez la source hors service. Réglage du volume % Tournez VOLUME pour régler le niveau sonore.
Section 02 Utilisation de l’appareil Mise en mémoire des fréquences les plus puissantes La fonction BSM (Mémoire des meilleures stations) vous permet d’utiliser les touches de présélection 1 à 6 pour mémoriser les six fréquences d’émission les plus puissantes. Une fois qu’elles sont enregistrées, vous pouvez vous accorder sur ces fréquences en appuyant simplement sur une touche.
Section Utilisation de l’appareil Vous pouvez aussi abandonner la réception d’un bulletin d’informations d’urgence en appuyant sur SOURCE, BAND, a, b, c ou d. Choix d’une autre fréquence possible 02 gramme. Pendant la recherche, PI SEEK s’affiche et le son est coupé. Recherche automatique PI d’une station dont la fréquence est en mémoire % Appuyez sur TA et maintenez l’appui répétitivement pour mettre en service ou hors service la fonction AF (recherche des autres fréquences possibles).
Section 02 Utilisation de l’appareil Réception des bulletins d’informations routières La fonction TA (attente de bulletins d’informations routières) vous permet de recevoir des bulletins d’informations routières automatiquement, quelle que soit la source que vous écoutez.
Section Utilisation de l’appareil Répétition de la lecture La fonction répétition de la lecture lit la même plage/le même dossier à l’intérieur de l’étendue de répétition sélectionnée. 1 Appuyez sur FUNCTION pour choisir RPT. # Lors de la lecture d’un CD, l’exécution d’une recherche de plage ou d’une avance/d’un retour rapide annule automatiquement la répétition de la lecture.
Section 02 Utilisation de l’appareil Examen des plages ou des dossiers L’examen du disque recherche la plage à l’intérieur de l’étendue de répétition sélectionnée. 1 Choisissez l’étendue de répétition. Reportez-vous à la page précédente, Répétition de la lecture. 2 Appuyez sur FUNCTION pour choisir SCAN. 3 Appuyez sur a pour activer la lecture du contenu du disque. SCAN apparaît sur l’écran. Les 10 premières secondes de chaque plage sont lues.
Section Utilisation de l’appareil Pour les disques CD TEXT Temps de lecture—DISC TTL (titre du disque) —ART NAME (interprète du disque)— TRK TTL (titre de la plage)—ART NAME (interprète de la plage) Pour les fichiers WMA/MP3 Temps de lecture—FOLDER (nom du dossier) —FILE (nom du fichier)—TRK TTL (titre de la plage)—ART NAME (nom de l’interprète)— ALBM TTL (titre de l’album)—COMMENT (commentaire)—Débit binaire Pour les fichiers WAV Temps de lecture—FOLDER (nom du dossier) —FILE (nom du fichier)—Fréquence d’
Section Utilisation de l’appareil 02 Réglage des graves/des médiums/des aigus Vous pouvez régler le niveau des graves, des médiums et des aigus. 1 Appuyez sur AUDIO pour choisir BASS/ MID/TREBLE. 2 Appuyez sur a ou b pour régler le niveau. Les valeurs +6 à –6 s’affichent tandis que le niveau augmente ou diminue. 1 Comparez le niveau du volume FM au niveau de la source que vous voulez régler. 2 Appuyez sur AUDIO pour choisir SLA. # Appuyez sur BAND pour revenir à l’affichage normal.
Section Utilisation de l’appareil 02 # Appuyez sur BAND pour annuler les réglages initiaux. # Vous pouvez également abandonner les réglages initiaux en maintenant la pression sur SOURCE jusqu’à ce que l’appareil se mette hors service. Mise en service ou hors service de l’entrée auxiliaire Sélection de l’incrément d’accord FM 1 Appuyez sur FUNCTION pour choisir AUX. Reportez-vous à la page précédente, Ajustement des réglages initiaux.
Section 02 Utilisation de l’appareil 1 Appuyez sur FUNCTION pour choisir SAVE. Reportez-vous à la page 70, Ajustement des réglages initiaux. 2 Appuyez sur a ou b pour mettre l’économie d’énergie en service ou hors service. Réglage de l’affichage multilingue Des informations textuelles telles que le nom du titre, le nom de l’interprète ou un commentaire peuvent être enregistrées sur un disque d’audio compressé.
Annexe Informations complémentaires Messages d’erreur Quand vous contactez votre distributeur ou le Service d’entretien agréé par Pioneer le plus proche, n’oubliez pas de noter le message d’erreur. Message Causes possibles Conseils sur la manipulation des disques et du lecteur ! Utilisez uniquement des disques affichant l’un ou l’autre des logos suivants. Action corrective Nettoyez le disque. ERROR-11, 12, Disque rayé 17, 30 Utilisez un autre disque.
Annexe Informations complémentaires ! La condensation peut perturber temporairement le fonctionnement du lecteur. Laissez celui-ci s’adapter à la température plus élevée pendant une heure environ. Essuyez également les disques humides avec un chiffon doux. ! La lecture de certains disques peut être impossible en raison des caractéristiques du disque, de son format, de l’application qui l’a enregistré, de l’environnement de lecture, des conditions de stockage ou d’autres conditions.
Annexe Informations complémentaires ! Débit binaire : 8 kbit/s à 320 kbit/s ! Fréquence d’échantillonnage : 16 kHz à 48 kHz (32, 44,1, 48 kHz pour accentuation) ! Version étiquette ID3 compatible : 1.0, 1.1, 2.2, 2.3, 2.4 (la Version 2.x de l’étiquette ID3 a priorité sur la Version 1.x.
Annexe Informations complémentaires Caractéristiques techniques Format du signal WAV .......... PCM Linéaire & MS ADPCM Généralités Syntoniseur FM Tension d’alimentation ......... 14,4 V CC (10,8 V à 15,1 V acceptable) Mise à la masse ....................... Pôle négatif Consommation max. en courant ..................................................... 10,0 A Dimensions (L × H × P) : DIN Châssis ..................... 178 mm × 50 mm × 162 mm Panneau avant ...... 188 mm × 58 mm × 15 mm D Châssis ........
Sommario Grazie per aver acquistato questo prodotto PIONEER. Leggere attentamente questo manuale prima di utilizzare il prodotto per la prima volta, per assicurarne il corretto utilizzo. Dopo aver terminato la lettura, conservare questo manuale in un luogo sicuro e accessibile, per consultazione futura.
Sezione 01 Prima di iniziare ! Se si vuole eliminare questo prodotto, non gettarlo insieme ai rifiuti domestici. Esiste un sistema di raccolta differenziata in conformità alle leggi che richiedono appositi trattamenti, recupero e riciclo.
Sezione Prima di iniziare Informazioni sul formato MP3 La fornitura di questo prodotto prevede il trasferimento di una licenza esclusivamente per uso privato, non-commerciale e non prevede la concessione di una licenza, né implica qualsiasi diritto a utilizzare questo prodotto in qualsiasi trasmissione in diretta commerciale (ovvero, che generi profitti) terrestre, via satellite, cavo e/o tramite altro mezzo, trasmissioni/ diffusioni tramite Internet, Intranet e/o altre reti o in altri sistemi elettronici
Sezione 02 Funzionamento dell’unità 8 Tasto DETACH Premere questo tasto per rimuovere il frontalino dall’unità centrale. Nomenclatura Unità principale 12 3 dc b 4 5 a 6 98 7 a Tasti da 1 a 6 Premere questi tasti per eseguire la preselezione sintonia. 1 Tasto FUNCTION Premere questo tasto per richiamare il menu delle funzioni quando si controlla una sorgente. b SOURCE tasto, VOLUME Questa unità viene accesa selezionando una sorgente.
Sezione Funzionamento dell’unità 1 Sezione del display principale Mostra le diverse informazioni come la banda, il tempo di riproduzione e le altre informazioni. ! Sintonizzatore Vengono visualizzate la banda e la frequenza. ! RDS Sono visualizzati il nome di servizio del programma, le informazioni PTY e altre informazioni letterali. ! Lettore CD incorporato Sono visualizzate il tempo di riproduzione trascorso e informazioni letterali.
Sezione 02 Funzionamento dell’unità ! Quando il conduttore isolato blu/bianco di questa unità viene collegato al terminale di controllo del relè dell’antenna automatica, l’antenna dell’automobile si estende quando si accende l’unità. Per ritirare l’antenna, spegnere la sorgente. Regolazione del volume % Ruotare VOLUME per regolare il livello sonoro. Sintonizzatore Ascolto della radio 1 Premere SOURCE per selezionare il sintonizzatore. 2 Premere BAND per selezionare una banda.
Sezione Funzionamento dell’unità Memorizzazione delle frequenze di trasmissione più forti La funzione BSM (memorizzazione delle stazioni migliori) consente di memorizzare automaticamente le sei frequenze di trasmissione più forti assegnandole ai tasti di preselezione sintonia da 1 a 6; una volta memorizzate, è quindi possibile richiamarle con la semplice pressione di un tasto.
Sezione 02 Funzionamento dell’unità Selezione di frequenze alternative Se il sintonizzatore riceve un segnale debole, l’unità ricerca automaticamente una stazione diversa della stessa rete. % Premere e tenere premuto TA per attivare o disattivare la funzione AF (ricerca delle frequenze alternative). # È inoltre possibile attivare o disattivare la funzione AF dal menu che viene visualizzato premendo FUNCTION.
Sezione Funzionamento dell’unità 02 Ricezione dei notiziari sul traffico Lettore incorporato La funzione TA (attesa di notiziari sul traffico) consente di ricevere automaticamente i notiziari sul traffico, indipendentemente dalla sorgente che si sta ascoltando.
Sezione 02 Funzionamento dell’unità ! Quando si riproducono CD-EXTRA o CD MODALITÀ MISTA, è possibile alternare tra file audio compressi e CD-DA premendo BAND. ! Se si alternano file audio compressi e CD-DA, la riproduzione viene avviata dal primo brano del disco. ! Il lettore CD incorporato può riprodurre file audio compressi registrati su CD-ROM. (Vedere la sezione seguente per i file che è possibile riprodurre. Vedere a pagina 93.
Sezione Funzionamento dell’unità 4 Quando si trova il brano desiderato, premere b per disattivare la lettura a scansione. # Se il display è tornato automaticamente alla visualizzazione della riproduzione, selezionare di nuovo SCAN premendo FUNCTION. # Dopo che la scansione del disco (o della cartella) è terminata, la riproduzione normale dei brani riprende. Pausa della riproduzione di un disco 02 cerca ogni 10 brani. Selezionando ROUGH, è possibile cercare ogni 10 brani.
Sezione Funzionamento dell’unità 02 Note ! È possibile scorrere a sinistra del titolo premendo e tenendo premuto DISPLAY. ! I CD audio che contengono alcune informazioni, ad esempio testo e/o numeri, sono CD TEXT. ! Se su un disco non è stata registrata nessuna informazione specifica, viene visualizzata l’indicazione NO XXXX (ad esempio, NO T-TTL).
Sezione Funzionamento dell’unità Regolazione dei bassi, dei medi e degli alti È possibile regolare il livello dei bassi, dei medi e degli alti. 1 Premere AUDIO per selezionare BASS/ MID/TREBLE. 2 Premere a o b per regolare il livello. A seconda se il livello viene aumentato o diminuito, viene visualizzata l’indicazione da +6 a –6. # Per tornare al display normale, premere BAND. Regolazione della sonorità La sonorità compensa le deficienze nelle gamme dei suoni bassi e alti a basso volume.
Sezione 02 Funzionamento dell’unità Impostazione del passo di sintonizzazione FM Normalmente il passo per la sintonizzazione in FM impiegata dalla ricerca di sintonia è 50 kHz. Quando sono attivate le funzioni AF o TA il passo di sintonizzazione cambia automaticamente a 100 kHz. Quando è attivata la funzione AF, è preferibile impostare il passo di sintonizzazione a 50 kHz. ! Il passo di sintonizzazione rimane a 50 kHz durante la sintonizzazione manuale. 1 Premere FUNCTION per selezionare FM.
Sezione Funzionamento dell’unità 02 Impostazione del display multilingue È possibile registrare su un disco contenente file audio compressi informazioni di testo, ad esempio titoli, nomi degli artisti o commenti. Questa unità è in grado di visualizzare le informazioni in una delle lingue europee o in russo. ! Se la lingua incorporata e l’impostazione della lingua selezionata non corrispondono, le informazioni di testo potrebbero non essere visualizzate correttamente.
Appendice Informazioni supplementari Messaggi di errore Quando si contatta il rivenditore o il Centro assistenza Pioneer più vicino, accertarsi di riportare il messaggio di errore. Messaggio Causa Azione ERROR-11, 12, Disco sporco 17, 30 Pulire il disco. ERROR-11, 12, Disco graffiato 17, 30 Sostituire il disco. ERROR-10, 11, Elettrica o mec12, 15, 17, 30, canica A0 Spegnere e accendere il motore oppure passare a una sorgente diversa e poi di nuovo al lettore CD.
Appendice Informazioni supplementari Dual Disc ! I supporti Dual Disc sono dischi con due lati: un CD registrabile per l’audio su un lato e un DVD registrabile per i video sull’altro lato. ! Poiché il lato CD dei Dual Disc non è fisicamente compatibile con gli standard CD generali, potrebbe non essere possibile riprodurre il lato CD con questa unità. ! Il caricamento e l’espulsione frequenti di un Dual Disc, possono provocare la presenza di graffi sul disco.
Appendice Informazioni supplementari Compatibilità audio compressa WMA ! Formato compatibile: WMA codificato con Windows Media Player ! Estensione file: .wma ! Velocità in bit: da 48 kbps a 320 kbps (CBR), da 48 kbps a 384 kbps (VBR) ! Frequenza di campionamento: da 32 kHz a 48 kHz ! Compatibilità Windows Media Audio 9 Professional, Lossless, Voice: no MP3 ! Estensione file: .
Appendice Informazioni supplementari Dati tecnici Generali Alimentazione ........................... 14,4 V di c.c. (variazioni consentite da 10,8 V a 15,1 V) Messa a terra ............................. Negativa Consumo massimo ................ 10,0 A Dimensioni (L × A × P): DIN Unità principale ... 178 mm × 50 mm × 162 mm Pannello anteriore ................................. 188 mm × 58 mm × 15 mm D Unità principale ... 178 mm × 50 mm × 162 mm Pannello anteriore .................................
Inhoud Hartelijk dank voor het aanschaffen van dit PIONEER product. Lees deze handleiding voordat u het product in gebruik neemt. Bewaar deze handleiding na het lezen op een veilige plaats zodat u hem altijd bij de hand hebt voor later.
Hoofdstuk Vóór u begint 01 ! Deponeer dit product niet bij het gewone huishoudelijk afval wanneer u het wilt verwijderen. Er bestaat een speciaal wettelijk voorgeschreven verzamelsysteem voor de juiste behandeling, het opnieuw bruikbaar maken en de recycling van gebruikte elektronische producten. In de lidstaten van de EU en in Zwitserland en Noorwegen kunnen particulieren afgedankte elektronische producten gratis bij de daarvoor bestemde verzamelplaatsen inleveren.
Hoofdstuk 01 Vóór u begint Informatie over MP3 Dit product is uitsluitend bedoeld voor nietcommercieel privégebruik. Het mag niet in een commerciële omgeving worden gebruikt voor realtime-uitzendingen (over land, via satelliet, kabel en/of andere media), voor uitzendingen/streaming via internet, intranet en/of andere netwerken, of in andere elektronische distributiesystemen zoals betaalradio of audioop-aanvraagtoepassingen. Hiervoor is een aparte licentie nodig. Kijk voor meer informatie op http://www.
Hoofdstuk Bediening van het toestel 9 AUX-ingang (3,5 mm stereoplug) Gebruik deze ingang om een extern toestel aan te sluiten. Wat is wat Hoofdtoestel 12 3 dc b 02 4 5 a 6 98 7 1 FUNCTION-toets Druk op deze toets om het functiemenu te openen terwijl u een signaalbron bedient. 2 AUDIO-toets Druk op deze toets om te kiezen uit de diverse toonregelingsfuncties. 3 a/b/c/d-toetsen Druk op deze toetsen om handmatig af te stemmen, vooruit en achteruit te spoelen, en om naar fragmenten te zoeken.
Hoofdstuk 02 Bediening van het toestel ! RDS De programmaservicenaam, PTY-informatie en andere tekstinformatie worden weergegeven. ! Ingebouwde cd-speler De verstreken weergavetijd en andere tekstinformatie worden weergegeven. 2 Voorkeuzenummer-/fragmentnummerindicator Toont het fragmentnummer of het nummer van de voorkeuzezender. ! Als fragmentnummer 100 of hoger is geselecteerd, gaat d links van de fragmentnummerindicator branden.
Hoofdstuk Bediening van het toestel 02 Tuner Op sterke signalen afstemmen Naar de radio luisteren Met de functie Automatisch afstemmen op lokale zenders kunt u het toestel laten afstemmen op zenders waarvan het signaal sterk genoeg is voor een goede ontvangst. 1 Druk op SOURCE om de tuner te selecteren. 2 Druk op BAND en kies een frequentieband. Druk op BAND totdat de gewenste frequentieband (F1, F2 voor FM of MW/LW) op het display verschijnt. 3 Druk kort op c of d om handmatig af te stemmen.
Hoofdstuk 02 Bediening van het toestel Weergave van het RDS-display wijzigen RDS (radiodatasysteem) bevat niet-hoorbare informatie die helpt bij het zoeken naar radiozenders. ! Sommige zenders leveren geen RDS-diensten. ! RDS-functies zoals AF en TA werken alleen wanneer is afgestemd op een RDS-zender. % Druk op DISPLAY.
Hoofdstuk Bediening van het toestel ! Het is mogelijk dat de geluidsweergave tijdelijk wordt onderbroken door een ander programma terwijl de AF-zoekfunctie actief is. ! De AF-functie kan voor elke FM-frequentieband afzonderlijk worden in- of uitgeschakeld. PI-zoeken Als de tuner geen geschikte zender kan vinden of als de ontvangst verslechtert, gaat het toestel automatisch op zoek naar een andere zender van hetzelfde programmatype. Tijdens het zoeken wordt PI SEEK weergegeven en wordt het volume gedempt.
Hoofdstuk 02 Bediening van het toestel Opmerkingen ! Wanneer het verkeersbericht is afgelopen, keert het systeem terug naar de oorspronkelijke signaalbron. ! Als de functie TA is ingeschakeld, wordt er bij automatisch afstemmen of gebruik van de BSM-functie alleen afgestemd op TP-zenders en uitgebreide TP-zenders van een ander netwerk. Ingebouwde speler Een disc afspelen 1 Plaats een cd (cd-rom) in de cd-laadsleuf. Het afspelen begint automatisch. # Plaats de cd met de bedrukte kant naar boven.
Hoofdstuk Bediening van het toestel # Als u een cd afspeelt, wordt de herhaalde weergave automatisch uitgeschakeld wanneer u naar fragmenten zoekt of vooruit- of achteruitspoelt. # Als u gecomprimeerde audio afspeelt en tijdens TRK (fragmenten herhalen) naar fragmenten zoekt of vooruit- of achteruitspoelt, wordt het herhaalbereik gewijzigd in map herhalen. # Als u FLD (map herhalen) hebt geselecteerd, kunt u geen submap van die map afspelen. # Druk op BAND om terug te keren naar het normale display.
Hoofdstuk Bediening van het toestel 02 Elk 10e fragment op de huidige disc of in de huidige map zoeken U kunt bij de zoekmethode kiezen tussen vooruit- en achteruitspoelen en elk 10e fragment zoeken. Als u ROUGH selecteert, kunt u ieder 10e fragment zoeken. 1 Druk op FUNCTION en selecteer FF/REV. # Als u eerder de zoekmethode ROUGH had ingesteld, verschijnt ROUGH op het display. 2 Druk op d en selecteer ROUGH.
Hoofdstuk Bediening van het toestel De equalizer Er zijn zes voorgeprogrammeerde equalizerinstellingen, die u op ieder moment eenvoudig kunt oproepen: DYNAMIC, VOCAL, NATURAL, CUSTOM, FLAT en POWERFUL. ! CUSTOM is een aangepaste equalizercurve die u zelf maakt. ! Als FLAT is geselecteerd, wordt het geluid niet aangevuld of gecorrigeerd. % Druk op EQ om een equalizer te selecteren.
Hoofdstuk 02 Bediening van het toestel Overige functies De begininstellingen aanpassen Uitgaande van de begininstellingen van het systeem kunt u verschillende instellingen aan uw wensen aanpassen. 1 Houd SOURCE ingedrukt tot het toestel uit gaat. 2 Houd SOURCE ingedrukt tot de functienaam op het display verschijnt. 3 Druk op FUNCTION en selecteer een van de begininstellingen.
Hoofdstuk Bediening van het toestel Belangrijk Als de accu van het voertuig wordt losgekoppeld, wordt de energiezuinige modus geannuleerd. U moet de energiezuinige modus opnieuw aanzetten nadat u de accu weer heeft aangesloten. Als de contactschakelaar van het voertuig niet is uitgerust met een ACC-stand (accessoirestand), is het mogelijk dat het toestel de accu als energiebron gebruikt als de energiebesparende modus is uitgeschakeld.
Aanhangsel Aanvullende informatie Foutmeldingen Schrijf een foutmelding altijd nauwkeurig op en houd deze bij de hand als u contact opneemt met uw leverancier of het dichtstbijzijnde Pioneer-servicecentrum. Melding Oorzaak Maak de disc schoon. ERROR-11, 12, Bekraste disc 17, 30 Vervang de disc. ERROR-15 De geplaatste disc bevat geen gegevens Vervang de disc. ERROR-22, 23 Het cd-formaat kan niet worden afgespeeld Vervang de disc.
Aanhangsel Aanvullende informatie ! Condens en vochtvorming kunnen de werking van de speler tijdelijk negatief beïnvloeden. Laat de speler in een warmere omgeving ongeveer een uur op temperatuur komen. Veeg vochtige schijven met een zachte doek schoon. ! Sommige discs kunnen niet worden afgespeeld afhankelijk van het type disc, de indeling ervan, de toepassing waarmee deze is opgenomen, de omgeving waarin deze wordt afgespeeld, de manier waarop deze wordt bewaard, enzovoort.
Aanhangsel Aanvullende informatie Voorbeeld van een boomstructuur : Map : Gecomprimeerd audiobestand 1 2 3 5 6 4 Niveau 1 Niveau 2 Niveau 3 Niveau 4 ! Mapnummers worden door dit toestel toegewezen. Als gebruiker kunt u geen mapnummers toewijzen. ! De mapvolgorde en andere instellingen zijn afhankelijk van de software die voor het coderen en schrijven is gebruikt. ! De mappenstructuur kan uit maximaal acht niveaus bestaan. Voor praktisch gebruik kunt u beter niet meer dan twee niveaus gebruiken.
Aanhangsel Aanvullende informatie Technische gegevens Algemeen Spanningsbron ......................... 14,4 V gelijkstroom (10,8 tot 15,1 V toelaatbaar) Aarding ......................................... Negatief Max. stroomverbruik .............. 10,0 A Afmetingen (B × H × D): DIN Chassis ..................... 178 mm × 50 mm × 162 mm Voorkant ................... 188 mm × 58 mm × 15 mm D Chassis ..................... 178 mm × 50 mm × 162 mm Voorkant ................... 170 mm × 48 mm × 15 mm Gewicht .......
Содержание Благодарим Вас за покупку этого изделия компании PIONEER. Для обеспечения правильности эксплуатации внимательно прочитайте данное руководство перед первым использованием изделия. Держите данное руководство под рукой для обращения к нему в будущем.
Раздел Перед началом эксплуатации 01 система передачи информации) доступна только в регионах, в которых имеются FMстанции, передающие сигналы RDS. ВНИМАНИЕ Если вы желаете утилизировать данное изделие, не выбрасывайте его вместе с обычным бытовым мусором. Существует отдельная система сбора использованных электронных изделий в соответствии с законодательством, которая предполагает соответствующее обращение, возврат и переработку.
Раздел 01 Перед началом эксплуатации Логотип Windows Media™, напечатанный на коробке, указывает на возможность воспроизведения данных в формате WMA. Windows Media и логотип Windows являются товарными знаками или зарегистрированными товарными знаками Microsoft Corporation в Соединенных Штатах и/или других странах. ! Это устройство может неверно воспроизводить некоторые файлы формата WMA в зависимости от приложений, использованных для их записи.
Раздел Перед началом эксплуатации 01 2 Нажмите на правый край передней панели и зафиксируйте ее. # Если прикрепить переднюю панель к основному устройству не удается, попробуйте еще раз. В случае приложения излишнего усилия при прикреплении передней панели она может быть повреждена.
Раздел 02 Управление данным устройством Описание элементов устройства 8 Кнопка DETACH Нажмите, чтобы извлечь переднюю панель из основного устройства. Основное устройство 12 3 4 5 6 9 Вход AUX (стереоразъем 3,5 мм) Для подключения дополнительного устройства. a Кнопки с 1 по 6 Нажмите для выбора предварительной настройки. dc b a 98 7 1 Кнопка FUNCTION Нажмите для вызова меню функций при работе с источником сигнала. 2 Кнопка AUDIO Нажмите, чтобы выбрать различные регулировки качества звука.
Раздел Управление данным устройством 1 Основной сектор дисплея Отображает различную информацию, такую как диапазон, время воспроизведения и другие настройки. ! Тюнер На дисплее отображаются диапазон и частота. ! RDS На дисплее отображается название программы, PTY-информация и текстовая информация. ! Встроенный проигрыватель компактдисков Отображаются текстовая информация и время, прошедшее с начала воспроизведения.
Раздел 02 Управление данным устройством ! Когда голубой/белый провод этого устройства подключен к реле панели управления автомобильной антенной, антенна на автомобиле выдвигается при включении источника сигнала этого устройства. Чтобы втянуть антенну, выключите источник сигнала. Регулировка громкости % Поверните VOLUME, чтобы отрегулировать уровень громкости.
Раздел Управление данным устройством Запоминание частот самых мощных трансляций Функция BSM (запоминание лучших станций) позволяет автоматически сохранять шесть самых мощных радиочастот, назначая их кнопкам предварительной настройки с 1 по 6. Сохранив частоты, можно настроить тюнер на эти частоты одним нажатием кнопки. ! Сохранение радиочастот при помощи функции BSM может заменить радиочастоты, которые Вы сохранили при помощи кнопок с 1 по 6. 1 Нажмите кнопку FUNCTION, чтобы выбрать BSM.
Раздел 02 Управление данным устройством Выбор альтернативных частот Если качество приема низкое, устройство автоматически выполнит поиск другой станции в той же сети. % Нажмите и удерживайте кнопку TA, чтобы включить или выключить функцию AF (поиск альтернативных частот). # Для включения и выключения функции AF можно также использовать меню, отображающееся при нажатии кнопки FUNCTION.
Раздел Управление данным устройством Прием дорожных сводок Функция TA (ожидание дорожных сводок) позволяет автоматически получать дорожные сводки вне зависимости от источника сигнала, который Вы прослушиваете. Функцию ТА можно активировать как для TPстанции (станции, передающей информацию о дорожном движении), так и для TPстанции расширенной сети вещания (станции, передающей информацию со ссылками на TP-станции).
Раздел 02 Управление данным устройством ! При воспроизведении дисков формата CDEXTRA или MIXED-MODE переключение между режимами сжатого аудиофайла и CD-DA осуществляется нажатием кнопки BAND. ! При переключении между режимами сжатого аудиофайла и CD-DA воспроизведение начинается с первой дорожки диска. ! Встроенный проигрыватель компакт-дисков может воспроизводить сжатые аудиофайлы, записанные на компакт-диск CDROM. (Подробную информацию о типах воспроизводимых файлов можно найти в нижеуказанном разделе.
Раздел Управление данным устройством 1 Выберите диапазон повторного воспроизведения. См. Повторное воспроизведение на стр. 124. 2 Нажмите кнопку FUNCTION, чтобы выбрать SCAN. 3 Нажмите a, чтобы включить сканирующее воспроизведение. На дисплее появится надпись SCAN. Будут воспроизводиться первые 10 секунд каждой дорожки. # Если включить сканирующее воспроизведение в режиме FLD, на дисплее появляется надпись FSCN.
Раздел 02 Управление данным устройством Отображение текстовой информации диска % Нажмите DISPLAY.
Раздел Управление данным устройством ! CUSTOM – это регулируемая кривая эквалайзера, которую Вы создаете сами. ! При выборе кривой FLAT звук не подвергается никаким дополнительным преобразованиям или коррекции. % Нажмите кнопку EQ, чтобы выбрать эквалайзер. Нажмите кнопку EQ несколько раз для выбора следующих настроек эквалайзера: DYNAMIC—VOCAL—NATURAL—CUSTOM —FLAT—POWERFUL Регулировка кривых эквалайзера Вы можете отрегулировать текущую выбранную кривую эквалайзера по своему усмотрению.
Раздел 02 Управление данным устройством Другие функции Изменение начальных настроек С помощью начальных настроек можно настроить разнообразные параметры системы для максимально эффективной работы этого устройства. 1 Нажмите и удерживайте кнопку SOURCE, пока устройство не выключится. 2 Нажмите и удерживайте кнопку SOURCE, пока на дисплее не появится название функции. 3 Нажмите кнопку FUNCTION, чтобы выбрать одну из начальных настроек.
Раздел Управление данным устройством Использование дополнительного источника сигнала(AUX) % Вставьте мини-штекер стереокабеля в гнездо входа этого устройства. Выбор AUX в качестве источника сигнала % Нажмите кнопку SOURCE, чтобы выбрать AUX в качестве источника сигнала. Экономия энергии аккумулятора Включение этой функции позволяет снизить потребляемую мощность аккумулятора. ! Если данная функция включена, то доступна только операция выбора источника сигнала.
Приложение Дополнительная информация Сообщения об ошибках Когда Вы обращаетесь к торговому представителю или в ближайший сервисный центр Pioneer, убедитесь, что Вы записали сообщение об ошибке. Сообщение Причина Очистите диск. ERROR-11, 12, Поцарапанный 17, 30 диск Замените диск. ERROR-15 Установленный Замените диск. диск не содержит данных ERROR-22, 23 Замените диск. Компакт-диск данного формата не может быть воспроизведен NO AUDIO Установленный Замените диск.
Приложение Дополнительная информация ! Конденсация может временно ухудшить работу проигрывателя. Оставьте его для адаптации к более высокой температуре примерно на час. Также протрите влажные диски мягкой тканью. ! Воспроизведение дисков может быть невозможно из-за характеристик диска, формата диска, приложения, при помощи которого выполнялась запись, условий воспроизведения, условий хранения и других факторов. ! Текстовая информация может отображаться неправильно в зависимости от условий записи.
Приложение Дополнительная информация Пример иерархии ! Windows Media Audio 9 Professional, Lossless, Voice: не поддерживаются : Папка : Сжатый аудиофайл 1 2 3 5 6 4 ! Это устройство назначает номера папок. Пользователь не может назначать номера папок. ! Последовательность выбора папок и других действий может изменяться в зависимости от кодировки или программного обеспечения, использованного для записи. ! Максимально допустимая иерархия папок составляет восемь уровней.
Приложение Дополнительная информация Технические характеристики Общие Источник питания ................. 14,4 В постоянного тока (допустимый диапазон от 10,8 В до 15,1 В) Система заземления .......... Заземление отрицательного полюса Максимальный потребляемый ток ..................................................... 10,0 А Размеры (Ш × В × Г): DIN Шасси ....................... 178 мм × 50 мм × 162 мм Передняя панель ................................. 188 мм × 58 мм × 15 мм D Шасси .......................
PIONEER CORPORATION 4-1, MEGURO 1-CHOME, MEGURO-KU TOKYO 153-8654, JAPAN Корпорация Пайонир 4-1, Мегуро 1-Чоме, Мегуро-ку, Токио 153-8654, Япония. PIONEER ELECTRONICS (USA) INC. P.O. Box 1540, Long Beach, California 90801-1540, U.S.A. TEL: (800) 421-1404 PIONEER EUROPE NV Haven 1087, Keetberglaan 1, B-9120 Melsele, Belgium TEL: (0) 3/570.05.11 PIONEER ELECTRONICS ASIACENTRE PTE. LTD. 253 Alexandra Road, #04-01, Singapore 159936 TEL: 65-6472-7555 PIONEER ELECTRONICS AUSTRALIA PTY. LTD.