
Operation Manual
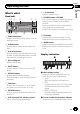


! If a track number 100 or more is selected,
d on the left of the track number indica-
tor will light.
3 AF indicator
Appears when AF (alternative frequencies
search) function is on.
4 TP indicator
Appears when a TP station is tuned in.
5 TA indicator
Appears when TA (traffic announcement
standby) function is on.
6 MP3/WMA indicator
Shows the type of the currently playing disc.
7 RPT indicator
Shows when repeat play is turned on.
8 LOUD indicator
Appears when loudness is on.
9 5 (stereo) indicator
Appears when the selected frequency is
being broadcast in stereo.
a LOC indicator
Appears when local seek tuning is on.
Basic Operations
Power ON/OFF
Turning the unit on
% Press SOURCE to turn the unit on.
Turning the unit off
% Press SOURCE and hold until the unit
turns off.
Selecting a source
You can select a source you want to listen to.
% Press SOURCE to select a source.
Press SOURCE repeatedly to switch between
the following sources.
Tuner—Built-in CD player —AUX
Notes
! In the following cases, the sound source will
not change.
— When there is no disc in the unit.
— When AUX (auxiliary input) is set to off
(refer to page 13).
! AUX is set to on by default. Turn off the AUX
when not in use (refer to Switching the auxili-
ary setting on page 13).
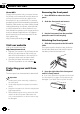
! When this unit’s blue/white lead is connected
to the vehicle’s auto-antenna relay control
terminal, the vehicle’s antenna extends when
this unit’s source is turned on. To retract the
antenna, turn the source off.
Adjusting the volume
% Turn VOLUME to adjust the sound level.
Tuner
Listening to the radio
1 Press SOURCE to select the tuner.
2 Press BAND to select a band.
Press BAND until the desired band (F1, F2 for
FM or MW/LW) is displayed.
3 To perform manual tuning, briefly press
c or d.
4 To perform seek tuning, press and hold
c or d for about one second and release.
The tuner will scan the frequencies until a
broadcast strong enough for good reception is
found.
# You can cancel seek tuning by briefly pressing
c or d.
Operating this unit
En
6
Section
02