DJ MIXER DJM-350 http://www.prodjnet.com/support/ The Pioneer website listed above provides answers to frequently asked questions, information about software, and other up-to-date data of assistance to our customers.
Thank you for buying this Pioneer product. Please read through these operating instructions so you will know how to operate your model properly. After you have finished reading the instructions, put them away in a safe place for future reference. In some countries or regions, the shape of the power plug and power outlet may sometimes differ from that shown in the explanatory drawings. However the method of connecting and operating the unit is the same.
WARNING This equipment is not waterproof. To prevent a fire or shock hazard, do not place any container filled with liquid near this equipment (such as a vase or flower pot) or expose it to dripping, splashing, rain or moisture. D3-4-2-1-3_A1_En WARNING Before plugging in for the first time, read the following section carefully. The voltage of the available power supply differs according to country or region.
We Want You Listening For A Lifetime Selecting fine audio equipment such as the unit you’ve just purchased is only the start of your musical enjoyment. Now it’s time to consider how you can maximize the fun and excitement your equipment offers. This manufacturer and the Electronic Industries Association’s Consumer Electronics Group want you to get the most out of your equipment by playing it at a safe level.
Contents How to read this manual The names of displays, menus, and buttons in this manual are enclosed in brackets. (e.g. [MASTER] channel, [ON/OFF], [File] menu) Before start Features........................................................................................................6 System setup example.................................................................................6 What’s in the box..........................................................................................
Before start Features This unit is a DJ mixer that carries over the technology of the Pioneer DJM series, the world standard in club sound. It is a standard type unit equipped with the basic functions required for mixing, enabling full-fledged DJ play easily. USB recording 3-band equalizer With this unit, the sound of DJ performances can easily be recorded on USB devices (portable flash memory devices, etc.). The recorded sound can also be played on this unit.
Connections Connections Be sure to turn off the power and unplug the power cord from the power outlet whenever making or changing connections. Refer to the operating instructions for the component to be connected. Connect the power cord after all the connections between devices have been completed. Be sure to use the included power cord.
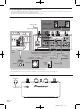
Connecting the input/output terminals ! When creating a DVS (Digital Vinyl System) combining a computer, audio interface, etc., be careful in connecting the audio interface to this unit’s input terminals and in the settings of the input selector switches. Also refer to the operating instructions of the DJ software and audio interface. Rear panel Component, amplifier, powered speaker, etc.
Operations Operations Control panel Flow of audio signals MIC/AUX section USB recording section Mixer section 3 AUX b TRIM TRIM 9 9 0 HI HI USB STOP HI 5 9 9 MID 12 LOW 6 EQ/ ISOLATOR p e f CH-1 CH-2 MIC/AUX ON/OFF 8 h MASTER 9 FADER START JET CH FADER q CRUSH i LEVEL MASTER LEVEL 0 GATE 7 PREVIEW MASTER EFFECT CH-2 CUE g EQ/ ISOLATOR 2 9 HEADPHONES CUE o LEVEL 9 MIXING PREVIEW SEARCH PLAY EQ MASTER LEVEL MIC/AUX ON CH-1 CUE REC 9 LO
m REC k/g n PLAY f Basic operations (mixer section) o TRACK MARK (PREVIEW) b p SEARCH o, p PHONO CD PHONO CD TRIM TRIM c Master effect section 9 9 HI HI MASTER CH-1 CH-2 Effects can be applied to the sound output from [MASTER OUT 1, 2] (page 12). 9 9 MID MID q MASTER EFFECT (GATE, CRUSH, JET, FILTER) d r LEVEL/DEPTH d 9 9 LOW LOW 1 2 LEVEL 9 9 About the power switch of this unit e f CH-1 To turn the power on g Press [u] 1. h Turn on the power of this unit.
— [ ]: Set here for a curve that rises steeply. (When the crossfader moves away from either the left or right edge, the sound is immediately output from the opposite side.) 5 Move the crossfader j. 6 Turn [MASTER LEVEL] 2 clockwise. Sound is output from the speakers. The master level indicator e on the control panel lights. Adjust [MASTER LEVEL] so that the orange indicator lights at the point in the track where the volume is loudest (the climax, etc.).
Monitoring the sound over headphones (headphones section) HEADPHONES CH-1 CUE CH-2 CUE MIXING 7 8 CUE Applying an effect Press one of the [MASTER EFFECT (GATE, CRUSH, JET, FILTER)] q buttons. The effect is applied to the sound. The button that was pressed flashes. The effect differs for the different buttons. For details on the different effects, see the table below. ! When a button that is flashing is pressed again, the effect is turned off.
3 Turn [LEVEL] 4 in the MIC/AUX section clockwise. ! The sound of the microphone or external device is output from the speakers. Previewing is not possible while the track is being recorded or played. Fast-forwarding/reversing recorded tracks Turn [HI] or [LOW] 5 in the MIC/AUX section. During playback, press and hold in [SEARCH o, p] p. Refer to Specifications on page 17 for the range of sound that can be adjusted by each control.
1 Press [u] 1 while pressing [o] and [p] p. This unit switches to the mode for changing the auto standby function’s setting. The topmost point on the master level indicator flashes. The other points on the indicator light according to the currently set time. 2 Press [o] or [p] p. Set the time until the standby mode is set. The set time switches each time the button is pressed. The points on the master level indicator light according to the set time (not including the topmost point).
Additional information Troubleshooting ! Problem Check Remedy The power is not turned on. Is the power cord properly connected? Plug in the power cord to an AC outlet. (page 8) No sound or small sound. Is the [CD, PHONO] (input selector) switch set to the proper position? Switch the [CD, PHONO] (input selector) switch to select the input source for that channel.
About errors If this unit cannot operate normally, the [u] (the power switch), [USB STOP] and [PLAY f] indicators flash to indicate an error. Check the table below and take the measures indicated. If the same error is indicated after the measures have been taken, contact your store of purchase or nearby Pioneer service station. About the [USB STOP] indicator’s error indication If the [USB STOP] indicator flashes repeatedly 2 to 5 times 1 Disconnect the USB device. 2 Press [USB STOP].
About the exemption clauses ! ! ! Pioneer is a registered trademark of Pioneer Corporation. The names of companies and products mentioned herein are the trademarks of their respective owners. When playing music files you have acquired on this unit, we kindly ask you to respect copyrights. Additional information Specifications General Power requirements.............................................................AC 120 V, 60 Hz Power consumption.............................................................
En DRB1502-E 18
Pioneer Electronics(USA) Inc. Limited Warranty PRODUCTS COVERED MODEL PREFIX DJ Compact Disc Player DJ DVD Player Digital Media Player DJ Mixer DJ Effector Video Switcher WARRANTY PERIOD Parts Labor CDJ, CMX .................................................................................... 1 YEAR DVJ .............................................................................................. 1 YEAR DMP .............................................................................................
To register your product, find the nearest authorized service location, to purchase replacement parts, operating instructions, or accessories, please go to one of following URLs : Pour enregistrer votre produit, trouver le service après-vente agréé le plus proche et pour acheter des pièces de rechange, des modes d’emploi ou des accessoires, reportez-vous aux URL suivantes : In the USA/Aux Etats-Unis http://www.pioneerelectronics.com In Canada/Aux Canada http://www.pioneerelectronics.