RDS AV RECEIVER Operation Manual Important (Serial number) The serial number is located on the bottom of this unit. For your own security and convenience, be sure to record this number on the enclosed warranty card.
Contents Important The screen shown in the examples may differ from actual screens, which may be changed without notice for performance and function improvements. ■ Precaution ................................................................................... 4 ■ Parts and controls....................................................................... 9 ■ Basic operation ......................................................................... 11 ■ Bluetooth®................................................
■ Other functions......................................................................... 48 ■ Appendix ...................................................................................
Precaution Important safety information Before using this product, be sure to read and fully understand the following safety information: • Do not operate this product, any applications, or the rear view camera option (if purchased) if doing so will divert your attention in any way from the safe operation of your vehicle. Always observe safe driving rules and follow all existing traffic regulations.
If your vehicle has a compliant backup camera that displays the backup view through the factory receiver, do not use the Pioneer receiver unless it is connected to and displays the same view as the factory backup camera. Connection to the factory backup camera will require an adaptor, sold separately. Not all vehicles may be able to connect. Please check with a qualified professional installer for installation options specific to your vehicle.
• Do not take any steps to tamper with or disable the parking brake interlock system which is in place for your protection. Tampering with or disabling the parking brake interlock system could result in serious injury or death. • To avoid the risk of damage and injury and the potential violation of applicable laws, this product is not for use with a video image that is visible to the driver.
Handling the USB connector CAUTION Failure to operate After-sales service for Pioneer products Please contact the dealer or distributor from which you purchased the product for after-sales service (including warranty conditions) or any other information. In case the necessary information is not available, please contact the companies listed below. Please do not ship your product to the companies at the addresses listed below for repair without making advance contact.
• When using a cellular phone, keep the antenna of the cellular phone away from the LCD screen to prevent disruption of the video in the form of spots, colored stripes, etc. • To protect the LCD screen from damage, be sure to touch the touch panel keys only with your finger and do so gently. Notes on internal memory About this manual • This manual uses diagrams of actual screens to describe operations. However, the screens on some units may not match those shown in this manual depending on the model used.
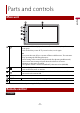
Parts and controls Main unit English Touch to turn off the display information. To turn on the display information, touch again. Touch and hold to power off. To power back on, touch again. * VOL (+/-) RESET LCD screen TIP If you power the unit off, you can turn off almost all functions. The unit turns on by operating the following functions: • An incoming call is received (only for hands-free phoning via Bluetooth). • A rear view camera image is input when the vehicle is in reverse.
English Volume (+/-) MODE SRC TOP MENU MENU Thumb pad MUTE AUDIO SUBTITLE ANGLE BAND/ESC RETURN or or FOLDER/P.CH Not used. Press to cycle through all the available sources. Press and hold to turn the power off. Not used. Not used. Not used. Not used. Press to select the tuner band when tuner is selected as a source. Not used. Press to pause or resume playback or play from the beginning when resume is off. Press to return to the previous track (chapter) or go to the next track (chapter).
Basic operation Resetting the microprocessor 1 2 Turn the ignition switch OFF. Press RESET with a pen tip or other pointed tools. Settings and recorded contents are reset to the factory settings. Preparing the remote control 1770NEX Remove the insulation sheet before use. How to replace the battery Insert the CR2025 (3 V) battery with the plus (+) and minus (-) poles orientated properly.
CAUTION Using the remote control Point the remote control in the direction of the front panel to operate. NOTE The remote control may not function properly in direct sunlight. Important • Do not store the remote control in high temperatures or direct sunlight. • Do not let the remote control fall onto the floor, where it may become jammed under the brake or gas pedal. Using the touch panel You can operate this product by touching the keys on the screen directly with your fingers.
Operating list screens English Touching an item on the list allows you to narrow down the options and proceed to the next operation. Appears when items cannot be displayed on a single page. Drag the side bar, the initial search bar or the list to view any hidden items. Operating the time bar You can change the playback point by dragging the key. The playback time corresponding to the position of the key is displayed while dragging the key.
Top menu screen English Source icons TIP You can display the hidden source icon(s) by swiping left on the screen.
Bluetooth® Bluetooth connection 4 5 Turn on the Bluetooth function on the device. Touch . Touch then [Bluetooth Settings]. The Bluetooth screen appears. Touch [Search]. The unit starts to search for available devices, then displays them in the device list. To search for available devices again, touch . Touch the Bluetooth device name. After the device is successfully registered, a Bluetooth connection is established by the system.
Menu Item Description [Bluetooth Memory Clear] Touch [OK] to clear the Bluetooth memory. [Bluetooth Paired Device List] Display the paired device list. Touch to delete registered device. [Bluetooth Device Info] Displaying the device name of this product. English Hands-free phoning To use this function you need to connect your cellular phone to this product via Bluetooth in advance (page 15). CAUTION For your safety, avoid talking on the phone as much as possible while driving.
Receiving a phone call 1 Touch Touch while getting a call waiting, switch to the talking person. while getting a call waiting to reject the call. Voice recognition function (for iPhone) By connecting your iPhone to this product, you can use the voice recognition function on this product. TIP You can also launch the voice recognition function by touching button. Phone settings 1 2 Touch . Touch then [Bluetooth Settings].
▶Registration and connection • Cellular phone operations vary depending on the type of cellular phone. Refer to the instruction manual that came with your cellular phone for detailed instructions. • When phone book transfer does not work, disconnect your phone and then perform pairing again from your phone to this product. • You may hear a noise in the following situations: – When you answer the phone using the button on the phone. – When the person on the other end of the line hangs up the phone.
• While you are listening to songs on your Bluetooth device, refrain from operating the phone function as much as possible. If you try operating, the signal may cause noise for song playback. • When you are talking on the Bluetooth device connected to this product via Bluetooth, it may pause playback. Touch . Touch [Bluetooth Audio]. The Bluetooth audio playback screen appears. Basic operation Switches between playback and pause. Skips files forward or backward. Performs fast forward or fast reverse.
AV source Supported AV source Selecting a source 1 2 Touch . Touch the source icon. TIP You can display the hidden source icon(s) by swiping left on the screen. - 20 - English You can play or use the following sources with this product. • Radio • USB The following sources can be played back or used by connecting an auxiliary device.
Radio Starting procedure Press English 1 2 . Touch [Radio]. The Radio screen appears. Basic operation 1 XX.XX 6 XX.XX Recalls the preset channel stored to a key from memory. Stores the current broadcast frequency to a key. FM1 BSM Selects the FM1, FM2, FM3, AM1 or AM2 band. Performs BSM (best stations memory) function (page 22). Manual tuning Seek tuning Releasing the key in a few seconds skips to the nearest station from the current frequency.
Local PS Activates/deactivates the local seek mode. Displays a preset channel for 10 seconds and switches to the next channel automatically. The BSM (best stations memory) function automatically stores the six strongest broadcast frequencies under the preset channel keys [1] to [6]. NOTES • Storing broadcast frequencies with BSM may replace those you have already saved. • Previously stored broadcast frequencies may remain stored if the number of frequencies stored has not reached the limit.
Compressed files Plugging/unplugging a USB storage device Plugging a USB storage device 1 2 Pull out the plug from the USB port of the USB cable. Plug a USB storage device into the USB cable. NOTES • This product may not achieve optimum performance with some USB storage devices. • Connection via a USB hub is not possible. • A USB cable is required for connection. USB cable USB storage device Unplugging a USB storage device 1 Pull out the USB storage device from the USB cable.
2 3 Plug the USB storage device into the USB cable (page 23). Touch [USB]. Playback is performed in order of folder numbers. Folders are skipped if they contain no playable files. English Basic operation Audio source Switches between playback and pause. Skips files forward or backward. Performs fast forward or fast reverse. Sets a repeat play range for all files/the current folder/the current file. Plays files or does not play in random order.
Selects a file from the list. Touch a file on the list to playback. Video source CAUTION For safety reasons, video images cannot be viewed while your vehicle is in motion. To view video images, stop in a safe place and apply the parking brake. Switches between playback and pause. Skips files forward or backward. Performs fast forward or fast reverse. Sets a repeat play range for all files/the current folder/the current file. - 25 - English TIPS • Touching a folder on the list shows its contents.
Selects a file from the list. Touch a file on the list to playback. You can adjust [Brightness]/[Contrast]/[Color] by touching [+]/[-]. Still image source Switches between playback and pause. Skips files forward or backward. Rotates the displayed picture 90° clockwise. Sets a repeat play range for all files/the current folder/the current file. - 26 - English TIPS • Touching a folder on the list shows its contents. You can play a file on the list by touching it.
Selects a file from the list. Touch a file on the list to playback. - 27 - English TIPS • Touching a folder on the list shows its contents. You can play a file on the list by touching it. • You can switch the following media file types.
iPhone NOTE iPhone may be referred to as iPod in this manual. When connecting an iPhone to this product, the settings are automatically configured according to the device to be connected. For details of the compatibility, refer to Compatible iPhone models (page 58). 1 2 3 Connect your iPhone. • iPhone via USB Touch . Touch [iPod]. NOTE For USB connection, refer to the Installation Manual. Basic operation Audio source Switches between playback and pause.
Skips files forward or backward. Performs fast forward or fast reverse. Sets a repeat play range for all in the selected list/the current song. English Plays songs within the selected list/album randomly. Selects a song from the list. Touch the category then the title of the list to playback of the selected list. TIP If you use English as the system language, the alphabet search function is available. Touch the initial search bar to use this function.
USB Mirroring NOTES • The supported finger gestures may vary depending on the USB Mirroring compatible application. • To use USB Mirroring, you must first install the USB Mirroring compatible applications on the smartphone. • Be sure to read Using app-based connected content (page 58) before you perform this operation. WARNING Certain uses of the smartphone may not be legal while driving in your jurisdiction, so you must be aware of and obey any such restrictions.
English Displays the main menu of the USB Mirroring source screen. For smartphone (Android™) users System requirement Android 5.0 or higher (up to Android 10) NOTES • [Android Phone MSC] is deactivated to enable use of this function (page 47). • The video playback capability depends on the connected Android device. 1 2 3 4 5 6 Touch . Touch then [Phone Connectivity Settings]. Touch [Mirroring] in the [Priority of Connectivity] setting. Unlock your smartphone and connect it to this product via USB.
Apple CarPlay You can operate iPhone applications with finger gestures such as tapping, dragging, scrolling, or flicking on the screen of this product. NOTE The compatible finger gestures vary depending on the application for the iPhone. WARNING Certain uses of the iPhone may not be legal while driving in your jurisdiction, so you must be aware of and obey any such restrictions. If in doubt as to a particular function, only perform it while the car is parked.
NOTES • For details on USB connection, refer to the Installation Manual. • If an Apple CarPlay compatible device has been connected and another screen is displayed, touch [Apple CarPlay] on the top menu screen to display the Application menu screen. • Hands-free phoning via Bluetooth wireless technology is not available while Apple CarPlay is on.
Android Auto™ You can operate Android applications with finger gestures such as tapping, dragging, scrolling, or flicking on the screen of this product. NOTES • [Android Phone MSC] is deactivated to enable use of this function (page 47). • The compatible finger gestures vary depending on the application for the smartphone. WARNING Certain uses of the smartphone may not be legal while driving in your jurisdiction, so you must be aware of and obey any such restrictions.
TIP You can use voice recognition function by touching button once Android Auto is activated. - 35 - English NOTES • For details on USB connection, refer to the Installation Manual. • When the device for Android Auto is connected to this unit, the device is also connected via Bluetooth at the same time. If five devices are already paired, the message confirming whether to delete the registered device is displayed. If you want to delete the device, touch [Agree].
SiriusXM® Satellite Radio Subscribing to the SiriusXM Satellite Radio service 1 2 3 4 Touch . Touch [SiriusXM]. You should be able to tune in to Channel 1. If you cannot get Channel 1, ensure that your SiriusXM Connect Vehicle Tuner is installed correctly. Switch to Channel 0 and check the Radio ID. The SiriusXM Radio ID can be found by tuning in to Channel 0. You will need this number to activate your subscription. NOTE The SiriusXM Radio ID does not include the letters I, O, S, or F.
Listening to SiriusXM 1 2 Touch . Touch [SiriusXM]. TIP [RADIO ID] is displayed when Channel 0 is selected. Current channel display (Live broadcast mode) Tunes a channel directly. Tune 1 Pre1 6 Pre6 Recalls the preset channel stored to a key from the memory. Stores the current channel to a key. Selects a band. There are 3 bands. You can store 6 channels per band for a total of 18 presets. Performs channel number up/down. Performs fast channel number up/down.
Selects a channel from the list. Scroll through the list of all channels then touch the desired channel to tune to that channel. NOTES • The types of categories available depend on the types of channels available. • It may take time to display the channel list depending on the SiriusXM reception condition. Parental Control The Parental Control feature allows you to limit access to any SiriusXM channels, including those with mature content.
AUX You can display the video image output by the device connected to video input. NOTE A Mini-jack AV cable (sold separately) is required for connection. For details, refer to the Installation Manual. Starting procedure 1 2 Touch then swipe left on the screen. Touch [AUX]. The AUX screen appears. Basic operation - 39 - English CAUTION For safety reasons, video images cannot be viewed while your vehicle is in motion. To view video images, stop in a safe place and apply the parking brake.
Camera You can display the video image output by the device connected to video or camera input. For details, refer to the Installation Manual. Starting procedure 1 2 Touch then swipe left on the screen. Touch [Camera] for connected camera view. The video image is displayed on the screen. - 40 - English CAUTION For safety reasons, video images cannot be viewed while your vehicle is in motion. To view video images, stop in a safe place and apply the parking brake.
Settings You can adjust various settings in the main menu. 1 2 3 Touch . Touch . Touch one of the following categories, then select the options. System Settings (page 41) Display Settings (page 43) Audio & EQ Settings (page 43) Bluetooth Settings (page 15) Camera settings (page 44) Phone Connectivity Settings (page 47) System Settings The menu items vary according to the source. Menu Item Description [Choose Language] Select the system language.
Menu Item Description [Factory Reset] Touch [OK] to restore the settings to the default settings. CAUTION Do not turn off the engine while restoring the settings. [System Information] Displaying and updating the firmware version. CAUTION • The USB storage device for updating must contain only the correct update file. • Never turn this product off, disconnect the USB storage device while the firmware is being updated.
Display Settings The menu items vary according to the source. Description [Lighting Detect] Activate to set the dimmer function on automatically when the head lamps of the vehicle are lit. [Day Illumination] Touch [+]/[-] to adjust the brightness of the display in the day time. [Night Illumination] Touch [+]/[-] to adjust the brightness of the display in the night time. [Illumination] Select an illumination color from the preset list.
Menu Item Description [Cutoff] Select enable or disable rear subwoofer output from this product. [Front HPF] Adjust the speaker output level of the listening position by touching [+]/[-]. [Rear HPF] [Subwoofer LPF] [EQ] [Super Bass] [Powerful] [Natural] [Vocal] [Flat] [Custom] Select or customize the equalizer curve. Select a curve that you want to use as the basis of customizing then touch the frequency that you want to adjust.
▶Rear view camera This product features a function that automatically switches to the full-screen image of the rear view camera installed on your vehicle when the shift lever is in the REVERSE (R) position. Camera View mode also allows you to check what is behind you while driving. ▶Camera for Camera View mode Camera View can be displayed at all times. Note that with this setting, the camera image is not resized to fit, and that a portion of what is seen by the camera is not viewable.
Menu Item Description [Parking Assist Guide Adjust] 1 Adjusting the guidelines by dragging or touching / / on the screen. 2 Touch [OK] to finish the settings. Touch [Reset] to reset the settings. / NOTES • Use painter's tape or similar tape to place markings as shown below before setting up the guidelines. • Adjust the guidelines so that they overlay the tape markings as closely as possible. 30 cm (1 ft) 25 cm (9-7/8 in.) Markings Markings 1.52 m (5 ft) 25 cm (9-7/8 in.) 6.
Phone Connectivity Settings The settings are not available when the USB storage device is connected. Description [Priority of Connectivity] [Android Auto] [Mirroring] Select the function that is prioritized when your smartphone (Android) is connected to the unit. [Android Phone MSC] Set the USB connection mode for your smartphone (Android) to MSC (Mass Storage Class).
Other functions Setting the time and date Touch the current time on the screen. Touch or to set the correct time and date. You can operate the following items: Year, month, date, hour, minute. TIPS • You can change the time display format to [AM], [PM] or [24H]. • You can change the order of the month/date display format: [DD/MM/YY], [MM/DD/YY].
Appendix Troubleshooting Common problems A black screen is displayed, and operation is not possible using the touch panel keys. → Power off mode is on. – Touch any button on this product to release the mode. Problems with the AV screen The screen is covered by a caution message and the video cannot be shown. → The parking brake lead is not connected or the parking brake is not applied. – Connect the parking brake lead correctly, and apply the parking brake. → The parking brake interlock is activated.
– Check the connection and make sure that the violet/white lead of the receiver is connected to the lead whose voltage changes when the shift lever is put in reverse. (Refer to the installation manual.) Problems with the phone screen Dialing is impossible because the touch panel keys for dialing are inactive. → Your phone is out of range for service. – Retry after re-entering the range for service. → The connection between the cellular phone and this product cannot be established.
or the nearest authorized Pioneer service center for assistance. www.siriusxm.ca or call 1-877-4389677. Channel Not Available → The channel that you have requested is not a valid SiriusXM channel. – Visit www.siriusxm.com for more information about the SiriusXM channel lineup. Incorrect Pass Code entered → The pass code is incorrect. – Enter the correct pass code. USB storage device Unsupport usb hub device → The connected USB hub is not supported by this product.
→ Security for the connected USB storage device is enabled. – Follow the USB storage device instructions to disable security. instructions, please reconnect the device. USB Mirroring Autolink can't connect right now. When it's safe to do so, check your Android phone. → The connection is not successfully established. – Stop your vehicle in a safe place and apply the parking brake. Perform the operations according to the following situations.
– Turn off the ignition switch (ACC OFF) and then turn the ignition switch to on (ACC ON) again. – Power the unit off and then power it on again. – Disconnect the (+) battery cable and then connect it again. Detailed information for playable media Compatibility Common notes about the USB storage device • Do not leave the USB storage device in any location with high temperatures.
USB storage device CODEC FORMAT FLAC compatibility SAMPLING FREQUENCY QUANTIZATION BIT RATE USB storage device MP3 compatibility • Ver. 2.x of ID3 tag is prioritized when both Ver. 1.x and Ver. 2.x exist. • This product is not compatible with the following: MP3i (MP3 interactive), mp3 PRO, m3u playlist SAMPLING FREQUENCY TRANSMISSION RATE ID3 TAG 8 kHz to 48 kHz CBR (8 kbps to 320 kbps)/VBR ver.1.0/1.1/2.2/ 2.3/2.
.mpg/.mpeg Compatible video codec Maximum resolution Maximum frame rate .ts MPEG2 720 × 576 30 fps .mp4 MPEG4, H.264 1 920 × 1 080 30 fps .3gp Compatible video codec Maximum resolution Maximum frame rate H.264 1 920 × 1 080 30 fps .mkv Compatible video codec Maximum resolution Maximum frame rate MPEG4, H.264, VC-1 1 920 × 1 080 30 fps .mov Compatible video codec Maximum resolution Maximum frame rate Maximum resolution Maximum frame rate MPEG4, H.264, MPEG2 1 920 × 1 080 30 fps .
SiriusXM® Satellite Radio WMA Windows Media is either a registered trademark or trademark of Microsoft Corporation in the United States and/or other countries. • This product includes technology owned by Microsoft Corporation and cannot be used or distributed without a license from Microsoft Licensing, Inc. FLAC Copyright © 2000-2009 Josh Coalson Copyright © 2011-2013 Xiph.
Android Auto is a trademark of Google LLC. Detailed information regarding connected iPhone devices App Store • Pioneer accepts no responsibility for data lost from an iPhone, even if that data is lost while using this product. Please back up your iPhone data regularly. • Do not leave the iPhone in direct sunlight for extended amounts of time. Extended exposure to direct sunlight can result in iPhone malfunction due to the resulting high temperature.
Siri Works with Siri through the microphone. Compatible iPhone models • iPhone SE (2nd generation) • iPhone 11 Pro Max • iPhone 11 Pro • iPhone 11 • iPhone XR • iPhone XS Max • iPhone XS • iPhone X • iPhone 8 • iPhone 8 Plus • iPhone 7 • iPhone 7 Plus • iPhone SE (1st generation) • iPhone 6s • iPhone 6s Plus • iPhone 6 • iPhone 6 Plus • iPhone 5s Depending on the iPhone models, it may not be compatible with some AV sources.
Notice regarding video viewing Remember that use of this system for commercial or public viewing purposes may constitute an infringement on the author’s rights as protected by the Copyright Law. Using the LCD screen correctly Handling the LCD screen • When the LCD screen is subjected to direct sunlight for a long period of time, it will become very hot, resulting in possible damage to the LCD screen. When not using this product, avoid exposing it to direct sunlight as much as possible.
Nose: 171 mm × 97 mm × 2 mm (6-3/4 in. × 3-7/8 in. × 1/8 in.) Weight: 1.1 kg (2.4 lbs) Maintaining the LCD screen LED (light-emitting diode) backlight A light emitting diode is used inside the display to illuminate the LCD screen. • At low temperatures, using the LED backlight may increase image lag and degrade the image quality because of the characteristics of the LCD screen. Image quality will improve with an increase in temperature.
Speaker level: +10 dB to -24 dB (1 dB/step) Bluetooth Version: Bluetooth 5.0 certified Output power: +4 dBm Max. (Power class 2) Frequency band(s): 2 402.0 MHz to 2 480.0 MHz FM tuner Frequency range: 87.9 MHz to 107.9 MHz Usable sensitivity: 13 dBf (1.
CTA2006 Specifications English Power output: 14 W RMS × 4 Channels (4 Ω and < = 1% THD+N) S/N ratio: 91 dBA (reference: 1 W into 4 Ω) NOTE Specifications and design are subject to possible modifications without notice due to improvements.
© 2021 PIONEER CORPORATION UC