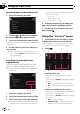
Chapter Using an iPod (iPod) 25 Narrowing down a video with the list 1 and the next character will be taken into account for searching. — “A” or “a” — “AN”, “An”, or “an” — “THE”, “The”, or “the” Touch the category you want. 4 Touch the character key to display the page which includes applicable options. 5 On the video list, touch the video you want to play. 2 Touching or switches the selection to the next or previous page in the list. 3 Touch the item that you want to refine.
Chapter Using an iPod (iPod) 4 5 6 p Depending on the number of files in the iPod, there may be a delay when displaying a list. ! Link Artist — Songs related to the currently playing artist will be played. ! Link Album — Songs related to the currently playing album will be played. ! Link Genre — Songs related to the currently playing genre will be played.
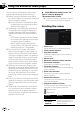
Chapter 26 Using the Bluetooth audio player You can control the Bluetooth audio player featuring Bluetooth wireless technology. p Before using the Bluetooth audio player, you need to register and connect the device to this navigation system. = For more details of the operation, refer to Registering and connecting the Bluetooth device on page 76.
Chapter Using the Bluetooth audio player 2 Track Repeat Media Random Touch . 1 2 All audio files in the current Bluetooth audio player are played in random order. = For more information, refer to Using the “Function” menu on page 132. Using the touch panel keys 1 2 3 1 Display the “Function” menu = For details, refer to Using the “Function” menu on page 132. 2 Connect the Bluetooth audio player Touching [Connection] connects the Bluetooth audio player manually.
Chapter 27 Using the XM tuner You can use the navigation system to control an XM satellite digital tuner, which is sold separately. For details concerning operation, refer to the XM tuner’s operation manuals. This section provides information on XM operations with the navigation system which differs from that described in the XM tuner’s operation manual.
Chapter Using the XM tuner 27 CATEGORY MODE Using the XM tuner You can select a channel from all channels when you operate this function. CATEGORY MODE: You can select a channel within a selected category that you operate this function. 8 Selecting an XM channel directly = For details, refer to Selecting an XM channel directly on this page. 9 Switching to the list display You can select the desired channel from the list display.
Chapter Using the XM tuner 27 Storing and recalling broadcast stations 2 Touch the desired channel that you want to listen to. With a touch of any of the preset tuning keys ([P1] to [P6]), you can easily store up to six broadcast channels for later recall (also with the touch of a key). 1 Select the channel that you want to store in memory. 2 Touch [Preset] to display the preset list. 3 Keep touching a preset tuning key [P1] to [P6]. The selected station has been stored in memory.
Chapter Using the XM tuner 2 Touch and hold [TRAFFIC] for two seconds or more. That “Instant Traffic & Weather” channel will be memorized. p Even if you use the SiriusConnect universal tuner together, only one station can be memorized. The station memorized afterward will overwrite the existing one. Tuning in to the memorized channel % Touch [TRAFFIC]. p You can also perform this operation by touching [TRAFFIC] on the “AV Source” menu.
Chapter Using the XM tuner 27 Setting the memorized songs Selecting the songs to alert The list of song titles memorized for the MyMix Function (MyMix list) is displayed. You can change the notification setting when the song is broadcast again. You can enable or disable notification for each song. 1 Touch [Memo Edit]. 2 Touch the song title that you want to exclude from the notification list. The check mark is removed, and the song title is excluded from the notification list.
Chapter Using the SIRIUS tuner Reading the screen All Ch Mode Shows the SIRIUS channel number that the tuner is tuned to. 5 SIRIUS channel select mode indicator Shows what channel select mode has been selected. You can select a channel from all channels in All Ch Mode, and select a channel from the selected category in Category Mode. = For details, refer to Switch the SIRIUS channel select mode on the next page.
Chapter 28 Using the SIRIUS tuner 2 3 4 5 6 7 8 9 a b c 150 En = For details, refer to Memorizing the song on the next page. Switch the SIRIUS Instant replay mode = For details, refer to Using the “Instant Replay” function on page 152. Recall equalizer curves = For details, refer to Recalling equalizer curves on page 164. Display the “Function” menu = For details, refer to Using the “Function” menu on page 152. Recalling channels from the preset Touch to recall the preset channel.
Chapter Using the SIRIUS tuner 3 Keep touching a preset tuning key [P1] to [P6]. The selected station has been stored in memory. The next time you touch the same preset tuning key [P1] to [P6] the station is recalled from memory. Using “My Mix” function The MyMix function memorizes the song title and artist name of the song currently being received.
Chapter Using the SIRIUS tuner 28 Using the “Instant Replay” function 2 Touch [Func]. The “Instant Replay” function allows you to replay the stored broadcast on the SIRIUS tuner (if the tuner capable for this function). As soon as you tune to a channel, the SIRIUS tuner automatically begins storing the broadcast. It can store approximately up to 44 minutes previous (depending on the selected channel and the memory capacity of connected tuner).
Chapter Using the SIRIUS tuner Changing the alert setting You can enable or disable alerts for all items at the same time. This function is useful when you want to turn alerts off temporarily without changing each memorized song. 1 4 Touch [On/Off]. The team displayed as [ON] is the alert target. p When the selected team is excluded from the alert target, the team is displayed as [OFF]. Up to 12 teams can be selected.
Chapter Using the SIRIUS tuner 28 p The Game Information function is available when [Alert] is [On] in “Game Alert”. 1 Touch [Game Info]. 2 Touch [Prev] or [Next] to view the game score information which is registered. p The game score will be updated automatically. p Touch [Tune To] to switch to the channel that broadcasts the displayed game. p If you have not made any team selections, “Not Set” is displayed.
Chapter Using AV input You can display “video image” output by AV1 Input or AV2 Input to the screen of the navigation system. For details of the connection method, refer to “Installation Manual”. 29 Using the touch panel keys % Touch the screen to display the touch panel keys. CAUTION Using AV1 You can display “video image” output by the equipment connected to “AV1 Input”. 1 Touch [AV1 Input] on the “AV System Settings” menu. 1 Hide the touch panel keys Touching [Hide] hides the touch panel keys.
Chapter 30 Using the external unit (EXT1, EXT2) The term “external unit” refers to future Pioneer devices that are not currently planned for, or to devices that allow control of basic functions although they are not fully controlled by the navigation system. Two external units can be controlled by this navigation system. When two external units are connected, the navigation system allocates them as external unit 1 or external unit 2. For details of the connection method, refer to “Installation Manual”.
Chapter Other functions Selecting the video for “Rear display” You can choose either to show the same image as the front screen or to show the selected source on the “Rear display”. % Touch [Rear View] on the “AV Source” menu. Each touch of [Rear Screen] changes the settings as follows: Operating the picture adjustment CAUTION For safety reasons, you cannot use some of these navigation functions while your vehicle is in motion.
Chapter 31 Other functions p You cannot adjust Color and Temp for the source without a video and navigation map display. p The setting contents can be memorized separately for the following screen and the “Video image”.
Chapter Customizing preferences Options on the “AV System Settings” menu Displaying the “AV System Settings” menu 1 Press the HOME button to display the “Top Menu”. 2 Touch [Settings]. The “Settings Menu” screen appears. 32 % Touch [AV1 Input] on the “AV System Settings” menu. = For details, refer to Displaying the “AV System Settings” menu on this page.
Chapter 32 Customizing preferences % Touch [ANT CTRL] on the “AV System Settings” menu. = For details, refer to Displaying the “AV System Settings” menu on the previous page. Touching [ANT CTRL] switches between [Radio] and [Power]. p Regardless of whether [Radio] or [Power] is selected, turning off the ignition switch will cause the antenna to automatically retract or turn off. Changing the wide screen mode % Touch [Wide Mode] on the “AV System Settings” menu.
Chapter Customizing preferences Switching the muting/ attenuation timing You can mute the AV source volume or attenuate the output signal. This setting is invalid for the mute signal has been received from the MUTE lead connected to the navigation unit. (Even if this setting is [Off], the navigation system will mute or attenuate the audio source volume when the signal is output via MUTE lead.
Chapter 32 Customizing preferences Unless [VR Catalog Mode] is turned off, this navigation system tries to acquire the information needed to operate iPod with voice commands. It may take a short period of time to transfer the information. Change the setting according to your usage.
Chapter Customizing preferences The “AV Sound Settings” menu options Displaying the “AV Sound Settings” menu 1 Press the HOME button to display the “Top Menu”. 2 Touch [Settings]. The “Settings Menu” screen appears. p You cannot make adjustments in the following situations: — AV source is [Off] — During muting/attenuation p You cannot select [SLA] when the FM tuner is selected as the AV source. 1 Touch [FAD/BAL] on the “AV Sound Settings” menu.
Chapter 32 Customizing preferences = For details, refer to Displaying the “AV Sound Settings” menu on the previous page. Using the equalizer The equalizer lets you adjust equalization to match vehicle interior acoustic characteristics as desired. 2 Recalling equalizer curves New translation required. There are seven stored equalizer curves that you can easily recall at any time. Here is a list of the equalizer curves: New translation required. New translation required.
Chapter Customizing preferences — AM and FM — EXT1 and EXT2 — AV1 and AV2 — SD and USB ! The different source volume level can be set between iPod and USB. ! When [Flat] is selected, no supplement or correction is made to the sound. This is useful to check the effect of the equalizer curves by switching alternatively between [Flat] and a set equalizer curve. 1 Touch [EQ] on the “AV Sound Settings” menu.
Chapter 32 Customizing preferences Using the high pass filter Enhancing bass (Bass Booster) When you do not want low sounds from the subwoofer output frequency range to play from the front or rear speakers, activate HPF (high pass filter). Only frequencies higher than those in the selected range are output from the front or rear speakers. The “Bass Booster” enhances bass sounds, which can be muted by driving noise. 1 Touch [HPF] on the “AV Sound Settings” menu.
Chapter Customizing preferences 32 Adjusting a position effect You can select a listener position that you want to make as the center of sound effects. 1 Touch [Staging] on the “AV Sound Settings” menu. 2 Touch [Position]. 3 Touch desired position.
Chapter 33 Operating Your Navigation System with Voice To Ensure Safe Driving CAUTION For your safety, avoid viewing the screen in the voice operation as much as possible while driving. If you use voice operation, select [English] in [Program language] of “Language”. If you select other languages, voice operation will not be available. Basics of Voice Operation Your Pioneer navigation system uses the latest in voice recognition technology. You can use voice commands to operate many of its functions.
Chapter Operating Your Navigation System with Voice 33 Starting voice operation How to use the voice operation % Press the VOICE when the map screen or the AV operation screen is displayed. The voice operation screen appears. Searching for a location by address In this example, you want to search for a location by address and set it as your destination. 1 Press the MODE button to display the map screen or the AV operation screen. 1 3 Say “I need directions”. New translation required.
Chapter Operating Your Navigation System with Voice 33 4 Say “Point of interest”. A message to prompt the next operation is given. 5 New translation required. p When the list of candidates with number appears, say the number that you want to select. When you select the entry next to “1”, say “Number One”. p New translation required. Calling the entry on “Contacts” A method for dialing the entry named “Nancy” is described here along with an operational example.
Chapter Operating Your Navigation System with Voice 33 Available Basic Voice Commands The navigation system can also recognize the words in the following list. Basic commands Voice commands and operations Back d Returns the previous screen. Cancel d Cancels the voice operation. Help d Outputs the brief operating instruction by voice. Next page, Previous page d Switch the page. Last page, First page d Switch to the last or first page.
Chapter 33 Operating Your Navigation System with Voice Show albums d Displays the album list together with sub-screen to continue the voice operation. d Say the desired voice commands. Show the album d Displays the song list of the selected album together with sub-screen to continue the voice operation. d Say the desired voice commands. Show playlists d Displays the playlist together with sub-screen to continue the voice operation. d Say the desired voice commands.
Chapter Operating Your Navigation System with Voice 33 Voice commands related to hands-free phoning p You can make a phone call by voice dialing if the cellular phone featuring Bluetooth wireless technology is being paired with the navigation system. p For shown on the following chart, say the name of the entry stored in “Contacts”. p For shown on the following chart, say the desired phone number.
Chapter 33 Operating Your Navigation System with Voice Tips for Voice Operation For your voice commands to be correctly recognized and interpreted, ensure that conditions are suitable for recognition. Close the vehicle windows Please note that wind through the vehicle window or miscellaneous noise from outside the vehicle can interfere with voice operation. Position the microphone carefully For optimum pick-up, the microphone should be fixed at a suitable distance directly in front of the driver.
Chapter Other functions 34 Setting the anti-theft function You can set a password for the navigation system. If the back-up lead is cut after the password is set, the navigation system prompts for the password at the time of next boot up. 8 Touch [OK]. Password protection is applied. p If you want to change the password currently set, enter the current password and then enter the new one. Entering the password Setting the password 1 Press the MENU button to display the “Top Menu”. 2 Touch [Settings].
Chapter Other functions 34 Forgotten passwords Contact the nearest authorized Pioneer Service Station. Restoring the default setting Resets various settings registered to the navigation system and restores them to the default or factory settings. p Some data remains. Read Returning the navigation system to the initial state before you operate this function. 1 Display the “Destination Menu” screen. 2 Touch [Settings]. The “Settings Menu” screen appears. 3 Touch [Restore Factory Settings].
Appendix Appendix Troubleshooting If you have problems operating your navigation system, refer to this section. The most common problems are listed below, along with likely causes and solutions. While this list is not comprehensive, it should answer your most common problems. If a solution to your problem cannot be found here, contact your dealer or the nearest authorized Pioneer service facility. Problems with the navigation screen Symptom Cause The power doesn’t turn on.
Appendix Appendix The navigation system may not be You cannot position your vehicle mounted securely in your vehicle. on the map without a significant positioning error. The navigation system is installed with an extreme angle exceeding the installation angle limitations. Check that the navigation system is securely mounted and, if necessary, consult the dealer that installed the system. Confirm the installation angle. (The navigation system must be installed within the allowed installation angle.
Appendix Appendix Nothing is displayed and the touch panel keys cannot be used. The setting for the rear view camera Select the appropriate setting for the rear is incorrect. view camera. The shift lever was placed in [R] when the rear view camera was not connected. Select the correct polarity setting for [Back Camera]. (Page 98) There is no response when the touch panel key are touched, or a different key responds. The touch panel keys deviate from Perform touch panel calibration.
Appendix Appendix The reading of data is impossible The picture stops (pauses) and during disc playback. the navigation system cannot be operated. After touching g once, start playback once more. The picture is stretched, with in- The aspect setting is incorrect for correct aspect ratio. the display. Select the appropriate setting for that image. (Page 160, Page 126) A parental lock message is displayed and DVD playback is not possible. Parental lock is on. Turn parental lock off or change the level.
Appendix Appendix Messages and how to react to them The following messages may be displayed by your navigation system. Refer to the table below to identify the problem, then take the suggested corrective action. There are occasions when you may see error messages other than those shown here. In such a case, follow the instructions given on the display.
Appendix Appendix Messages for audio functions When problems occur with AV source playback, an error message appears on the display. Refer to the table below to identify the problem, then take the suggested corrective action. If the error persists, record the error message and contact your dealer or your nearest Pioneer service center. The messages in “( )” will appear on the “Rear display”.
Appendix Appendix Positioning technology Positioning by GPS The Global Positioning System (GPS) uses a network of satellites orbiting the Earth. Each of the satellites, which orbit at a height of 21 000 km, continually broadcasts radio signals giving time and position information. This ensures that signals from at least three can be picked up from any open area on the earth’s surface. The accuracy of the GPS information depends on how good the reception is.
Appendix Appendix Map matching As mentioned, the positioning systems used by this navigation system are susceptible to certain errors. Their calculations may, on occasion, place you in a location on the map where no road exists. In this situation, the processing system understands that vehicles travel only on roads, and can correct your position by adjusting it to a nearby road. This is called map matching.
Appendix Appendix Conditions likely to cause noticeable positioning errors For various reasons, such as the state of the road you are traveling on and the reception status of the GPS signal, the actual position of your vehicle may differ from the position displayed on the map screen. ! If you make a shallow turn. ! If you drive in zigzags. ! If the road has a series of hairpin bends. ! If there is a parallel road. ! If there is a loop or similar road configuration.
Appendix Appendix ! If you are on a steep mountain road with many height changes. ! If trees or other obstacles block the GPS signals for a considerable period. ! If you enter or exit a multi-storey parking lot or similar structure using a spiral ramp. ! If you drive very slowly, or in a start-andstop manner, as in a traffic congestion. ! If your vehicle is turned on a turntable or similar structure. ! If you join the road after driving around a large parking lot.
Appendix Appendix CAUTION When a route is calculated, the route and voice guidance for the route are automatically set. Also, for day or time traffic regulations, only information about traffic regulations applicable at the time when the route was calculated is shown. One-way streets and street closures may not be taken into consideration. For example, if a street is open during the morning only, but you arrive later, it would be against the traffic regulations so you cannot drive along the set route.
Appendix Appendix Built-in drive and care ! Use only conventional, fully circular discs. Do not use shaped discs. ! Do not use cracked, chipped, warped, or otherwise damaged discs as they may damage the built-in drive. ! Do not touch the recorded surface of the discs. ! Store discs in their cases when not in use. ! Avoid leaving discs in excessively hot environments including under direct sunlight. ! Do not attach labels, write on or apply chemicals to the surface of the discs.
Appendix Appendix Playing DualDisc Dolby Digital AVIC-Z110BT will down-mix Dolby Digital signals internally and the sound will be output in stereo. (Equipped with optical output for future extension.) p Manufactured under license from Dolby Laboratories. “Dolby” and the double-D symbol are trademarks of Dolby Laboratories. DTS sound DTS audio cannot be output, so select an audio setting other than DTS. “DTS” is registered trademarks of DTS, Inc.
Appendix Appendix CD-R/CD-RW discs ! Unfinalized discs cannot be played back. ! It may not be possible to play back CD-R/ CD-RW discs recorded on a music CD recorder or a personal computer because of disc characteristics, scratches or dirt on the disc, or dirt, scratches or condensation on the lens of the built-in drive. ! Playback of discs recorded on a personal computer may not be possible, depending on the recording device, writing software, their settings, and other environmental factors.
Appendix Appendix Handling guidelines and supplemental information ! This system is not compatible with Multi Media Card (MMC). ! Copyright protected files cannot be played back. Notes specific to DivX files Appendix ! Only DivX files downloaded from DivX partner sites are guarantee for proper operation. Unauthorized DivX files may not operate properly. ! DRM rental files cannot be operated until playing back is started.
Appendix Appendix Media compatibility chart General Media CD-R/-RW DVD-R/-RW/-R DL USB storage device File system ISO9660 level 1, ISO9660 level 2, Romeo and Joliet ISO9660 level 1, ISO9660 level 2, Romeo, Joliet and UDF 1.02 FAT16/FAT32 Maximum number of folders 255 Maximum number of files 999 Playable file types MP3, WMA, AAC, WAV, AVI, WMV, MPEG-4 SD memory card 500 3 500 15 000 MP3 compatibility Media CD-R/-RW File extension .
Appendix Appendix WMA compatibility DVD-R/-RW/-R DL Media CD-R/-RW File extension .wma Bit rate 5 kbps to 320 kbps (CBR), VBR Sampling frequency 8 kHz to 48 kHz USB storage device SD memory card USB storage device SD memory card Note: ! The navigation system is not compatible with the following: Windows Media Audio 9 Professional, Lossless, Voice WAV compatibility DVD-R/-RW/-R DL CD-R/-RW File extension .
Appendix Appendix AAC compatibility DVD-R/-RW/-R DL Media CD-R/-RW File extension .m4a Bit rate 8 kbps to 320 kbps (CBR), VBR Sampling frequency 8 kHz to 44.1 kHz USB storage device SD memory card USB storage device SD memory card Notes: ! The navigation system plays back AAC files encoded by iTunes. DivX compatibility DVD-R/-RW/-R DL Media CD-R/-RW File extension .avi/.divx Profile (DivX version) Home Theater Ver. 3.11/Ver. 4.x/Ver. 5.x/ Ver. 6.
Appendix Appendix Video files compatibility (USB, SD) File extension .avi .mp4 .m4v .wmv Format MPEG-4 MPEG-4 H.264 MPEG-4 WMV Compatible video codec MPEG-4 MPEG-4 H.
Appendix Appendix Example of a hierarchy The following figure is an example of the tier structure in the disc. The numbers in the figure indicate the order in which folder numbers are assigned and the order to be played back. : Folder : File 1 second. Bluetooth was launched by a special interest group (SIG) comprising Ericsson Inc., Intel Corp., Nokia Corp., Toshiba and IBM in 1998, and it is currently developed by nearly 2 000 companies worldwide.
Appendix Appendix Windows Media and the Windows logo are trademarks or registered trademarks of Microsoft Corporation in the United States and/or other countries. DivX AAC AAC is short for Advanced Audio Coding and refers to an audio compression technology standard used with MPEG-2 and MPEG-4. Several applications can be used to encode AAC files, but file formats and extensions differ depending on the application which is used to encode. This unit plays back AAC files encoded by iTunes version 7.7.
Appendix Appendix iPhone Touch panel functions. The LCD screen can scratch easily. Liquid crystal display (LCD) screen “Works with iPhone” means that an electronic accessory has been designed to connect specifically to iPhone and has been certified by the developer to meet Apple performance standards. Apple is not responsible for the operation of this device or its compliance with safety and regulatory standards. iPhone is a trademark of Apple Inc. iTunes iTunes is a trademark of Apple Inc.
Appendix Appendix ! If the LED backlight reaches the end of its product lifetime, the screen will become dimmer and the image will no longer be visible. In that case, please consult your dealer or the nearest authorized PIONEER Service Station.
Appendix Appendix Display information “Phone Menu” screen Destination Menu Page [Address Search] [Dial Pad] [Return Home] [Call Home] [POI] [Contacts] [Gas Station] [Contacts Transfer] [ATM] [Received Calls] [Coffee] [Dialled Calls] [Hotel] [Missed Calls] [Spell Name] [GOOG-411] [Near Me] [Near Destination] [Around City] [AVIC FEEDS] [Address Book] [History] [Cancel Route] [MSN Direct] [Coordinates] [Route Overview] 200 Page En
Appendix Appendix Settings Menu System Settings menu Page Page [Regional Settings] [Navi Settings] [Program language], [Voice language] [System Settings] [AV Settings] [Time] [AV Sound] [km / mile] [Map Settings] [Speed] [Bluetooth Settings] [Volume] [Setting Rplctr] Appendix [Splash Screen] [Back Camera] Navi Settings [Screen Calibration] [Illumi Color] [Service Information] [Restore Factory Settings] Page [Connection Status] [3D Calibration Status] [Gas Mileage] [Drive Log Settings] [D
Appendix Appendix Map Settings menu AV System Settings menu Page [Displayed Info] [AV2 Input] [City Map] [ANT CTRL] [City Map Barrier] [Wide Mode] [Show Traffic Incident] [Rear SP] [Bluetooth Connected] [Mute] [Current Street Name] [Mute Level] [Address Book Icon] [Guidance/Tel SP] [3D Landmark] [VR Catalog Menu] [Show Manuever] [DivX VOD] [MSN Direct] [Overlay POI] [View Mode] [Day/Night Display] [AV Guide Mode] [Road Color] En [AV1 Input] [Close Up View] [Quick Access Selection]
Appendix Appendix AV Sound Settings menu Bluetooth Settings Page Page [FAD/BAL] ([Balance]) [Connection] [EQ] [Registration] [Loudness] [Device Name] [Sub Woofer] [Password] [Bluetooth On/Off] [SLA] [Echo Cancel] [Bass Booster] [Auto Answer Preference] [Staging] [Refuse All Calls] Appendix [HPF] [Clear Memory] [Firmware Update] En 203
Appendix Appendix Glossary AAC AAC is short for Advanced Audio Coding and refers to an audio compression technology standard used with MPEG-2 and MPEG-4. Aspect ratio This is the width-to-height ratio of a TV screen. A regular display has an aspect ratio of 4:3. Wide screen displays have an aspect ratio of 16:9, providing a bigger picture for exceptional presence and atmosphere. Bit rate This expresses data volume per second, or bps units (bits per second).
Appendix Appendix ID3 tag This is a method of embedding track-related information in an MP3 file. This embedded information can include the track title, the artist’s name, the album title, the music genre, the year of production, comments and other data. The contents can be freely edited using software with ID3 Tag editing functions. Although the tags are restricted by the number of characters, the information can be viewed when the track is played back.
Appendix Appendix Packet write This is a general term for a method of writing individual files to a CD-R, etc. whenever required, just as is done with files on floppy or hard disks. Parental lock Some DVD-Video discs with violent or adult-oriented scenes feature parental lock which prevents children from viewing such scenes. With this kind of disc, if you set the unit’s parental lock level, playback of scenes inappropriate for children will be disabled, or these scenes will be skipped.
Appendix Appendix Specifications CEA2006 Specifications Power output ............................. 14 W RMS × 4 Channels (4 W and ≦ 1 % THD+N) S/N ratio ....................................... 91 dBA (reference: 1 W into 4 W) Note Specifications and design are subject to possible modifications without notice due to improvements.
PIONEER CORPORATION 4-1, MEGURO 1-CHOME, MEGURO-KU TOKYO 153-8654, JAPAN PIONEER ELECTRONICS (USA) INC. P.O. Box 1540, Long Beach, California 90801-1540, U.S.A. TEL: (800) 421-1404 PIONEER EUROPE NV Haven 1087, Keetberglaan 1, B-9120 Melsele, Belgium/Belgique TEL: (0) 3/570.05.11 PIONEER ELECTRONICS ASIACENTRE PTE. LTD. 253 Alexandra Road, #04-01, Singapore 159936 TEL: 65-6472-7555 PIONEER ELECTRONICS AUSTRALIA PTY. LTD.