Plasma Display Écran à plasma Plasma-Display Display a Plasma Plasmascherm Pantalla de plasma PDP-50MXE20 PDP-50MXE20-S PDP-60MXE20 Start up Guide Guide de démarrage Startleitfaden Guida iniziale Startgids Guía resumida
English This unit has been designed for use as a computer display monitor. The optional video card is required if you wish to view other video signals on the monitor. For details consult your local retail dealer. Français Cet appareil est conçu pour une utilisation comme moniteur d’affichage d’ordinateur. La carte vidéo optionnelle est nécessaire si vous souhaitez regarder d’autres signaux sur ce moniteur. Pour plus de renseignements, consultez votre revendeur.
English Start up Guide Thank you very much for purchasing this PIONEER product. Before using your Plasma Display, please read the “Safety Precautions” and these “Start up Guide” carefully so you will know how to operate the Plasma Display properly. Keep this manual in a safe place. You will find it useful in the future. Notes on Installation Work: This product is marketed assuming that it is installed by qualified personnel with enough skill and competence.
English Safety Precautions IMPORTANT CAUTION RISK OF ELECTRIC SHOCK DO NOT OPEN The lightning flash with arrowhead symbol, within an equilateral triangle, is intended to alert the user to the presence of uninsulated "dangerous voltage" within the product's enclosure that may be of sufficient magnitude to constitute a risk of electric shock to persons. CAUTION: TO PREVENT THE RISK OF ELECTRIC SHOCK, DO NOT REMOVE COVER (OR BACK). NO USER-SERVICEABLE PARTS INSIDE.
Safety Precautions ................................... i Features ................................................... 2 Before Proceeding ................................... 3 Checking supplied accessories .......................... 3 Setting the Onscreen Display Language (Computer Signal) ............... 13 Setting the Onscreen Display Language (Video Signal) ...................... 14 Part Names and Functions ..................... 4 Additional Information ......................... 15 Main unit ........
English Features ¶ Introduces newly developed Wide Plasma Panel The new wide high-precision plasma panel (1365x768 / 16:9) pushes the envelope of previous high-luminance panels, producing brighter, clearer images with higher contrast. ¶ ES Slot interface for enhanced potential The display is provided with a built-in ES Slot Interface to allow the installation of cards for the connection of external devices, thus enhancing its expansion potential.
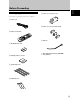
Checking supplied accessories English Before Proceeding 7 Ferrite core (for power cord) Check that the following accessories were supplied.
English Part Names and Functions Main unit 4 (PDP-50MXE20/PDP-50MXE20-S) 4 (PDP-60MXE20) Main unit PDP-50MXE20/ PDP-50MXE20-S 1 STANDBY ON Operation panel on the main unit STANDBY/ON MENU DISPLAY / SET 5 6 7 INPUT SCREEN SIZE 8 9 – VOL + 2 3 0 PDP-60MXE20 31 Main unit Operation panel on the main unit 1 Remote control sensor 5 STANDBY/ON button ( Point the remote control toward the remote sensor to operate the unit.
English Part Names and Functions 1 SCREEN SIZE button Remote control unit Press to select the screen size. 2 INPUT buttons Press to select the input. 3 MENU button 1 0 - 2 = Press to open and close the on-screen menu. 4 ADJUST (5/∞/3/2) buttons Use to navigate menu screens and to adjust various settings on the unit. 5 SET button Press to adjust or enter various settings on the unit. 3 ~ 4 ! 6 SUB INPUT button During multi-screen display, use this button to change inputs to subscreens.
English Part Names and Functions Operating range of the remote control unit When operating the remote control unit, point it at the remote sensor located on the front panel of the main unit. The remote control unit is operable up to 7 m from the unit and within a 30 angle on each side of the sensor. Inserting the batteries in the remote control unit While pressing down lightly, slide in the direction of the arrow. Two AA (R6) batteries Designated batteries Please use size AA (R6) or AA (LR6).
English Part Names and Functions Connection panel (PDP-50MXE20/PDP-50MXE20-S) The connection panel is provided with two video input terminals and one video output terminal. Audio input/ output and speaker output terminals are also provided. - IN = OUT OUTPUT INPUT1 INPUT2 COMBINATION 1 2 3 1 SPEAKER (R) terminal 2 3 4 5 For connection of an external right speaker. Connect a speaker that has an impedance of 6 Ω. SPEAKER (L) terminal For connection of an external left speaker.
English Part Names and Functions Connection panel (PDP-60MXE20) The connection panel is provided with two video input terminals and one video output terminal. Audio input/ output and speaker output terminals are also provided. - IN = OUT OUTPUT INPUT1 INPUT2 1 2 AUDIO RS-232C COMBINATION 3 4 1 COMBINATION IN/OUT 2 3 4 5 Never connect any component to these connectors without first consulting your Pioneer installation technician.
Installation of the unit Installation using the optional PIONEER stand or other mounting brackets ÷ Please be sure to request installation or mounting of this unit by an installation specialist or the dealer where purchased. CAUTION ÷ Handles should not be removed or reattached by anyone other than the professional installation technician or service personnel. ÷ When moving the display, it should always be carried by two persons holding the rear handles in the manner shown.
English Installation and Connections Air vents (fan) b hole* a hole b hole* a hole Attaching surface Installation bracket, etc.
Note Power cord connection Connect the power cord after all component connections have been completed. Regarding the audio cable, attach the supplied ferrite core. Wind the audio cable (not supplied) around the ferrite core once, and then fasten the catch. If you do not do this, this monitor will not conform to mandatory CE or C-Tick standards. Audio cable (not supplied) AC IN Ferrite core 2 1 Connect the power cord to this unit. 2 Plug the power cord into a power outlet.
English Installation and Connections How to route cables Speed clamps are included with this unit for bunching cables together. Once components are connected, follow the following steps to route cables. * As viewed from the rear of the display. 1 1 2 Organize cables together using the provided speed clamps. Insert 1 into an appropriate hole on the rear of the unit, then snap 2 into the back of 1 to fix the clamp. Speed clamps are designed to be difficult to undo once in place. Please attach carefully.
The onscreen display language has been set to English as the factory default. To change to another language, the screen setting must be changed. Follow the procedures below to change the setting. 4 Use the 2/3 buttons to select [OPTION]. MENU INPUT1 PICTURE SCREEN LANGUAGE E N E R G Y S AV E TIMER SETTING S C R E E N M G T.
English Setting the Onscreen Display Language (Video Signal) The onscreen display language has been set to English as the factory default. To change to another language, the screen setting must be changed. Follow the procedures below to change the setting. 4 Use the 2/3 buttons to select [OPTION]. MENU INPUT1 PICTURE SCREEN LANGUAGE E N E R G Y S AV E TIMER SETTING S C R E E N M G T.
Cleaning Regular cleaning will extend the life and performance of this unit. The recommended way to clean the display and related parts is described below. Before cleaning, be sure to unplug the power cord from the power outlet. Cleaning the vents As a general rule, use a vacuum cleaner about once a month to clean the vents on the rear panel of the display of dust buildup (set the vacuum cleaner to its weakest setting when doing this).
English Additional Information Troubleshooting What may at first seem to be an malfunction, may be remedied with a quick check. Please check to see if a warning is displayed on the screen. If displayed, refer to the table below and check the mode. If there is no display check to see if the problem is listed on page 17. The problem may also be caused by something other than this unit so please also check the other components being used such as a video deck.
English Additional Information General problems Problem • No power. • Unit cannot be operated. • Remote control does not operate. • Picture is cut off. • Strange color, light color, or dark, or color misalignment. • Power is suddenly turned off. • No picture. Possible Solution • Is the power cord disconnected? • Has the MAIN POWER switch been switched on? • External influences such as lightning, static electricity, etc., may cause improper operation.
English Additional Information Precautions regarding use Panel sticking and after-image lag • Displaying the same images such as still images for a long time may cause after-image lagging. This may occur in the following two cases. 1. After-image lagging due to remaining electrical load When image patterns with very high peak luminance are displayed for more than 1 minute, after-image lagging may occur due to the remaining electric load.
Specifications General (PDP-50MXE20/PDP-50MXE20-S) Light emission panel ................ 50V type AC Plasma Panel 110.36 cm (W) x 62.09 cm (H) x 126.63 cm (diagonal) Number of pixels .............................................. 1365 x 768 Power supply ................... AC 100 V to 240 V, 50 Hz/60 Hz Rated current ............................................... 3.7 A to 1.5 A Standby power consumption ................................... 0.6 W External dimensions ...............................
20 En English
Français Guide de démarrage Nous vous remercions vivement d’avoir fait l’acquisition de ce produit PIONEER. Avant d’utiliser votre écran à plasma, veuillez lire attentivement les “Précautions de Sécurité” ainsi que le présent “Guide de démarrage” de manière à utiliser l’écran à plasma correctement. Conservez ce manuel dans un endroit sûr. Il vous sera sûrement utile dans les mois ou les années qui suivent.
Précautions de Sécurité Français IMPORTANT ATTENTION DANGER D´ELECTROCUTION NE PAS OUVRIR Ce symbole de l’éclair, placé dans un triangle équilatéral, a pour but d’attirer l’attention de l’utilisateur sur la présence, à l’intérieur du coffret de l’appareil, de “tensions dangereuses” non isolées d’une grandeur suffisante pour représenter un risque d’électrocution pour les êtres humains. ATTENTION: POUR ÉVITER TOUT RISQUE D’ÉLECTROCUTION, NE PAS ENLEVER LE COUVERCLE (NI LE PANNEAU ARRIÈRE).
Table des matières Particularités ............................................ 2 Avant de commencer .............................. 3 Vérification des accessoires fournis .................. 3 Réglage de la langue d’affichage sur écran (Signal d’ordinateur) .................. 13 Réglage de la langue d’affichage sur écran (Signal vidéo) .............................. 14 Les différents organes et leurs rôles ..... 4 Informations complémentaires ........... 15 Appareil .......................................
Particularités Français ¶ Découvrez le large panneau à plasma de conception nouvelle Produisant des images plus claires et nettes dont le contraste est élevé, le nouvel écran à plasma large et de haute précision (1365x768 / 16:9) surpasse les écrans antérieurs à haute luminance.
Avant de commencer 7 Noyau en ferrite (pour cordon d’alimentation) Français Vérification des accessoires fournis Assurez-vous que les accessoires suivants font partie de la fourniture.
Les différents organes et leurs rôles Appareil 4 (PDP-50MXE20/PDP-50MXE20-S) Français 4 (PDP-60MXE20) Appareil PDP-50MXE20/ PDP-50MXE20-S 1 STANDBY ON Panneau de commande de l’écran à plasma STANDBY/ON MENU DISPLAY / SET 5 6 7 INPUT SCREEN SIZE 8 9 – VOL + 2 3 0 PDP-60MXE20 31 Appareil Panneau de commande de l’écran à plasma 1 Capteur de télécommande 5 Touche Dirigez le faisceau de télécommande vers ce capteur.
Les différents organes et leurs rôles 1 Touche SCREEN SIZE Télécommande Français Appuyez sur cette touche pour choisir le format de l’image. 2 Touches INPUT Appuyez ces touches pour choisir le signal d’entrée. 3 Touche MENU 1 0 - 2 = Appuyez sur cette touche pour ouvrir ou fermer les menus s’affichant sur l’écran. 4 Touches ADJUST (5/∞/3/2) Utilisez ces touches pour naviguer dans les menus et choisir des valeurs de réglage.
Les différents organes et leurs rôles Français Portée de fonctionnement de la télécommande Pour utiliser la télécommande, dirigez-la vers le capteur situé sur la face avant de l’écran. La portée de la télécommande va jusqu’à 7 mètres à un angle de 30˚ maximum de part et d’autre de l’axe du capteur. Mise en place des piles de la télécommande Tout en appuyant sur le couvercle, faitesle glisser dans le sens de la flèche. 2 piles AA (R6) Piles designées Utilisez des piles de format AA (R6) ou AA (LR6).
Les différents organes et leurs rôles Français Panneau de raccordement (PDP-50MXE20/PDP-50MXE20-S) Le panneau de raccordement comporte deux prises d’entrée vidéo et une prise de sortie vidéo. Des prises d’entrée/sortie audio et de sortie de haut-parleurs sont également prévues. - IN = OUT OUTPUT INPUT1 INPUT2 COMBINATION 1 2 3 RS-232C AUDIO 4 567 1 Borne SPEAKER (R) 2 3 4 5 Pour le raccordement à l’enceinte droite. Cette enceinte doit présenter une impédance de 6 Ohms.
Les différents organes et leurs rôles Français Panneau de raccordement (PDP-60MXE20) Le panneau de raccordement comporte deux prises d’entrée vidéo et une prise de sortie vidéo. Des prises d’entrée/sortie audio et de sortie de haut-parleurs sont également prévues. - IN = OUT OUTPUT INPUT1 INPUT2 RS-232C COMBINATION 1 2 AUDIO 3 4 567 1 COMBINATION IN/OUT 2 3 4 5 Ne branchez jamais un composant sur ces prises sans consulter au préalable le technicien d’installation Pioneer.
Installation et raccordements Installation à l’aide du support PIONEER et d’autres appliques de montage en option ÷ Veuillez demander l’installation ou le montage de cet appareil par un spécialiste compétent ou le revendeur chez qui vous l’avez acheté. ATTENTION ÷ Seul un technicien spécialisé en installation ou un personnel de service sera habilité à détacher ou à rattacher les poignées.
Installation et raccordements Perçage b* Ouïes d’aération (ventilateur) Perçage b* Perçage a Français Perçage a Surface de pose Fixation, etc.
Installation et raccordements Raccordement du cordon d’alimentation Fixation des noyaux en ferrite AC IN Français Branchez le cordon d’alimentation après que tous les raccordements ont été réalisés. Fixez le noyau en ferrite fourni comme accessoire sur le bout du cordon d’alimentation comme indiqué sur cette illustration. Utilisez l’attache de câble fournie pour éviter un glissement du noyau en ferrite sur le câble.
Installation et raccordements Français Comment faire cheminer les câbles Des colliers rapides sont fournis avec cet écran à plasma pour grouper les câbles ensemble. Après raccordements des appareils, procédez aux opérations qui suivent. * Vue de l’arrière de l’écran. 1 1 2 Groupez les câbles en utilisant les colliers rapides fournis. Introduisez la partie 1 dans un des perçages à l’arrière de l’écran à plas ma puis insérez 2 à l’arrière de 1 pour assurer la fixation.
Réglage de la langue d’affichage sur écran (Signal d’ordinateur) 4 Utilisez les touches 2/3 pour sélectionner [OPTION]. MENU SET MENU 2/3 INPUT1 PICTURE SCREEN LANGUAGE E N E R G Y S AV E TIMER SETTING S C R E E N M G T. AUTO SETUP MODE AUTO FUNCTION PIP DETECT SPLIT FREEZE STANDBY/ ON 5 Français L’anglais a été défini par défaut comme langue des affichages sur écran. Pour passer à une autre langue, le réglage doit être modifié. Procédez comme suit pour effectuer ce changement.
Français Réglage de la langue d’affichage sur écran (Signal vidéo) L’anglais a été défini par défaut comme langue des affichages sur écran. Pour passer à une autre langue, le réglage doit être modifié. Procédez comme suit pour effectuer ce changement. 4 Utilisez les touches 2/3 pour sélectionner [OPTION]. MENU STANDBY/ ON SET MENU 2/3 INPUT1 PICTURE SCREEN LANGUAGE E N E R G Y S AV E TIMER SETTING S C R E E N M G T.
Informations complémentaires Le nettoyage régulier de l’écran à plasma prolonge sa durée de vie et permet de maintenir ses performances. La manière de nettoyer l’écran est indiquée ci-après. Avant tout nettoyage, débranchez la fiche du cordon d’alimentation. En règle générale, utilisez un aspirateur une fois par mois pour nettoyer les ouïes, à l’arrière de l’écran à plasma (si cela est possible, réglez au minimum la puissance de l’aspirateur).
Informations complémentaires Français Guide de dépannage Une erreur de commande peut parfois être interprétée comme une anomalie de fonctionnement. Si une indication est affichée sur l’écran, consultez le tableau ci-dessous. Dans le cas contraire, et si vous pensez que cet appareil est défectueux, procédez aux vérifications de la page 17. Il peut arriver aussi que le défaut provienne d’un autre élément de l’installation; assurez-vous que ce n’est pas le cas.
Informations complémentaires Anomalies générales Anomalies • L’écran à plasma ne fonctionne pas. • La télécommande ne fonctionne pas. • L’image est tronquée. • Les couleurs sont anormales, délavées, trop sombres, mal repérées. • L’alimentation se coupe soudainement. • Absence d’image.
Informations complémentaires Français Précautions relatives à l’utilisation Persistance des images • Afficher pendant une longue période la même image fixe peut entraîner une persistance de cette image. Cela se produit dans les cas suivants. 1. Persistance d’image due à une charge électrique Si une image fixe très lumineuse est affichée pendant plus d’une minute, une persistance de cette image peut apparaître en raison d’une charge électrique résiduelle.
Informations complémentaires Audio Entrée Généralités (PDP-50MXE20/PDP-50MXE20-S) Panneau électroluminescent ............................... Panneau à plasma AC de type 50 V 110,36 cm (L) x 62,09 cm (H) x 126,63 cm (diagonale) Nombre de pixels ............................................. 1365 x 768 Alimentation ...................... 100 V à 240 V CA, 50 Hz/60 Hz Courant nominal ............................................ 3,7 A à 1,5 A Consommation en veille ...........................................
20 Fr Français