SX-SW260_KU.book Page 1 Wednesday, March 29, 2006 2:43 PM HTS-260 SX-SW260 Audio Multi-channel Receiver Subwoofer Caisson de basse de rècepteur multi-voies audio S-ST404 Speaker System Enceintes Acoustiques Register Your Product at www.pioneerelectronics.com (US) www.pioneerelectronics.
SX-SW260_KU.book Page 2 Wednesday, March 29, 2006 2:43 PM CAUTION RISK OF ELECTRIC SHOCK DO NOT OPEN The lightning flash with arrowhead, within an equilateral triangle, is intended to alert the user to the presence of uninsulated "dangerous voltage" within the product's enclosure that may be of sufficient magnitude to constitute a risk of electric shock to persons. CAUTION: TO PREVENT THE RISK OF ELECTRIC SHOCK, DO NOT REMOVE COVER (OR BACK). NO USER-SERVICEABLE PARTS INSIDE.
SX-SW260_KU.book Page 3 Wednesday, March 29, 2006 2:43 PM READ INSTRUCTIONS — All the safety and operating instructions should be read before the product is operated. RETAIN INSTRUCTIONS — The safety and operating instructions should be retained for future reference. HEED WARNINGS — All warnings on the product and in the operating instructions should be adhered to. FOLLOW INSTRUCTIONS — All operating and use instructions should be followed.
SX-SW260_KU.book Page 4 Wednesday, March 29, 2006 2:43 PM For U.S. and Australia Model POWER-CORD CAUTION Handle the power cord by the plug. Do not pull out the plug by tugging the cord and never touch the power cord when your hands are wet as this could cause a short circuit or electric shock. Do not place the unit, a piece of furniture, etc., on the power cord, or pinch the cord. Never make a knot in the cord or tie it with other cords.
SX-SW260_KU.book Page 5 Wednesday, March 29, 2006 2:43 PM We Want You Listening For A Lifetime Sound can be deceiving. Over time your hearing “comfort level” adapts to higher volumes of sound. So what sounds “normal” can actually be loud and harmful to your hearing. Guard against this by setting your equipment at a safe level BEFORE your hearing adapts.
SX-SW260_KU.book Page 6 Wednesday, March 29, 2006 2:43 PM Contents Thank you for buying this Pioneer product. Please read through these operating instructions so that you will know how to operate your model properly. After you have finished reading the instructions, put them in a safe place for future reference . Contents What’s in the box . . . . . . . . . . . . . . . . . . . . . . . . . . . . .5 01 Speaker Setup Guide Safety precautions when setting up . . . . . . . . . . . . . . .
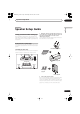
SX-SW260_KU.book Page 7 Wednesday, March 29, 2006 2:43 PM Speaker Setup Guide 01 Chapter 1 Safety precautions when setting up When assembling the speakers, lay them down flat on their side to avoid accidents or injury. Make sure to use a stable surface when assembling, setting up, and placing the speakers. English Speaker Setup Guide 1 Attach the smaller non-skid pads to the base of each of the front, surround and center speakers. The four large non-skid pads are for the receiver subwoofer (as shown).
SX-SW260_KU.book Page 8 Wednesday, March 29, 2006 2:43 PM 01 Speaker Setup Guide Front surround setup This setup is ideal when rear surround speaker placement isn't possible or you want to avoid running long speaker cables in your listening area. Use this setup together with the Front Surround modes in page 20 to take advantage of wall and ceiling reflections for a very realistic surround effect. Surround right Surround left Front left 2 Attach the surround speakers to the speaker stands.
SX-SW260_KU.book Page 9 Wednesday, March 29, 2006 2:43 PM Speaker Setup Guide 01 5 mm/ 3/16 in. 10 mm/ 3/8 in. English Caution • Please don’t attach the surround speakers to the wall for Front surround setup. Wall mounting the speakers Before mounting • Remember that the speaker system is heavy and that its weight could cause the screws to work loose, or the wall material to fail to support it, resulting in the speaker falling.
SX-SW260_KU.book Page 10 Wednesday, March 29, 2006 2:43 PM 02 Connecting up Chapter 2 Connecting up Basic connections Important • When connecting this system or changing connections, be sure to switch power off and disconnect the power cord from the wall socket. After completing all connections, connect the power cord to the wall socket.
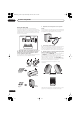
SX-SW260_KU.book Page 11 Wednesday, March 29, 2006 2:43 PM Connecting up 02 2 4 Connect each speaker. • Each speaker cable has a color-coded connector at one end and two wires at the other end. English 1 Connect the display unit to the receiver subwoofer. Plug the L-shaped end of the display cable into the connector on the rear of the display unit, then plug the other end of the display cable into SYSTEM CONNECTOR jack on the receiver subwoofer. Assemble the AM loop antenna.
SX-SW260_KU.book Page 12 Wednesday, March 29, 2006 2:43 PM Connecting up 02 • Do not connect any speakers other than those supplied to this system. Caution • These speaker terminals carry HAZARDOUS LIVE voltage. To prevent the risk of electric shock when connecting or disconnecting the speaker cables, disconnect the power cord before touching any uninsulated parts. • Do not connect the supplied speakers to any amplifier other than the one supplied with this system.
SX-SW260_KU.book Page 13 Wednesday, March 29, 2006 2:43 PM Connecting up 02 Wall mounting the display unit Using this system for TV audio Before mounting: If your TV has a stereo audio output you can connect it to this system and enjoy surround TV sound. • Remember that the display unit is heavy and could cause the wood screws to work loose, or the wall material to fail to support it, resulting in the display falling.
SX-SW260_KU.book Page 14 Wednesday, March 29, 2006 2:43 PM Controls and displays 03 Chapter 3 Controls and displays Display unit – VOLUME + AUDIO INPUT SURROUND STANDBY/ON 1 2 3 1 STANDBY/ON Press to switch the system on/into standby. 4 5 6 4 AUDIO INPUT (page 27) Press repeatedly to select one of the external audio inputs (DVD, DTV, PC/GAME or AUX). 2 Front panel display See below for details. 5 SURROUND Use to select a Surround mode (page 19). 3 VOLUME buttons Use to adjust the volume.
SX-SW260_KU.book Page 15 Wednesday, March 29, 2006 2:43 PM Controls and displays 03 TUNER (page 23) Press to select the built-in radio tuner. STANDBY/ON 1 MUTE VOLUME 2 4 3 DVD DTV PC/GAME AUX 6 SLEEP Press to set the sleep timer (page 30). 5 SLEEP ENTER CLEAR 6 SR SETUP 7 8 TUNE 9 ST ST ENTER SOUND TEST TONE TUNE 11 SOUND RETRIEVER 14 12 SURROUND ADVANCED MCACC 13 15 CHANNEL 16 Use CLEAR to clear an entry and start again. Use ENTER to confirm an entry.
SX-SW260_KU.book Page 16 Wednesday, March 29, 2006 2:43 PM Controls and displays 03 Using the remote control Please keep in mind the following when using the remote control: • Make sure that there are no obstacles between the remote and the remote sensor on the unit. • Remote operation may become unreliable if strong sunlight or fluorescent light is shining on the unit’s remote sensor. • Remote controllers for different devices can interfere with each other.
SX-SW260_KU.book Page 17 Wednesday, March 29, 2006 2:43 PM Getting started 04 Chapter 4 System demo setting Switches the automatic demo feature on or off (this starts when you plug in for the first time).
SX-SW260_KU.book Page 18 Wednesday, March 29, 2006 2:43 PM 04 Getting started 3 If the receiver subwoofer is off, press STANDBY/ ON to turn the power on. 4 Press MCACC. Try to be as quiet as possible after pressing MCACC. The volume increases automatically and the system outputs a series of test tones. • To cancel Auto MCACC setup before it has finished, press MCACC. The unit will continue to use the previous settings.
SX-SW260_KU.book Page 19 Wednesday, March 29, 2006 2:43 PM Listening to your system 05 Chapter 5 • AUTO – Auto listening mode (see above) Auto listening mode The Auto listening mode is the simplest way to listen to any source as it was mastered: the output from the speakers mirrors the channels in the source material. If you set up the system for Front surround (page 8), the Front Surround modes will give the best results (see Using Front Surround on page 20).
SX-SW260_KU.book Page 20 Wednesday, March 29, 2006 2:43 PM 05 Listening to your system Using Front Surround Using Advanced Surround The Front Surround modes are effective when you are using the Front surround speaker setup as described on page 8. The surround speakers should be placed beside the front speakers and oriented either towards the walls, or straight ahead, depending on which mode you are using (see below).
SX-SW260_KU.book Page 21 Wednesday, March 29, 2006 2:43 PM Listening to your system 05 Enhancing dialogue When audio data is removed during the MP3 or WMA compression process, sound quality often suffers from an uneven sound image. The Sound Retriever feature employs new DSP technology that helps bring CD quality sound back to compressed 2-channel audio by restoring sound pressure and smoothing jagged artifacts left over after compression.
SX-SW260_KU.book Page 22 Wednesday, March 29, 2006 2:43 PM Listening to your system 05 Boosting the bass level There are two bass modes you can use to enhance the bass in a source. 1 Press SOUND. 2 Use the / (cursor left/right) buttons to select BASSMODE then press ENTER. 3 Use the / (cursor up/down) buttons to select the sound then press ENTER to confirm. Select between OFF, MUSIC or CINEMA.
SX-SW260_KU.book Page 23 Wednesday, March 29, 2006 2:43 PM Listening to the radio 06 Chapter 6 Improving poor AM sound Listening to the radio The tuner can receive both FM and AM broadcasts, and lets you memorize your favorite stations so you don’t have to manually tune in every time you want to listen. English Listening to the radio The simplest way to improve the sound quality of AM radio is to make sure that the TV in the room is switched off.
SX-SW260_KU.book Page 24 Wednesday, March 29, 2006 2:43 PM Listening to the radio 06 Changing the frequency step If you find that you can’t tune into stations successfully, the frequency step may not be suitable for your country/ region. 1 Switch the system into standby. 2 Press SETUP. 3 Use the / (cursor left/right) buttons to select ‘AM 9K/10K’, then press ENTER. 4 Use the / (cursor up/down) buttons to select a setting then press ENTER to confirm.
SX-SW260_KU.book Page 25 Wednesday, March 29, 2006 2:43 PM Surround sound settings 07 Chapter 7 5 Using the Setup menu From the Setup menu you can access all the surround sound settings of the system1, including channel levels, speaker distances, dynamic range adjustment and dual mono audio playback. Use the following buttons to use the Setup menu. SLEEP ENTER CLEAR Press ENTER when you’re finished. • If you use the Auto MCACC feature again, it will overwrite the settings you have made here.
SX-SW260_KU.book Page 26 Wednesday, March 29, 2006 2:43 PM Surround sound settings 07 • DRC OFF (default) – No dynamic range adjustment (use when listening at higher volume) • DRC MID – Mid setting • DRC HIGH – Dynamic range is reduced (loud sounds are reduced in volume while quieter sounds are increased) 4 Press ENTER to exit. Dual mono setting Specifies how dual mono encoded Dolby Digital or DTS soundtracks should be played.
SX-SW260_KU.book Page 27 Wednesday, March 29, 2006 2:43 PM Other connections 08 Chapter 8 Important • When connecting this system or changing connections, be sure to switch power off and disconnect the power cord from the wall socket. After completing all connections, connect the power cord to the wall socket. English Other connections Listening to an external audio source You can connect both analog and digital external audio sources to this system.
SX-SW260_KU.book Page 28 Wednesday, March 29, 2006 2:43 PM 08 Other connections For an external FM antenna, Use a PAL connector to hook up an external FM antenna. • Use a 3-ringed miniplug SR+ cable to connect the CONTROL IN jack of this unit (through a media receiver, if applicable) to the CONTROL OUT jack of your plasma display.3 Before you can use the extra SR+ features, you need to make a few settings in the unit—see SR+ Setup for Pioneer plasma displays below.
SX-SW260_KU.book Page 29 Wednesday, March 29, 2006 2:43 PM Other connections • VOL.C OFF – This unit does not control the volume of the plasma display Automatic plasma display input switching In order that the plasma display can switch automatically to the correct input when you switch the input function of the receiver subwoofer, you need to tell it how your system is connected.
SX-SW260_KU.book Page 30 Wednesday, March 29, 2006 2:43 PM Additional information 09 Chapter 9 Additional information Setting the sleep timer DTS CD setting The sleep timer switches off the receiver subwoofer after a specified time so you can fall asleep without worrying about it.1 If you play a DTS-encoded CD, you will need to change this setting to hear the decoded signal. DVD DTV PC/GAME AUX TUNER SLEEP ENTER CLEAR SR SETUP TUNE ST 1 Switch the system into standby. 2 Press SETUP.
SX-SW260_KU.book Page 31 Wednesday, March 29, 2006 2:43 PM Additional information Hints on installation We want you to enjoy using this system for years to come, so please bear in mind the following points when choosing a location: Setting up the remote to control your TV You can use the supplied remote to control your TV. To be able to use this feature you first have to program the remote with a maker code from the table on the following page. English Installation and maintenance 09 Do...
SX-SW260_KU.book Page 32 Wednesday, March 29, 2006 2:43 PM 09 Additional information Preset code list Please note that there are cases where only certain functions may be controllable after assigning the proper preset code, or the codes for the manufacturer in the list will not work for the model that you are using.
SX-SW260_KU.book Page 33 Wednesday, March 29, 2006 2:43 PM Additional information Incorrect operations are often mistaken for trouble and malfunctions. If you think that there is something wrong with this component, check the points below. Sometimes the trouble may lie in another component. Investigate the other components and electrical appliances being used.
SX-SW260_KU.book Page 34 Wednesday, March 29, 2006 2:43 PM 09 Additional information Problem Remedy Auto tuning does not • The radio signal is weak. Auto tuning will only detect radio stations with a good signal. For more pick up some stations. sensitive tuning, connect an outdoor antenna. Error Messages 34 En Message Description 2CH ONLY • An operation is prohibited because it is only applicable to 2 channel sources, while the current source is a multichannel source.
SX-SW260_KU.book Page 35 Wednesday, March 29, 2006 2:43 PM Additional information 09 S-ST404 Speaker system (Front speakers x2, surround speakers x2, center speaker x1) SX-SW260 Audio Multi-channal Receiver Subwoofer • • Amplifier section RMS Power Output : Front, Center, Surround ........................ 100 W per channel (1 kHz, 10 % T.H.D., 4 Ω) Subwoofer ....................... 100 W (100 Hz, 10 % T.H.D., 4 Ω) FTC Power Output : Front, Center, Surround ..........................
CAUTION RISK OF ELECTRIC SHOCK DO NOT OPEN The lightning flash with arrowhead, within an equilateral triangle, is intended to alert the user to the presence of uninsulated "dangerous voltage" within the product's enclosure that may be of sufficient magnitude to constitute a risk of electric shock to persons. CAUTION: TO PREVENT THE RISK OF ELECTRIC SHOCK, DO NOT REMOVE COVER (OR BACK). NO USER-SERVICEABLE PARTS INSIDE. REFER SERVICING TO QUALIFIED SERVICE PERSONNEL.
READ INSTRUCTIONS — All the safety and operating instructions should be read before the product is operated. RETAIN INSTRUCTIONS — The safety and operating instructions should be retained for future reference. HEED WARNINGS — All warnings on the product and in the operating instructions should be adhered to. FOLLOW INSTRUCTIONS — All operating and use instructions should be followed. CLEANING — The product should be cleaned only with a polishing cloth or a soft dry cloth.
For U.S. and Australia Model POWER-CORD CAUTION Handle the power cord by the plug. Do not pull out the plug by tugging the cord and never touch the power cord when your hands are wet as this could cause a short circuit or electric shock. Do not place the unit, a piece of furniture, etc., on the power cord, or pinch the cord. Never make a knot in the cord or tie it with other cords. The power cords should be routed such that they are not likely to be stepped on.
We Want You Listening For A Lifetime Selecting fine audio equipment such as the unit you’ve just purchased is only the start of your musical enjoyment. Now it’s time to consider how you can maximize the fun and excitement your equipment offers. This manufacturer and the Electronic Industries Association’s Consumer Electronics Group want you to get the most out of your equipment by playing it at a safe level.
SX-SW260_FR.book Page 4 Wednesday, March 29, 2006 1:43 PM Table des matières Nous vous remercions d’avoir acheté ce produit Pioneer. Veuillez lire attentivement ces instructions d’utilisation afin d’apprendre à manipuler votre modèle correctement. Lorsque vous avez terminé, rangez ces instructions en lieu sûr afin de pouvoir vous y référer, au besoin. Table des matières Contenu de l’emballage . . . . . . . . . . . . . . . . . . . . . . . .
SX-SW260_FR.book Page 5 Wednesday, March 29, 2006 1:43 PM Table des matières 09 Informations complémentaires Réglage du minuteur de mise en veille . . . . . . . . . . . 30 Réduction de la luminosité de l’écran . . . . . . . . . . . . 30 Réglage d’un CD DTS . . . . . . . . . . . . . . . . . . . . . . . . 30 Réinitialisation du système . . . . . . . . . . . . . . . . . . . . 30 Installation et entretien . . . . . . . . . . . . . . . . . . . . . . . 31 Conseils d’installation . . . . . . . . . . . . . . . .
SX-SW260_FR.book Page 6 Wednesday, March 29, 2006 1:43 PM 01 Guide d’installation des haut-parleurs Chapitre 1 Guide d’installation des haut-parleurs Précautions de sécurité lors de l’installation Lors de l’installation des haut-parleurs, posez-les à plat sur leur flanc pour éviter des accidents ou des blessures. Veillez à utiliser une surface stable lors de l’assemblage, de l’installation et de la disposition des haut-parleurs.
SX-SW260_FR.book Page 7 Wednesday, March 29, 2006 1:43 PM Guide d’installation des haut-parleurs 01 Installation frontale de haut-parleurs d’ambiance Cette installation est idéale lorsqu’il est impossible de poser les haut-parleurs d’ambiance derrière ou que vous souhaitez éviter de longs câbles d’enceinte dans votre zone d’écoute.
SX-SW260_FR.book Page 8 Wednesday, March 29, 2006 1:43 PM 01 Guide d’installation des haut-parleurs 4 Tournez les haut-parleurs comme illustré, en suivant les repères de guidage pour des sons “Front Surround” optimaux. Si vous avez sélectionné FRTMOVIE (Front Surround Movie) ou FRTMUSIC (Front Surround Music), tournez chaque haut-parleur d’ambiance de telle sorte que les repères de guidage prévus sur la base du support soient alignés horizontalement dans le sens de la position d’écoute (voir ci-après).
SX-SW260_FR.book Page 9 Wednesday, March 29, 2006 1:43 PM Guide d’installation des haut-parleurs Fixation des autres haut-parleurs sur une paroi Comme le haut-parleur central, les haut-parleurs avant et d’ambiance présentent aussi un trou, permettant leur fixation sur une paroi. Cependant, si vous utilisez la configuration “Front Surround” (ambiance avant) décrite à la page précédente, ne fixez pas les haut-parleurs d’ambiance sur une paroi.
SX-SW260_FR.book Page 10 Wednesday, March 29, 2006 1:43 PM 02 Connexions Chapitre 2 Connexions Connexions de base Important • Lors du branchement de cet appareil ou avant de changer ses connexions, coupez l’interrupteur d’alimentation et débranchez le cordon d’alimentation au niveau de la prise secteur. Toutes les connexions étant terminées, branchez le cordon d’alimentation sur la prise secteur.
SX-SW260_FR.book Page 11 Wednesday, March 29, 2006 1:43 PM Connexions 02 1 Raccordez l’unité d’affichage sur le caisson de basses à récepteur Branchez le bout en L du câble d’affichage sur le connecteur à l’arrière de l’unité d’affichage, puis branchez l’autre bout du câble d’affichage sur la prise SYSTEM CONNECTOR du caisson de basses à récepteur. 2 Assemblage de l’antenne cadre AM 4 Branchez chaque haut-parleur.
SX-SW260_FR.book Page 12 Wednesday, March 29, 2006 1:43 PM Connexions 02 Attention • Ces bornes de haut-parleurs ont une tension POTENTIELLEMENT MORTELLE . Pour éviter toute décharge électrique lors du branchement ou du débranchement des câbles de haut-parleur, débranchez le cordon d’alimentation avant de toucher des pièces non isolées. • Ne raccordez à ce système aucun haut-parleur autre que ceux qui sont fournis.
SX-SW260_FR.book Page 13 Wednesday, March 29, 2006 1:43 PM Connexions 02 Fixation de l’unité d’affichage sur une paroi • Pioneer n’assume aucune responsabilité en cas d’accidents, résultant d’une erreur d’assemblage ou d’installation, d’une résistance suffisante des parois ou d’autres composants de construction, d’une utilisation abusive ou de catastrophes naturelles. • Si vous hésitez quant aux propriétés et à la résistance des parois, demandez conseil à un professionnel.
SX-SW260_FR.book Page 14 Wednesday, March 29, 2006 1:43 PM 03 Commandes et affichages Chapitre 3 Commandes et affichages Unité d’affichage – VOLUME + AUDIO INPUT SURROUND STANDBY/ON 1 2 3 1 STANDBY/ON Appuyez pour mettre le système sous tension ou en mode Veille. 2 Affichage du panneau avant Pour plus de détails, reportez-vous ci-après. 3 Touches VOLUME Utilisez pour ajuster le volume.
SX-SW260_FR.book Page 15 Wednesday, March 29, 2006 1:43 PM Commandes et affichages 03 Télécommande STANDBY/ON 1 MUTE VOLUME 2 4 3 DVD DTV PC/GAME AUX 5 SLEEP ENTER CLEAR 7 8 TUNE 9 ST ST ENTER SOUND 10 TEST TONE TUNE 11 SOUND RETRIEVER 14 12 SURROUND ADVANCED MCACC 13 15 CHANNEL 16 6 SR SETUP VOLUME TV INPUT TV CONTROL 1 STANDBY/ON Appuyez pour mettre le caisson de basse à récepteur sous tension ou en mode veille.
SX-SW260_FR.book Page 16 Wednesday, March 29, 2006 1:43 PM Commandes et affichages 03 Utilisation de la télécommande Gardez les points suivants à l’esprit quand vous utilisez la télécommande. • Assurez-vous qu’aucun obstacle ne se trouve entre la télécommande et le capteur de ses signaux sur l’appareil. • Le fonctionnement de la télécommande peut devenir instable si une forte lumière ou une lampe fluorescente brille sur le capteur des signaux de télécommande sur l’appareil.
SX-SW260_FR.book Page 17 Wednesday, March 29, 2006 1:43 PM Pour commencer 04 Chapitre 4 Pour commencer Réglage du mode Démonstration du système SLEEP ENTER CLEAR SR SETUP TUNE ST ST ENTER SOUND TUNE TEST TONE SOUND RETRIEVER SURROUND ADVANCED Le système de Calibrage Acoustique Multicanaux (MCACC) mesure les caractéristiques acoustiques de votre local d’écoute, prenant en considération les bruits ambiants et testant le décalage et le niveau des sons des canaux.
SX-SW260_FR.book Page 18 Wednesday, March 29, 2006 1:43 PM 04 Pour commencer 3 Si le caisson de basses à récepteur est désactivé, appuyez sur STANDBY/ON pour le mettre sous tension. 4 Appuyez sur MCACC. Essayez d’être aussi silencieux que possible après avoir appuyé sur MCACC. Le volume augmente automatiquement et le système émet une série de tonalités d’essai. • Pour annuler la configuration Auto MCACC avant qu’elle ne soit terminée, appuyez sur MCACC.
SX-SW260_FR.book Page 19 Wednesday, March 29, 2006 1:43 PM Écoute de votre système 05 Chapitre 5 Écoute de votre système Mode d’écoute Auto ST ST ENTER SOUND TEST TONE TUNE SOUND RETRIEVER SURROUND ADVANCED MCACC VOLUME CHANNEL TV INPUT • Appuyez sur SURROUND pour sélectionner le mode d’écoute AUTO. En présence d’une source Dolby Digital ou DTS, le voyant 2 D ou DTS du panneau avant s’allume.
SX-SW260_FR.book Page 20 Wednesday, March 29, 2006 1:43 PM 05 Écoute de votre système Utilisation du mode Front Surround Les modes d’ambiance avant (Front Surround) sont efficaces s’ils sont utilisés avec la configuration de hautparleurs d’ambiance avant, comme décrit à la page 7. Les haut-parleurs d’ambiance doivent être placés à côté des haut-parleurs avant et orientés soit vers les murs, soit droit devant, selon le mode utilisé (voir ci-dessous).
SX-SW260_FR.book Page 21 Wednesday, March 29, 2006 1:43 PM Écoute de votre système 05 • La fonction Acoustic Calibration EQ est activée automatiquement après que la configuration Auto MCACC est utilisée. Utilisation de “Sound Retriever” Quand les données audio sont extraites au cours du processus de compression MP3 ou WMA, la qualité sonore souffre souvent d’une image sonore inégale.
SX-SW260_FR.book Page 22 Wednesday, March 29, 2006 1:43 PM 05 Écoute de votre système Accentuation du niveau des graves Deux modes de graves sont à votre disposition pour renforcer les graves d’une source. 1 Appuyez sur SOUND. 2 Utilisez les touches / (curseur gauche/droite) pour sélectionner BASSMODE, puis appuyez sur ENTER. 3 Utilisez les touches / (curseur haut/bas) pour sélectionner le son, puis appuyez sur ENTER pour vérifier. Sélectionnez OFF, MUSIC ou CINEMA.
SX-SW260_FR.book Page 23 Wednesday, March 29, 2006 1:43 PM Écoute de la radio 06 Chapitre 6 Écoute de la radio Écoute de la radio TUNER Amélioration d’un son AM de mauvaise qualité Le moyen le plus simple d’améliorer la qualité sonore d’une émission radio AM est de désactiver le téléviseur de la salle. Essayez également de changer la position et l’orientation de l’antenne cadre AM.
SX-SW260_FR.book Page 24 Wednesday, March 29, 2006 1:43 PM 06 Écoute de la radio Changement du pas de fréquence Si vous ne parvenez pas à effectuer correctement l’accord sur les stations, il se peut que le pas des fréquences ne convienne pas à votre pays ou votre région. 1 Mettez le système en mode Veille. 2 Appuyez sur SETUP. 3 Utilisez les touches / (curseur gauche/droite) pour sélectionner ‘AM 9K/10K’, puis appuyez sur ENTER.
SX-SW260_FR.book Page 25 Wednesday, March 29, 2006 1:43 PM Réglages de sons d’ambiance 07 Chapitre 7 Réglages de sons d’ambiance Utilisation du menu Setup (Configuration) SLEEP ENTER CLEAR SR SETUP TUNE ST ST ENTER SOUND TEST TONE TUNE SOUND RETRIEVER SURROUND ADVANCED CHANNEL MCACC VOLUME Réglage du niveau des canaux La fonction Auto MCACC (voir sous page 17) doit vous procurer la meilleure configuration des sons d’ambiance.
SX-SW260_FR.book Page 26 Wednesday, March 29, 2006 1:43 PM 07 Réglages de sons d’ambiance 1 Appuyez sur SETUP. 2 Utilisez les touches / (curseur gauche/droite) pour sélectionner DRC, puis appuyez sur ENTER. 3 Utilisez / (curseur haut/bas) pour sélectionner un paramètre.
SX-SW260_FR.book Page 27 Wednesday, March 29, 2006 1:43 PM Autres connexions 08 Chapitre 8 Autres connexions Connexion d’appareils auxiliaires Écoute d’une source audio externe Ce système accepte le branchement de sources audio aussi bien analogiques que numériques. Les sources audio numériques comprennent les récepteurs d’émissions numériques par satellite, les lecteurs de CD, etc. Comme sources analogiques, on peut citer votre téléviseur. Reportez-vous à Connexion d’appareils auxiliaires ci-avant.
SX-SW260_FR.book Page 28 Wednesday, March 29, 2006 1:43 PM 08 Autres connexions Pour raccorder une antenne FM extérieure, utilisez un connecteur PAL. ANTENNA • Utilisez le câble minifiche SR+ à 3 anneaux de Pioneer pour raccorder prise CONTROL IN de cet appareil (au besoin via un un récepteur de média), sur prise CONTROL OUT de votre écran plasma.
SX-SW260_FR.book Page 29 Wednesday, March 29, 2006 1:43 PM Autres connexions • VOL.C ON – Quand cet appareil est mis sous tension, ou que la fonction d’entrée est changée, le volume de l’écran plasma est mis en sourdine de façon à n’entendre que le son de cet appareil. • VOL.C OFF – Cet appareil ne contrôle pas le volume de l’écran plasma. Commutation automatique de l’entrée de l’écran plasma Remarque • Le nombre d’entrée vidéo disponibles dépendra de l’écran plasma que vous avez raccordé.
SX-SW260_FR.book Page 30 Wednesday, March 29, 2006 1:43 PM 09 Informations complémentaires Chapitre 9 Informations complémentaires Réglage du minuteur de mise en veille Le minuteur de mise en veille met le récepteur hors tension après le délai spécifié pour que vous puissiez vous endormir l’esprit tranquille.1 DVD DTV PC/GAME AUX TUNER SLEEP ENTER CLEAR SR SETUP TUNE ST ST ENTER 1 Appuyez sur la touche SLEEP pour sélectionner une option.
SX-SW260_FR.book Page 31 Wednesday, March 29, 2006 1:43 PM Informations complémentaires Installation et entretien Conseils d’installation Nous souhaitons que vous puissiez utiliser ce système pendant de nombreuses années. Par conséquent, tenez compte des consignes suivantes pour le choix de l’emplacement : Ce que vous devez faire… 09 Configuration de la télécommande pour contrôler votre téléviseur Vous pouvez utiliser la télécommande fournie pour contrôler votre téléviseur.
SX-SW260_FR.book Page 32 Wednesday, March 29, 2006 1:43 PM 09 Informations complémentaires Liste des codes de préréglage Sachez que, dans certains cas, seules certaines fonctions pourront être contrôlées même après avoir saisi le code de préréglage correct, ou que les codes des fabricants repris sur la liste ne fonctionneront pas avec le modèle de téléviseur que vous utilisez.
SX-SW260_FR.book Page 33 Wednesday, March 29, 2006 1:43 PM Informations complémentaires 09 Guide de dépannage Problèmes d’ordre général Anomalie Correction proposée Impossible de mettre le système sous tension ou celui-ci s’éteint brusquement (il se peut qu’un message d’erreur s’affiche au démarrage). • Laissez l’appareil branché, patientez une minute, puis remettez-le sous tension. • Vérifiez qu’aucun fil détaché du câble ne soit en contact avec l’appareil.
SX-SW260_FR.book Page 34 Wednesday, March 29, 2006 1:43 PM 09 Informations complémentaires Syntoniseur Anomalie Correction proposée Présence de parasites • Branchez l’antenne AM (reportez-vous à Connexions) et réglez-en la direction et la position pour considérables dans les bénéficier d’une réception optimale. Vous pouvez également brancher une autre antenne AM émissions radio. intérieure ou extérieure (reportez-vous à la section Connexion d’antennes extérieures la page 27).
SX-SW260_FR.book Page 35 Wednesday, March 29, 2006 1:43 PM Informations complémentaires 09 Système d’enceinte acoustique S-ST404 Caractéristiques techniques Caisson de basses à récepteur multi-canaux audio SX-SW260 • Section amplificateur • Section syntoniseur FM Gamme de fréquences . . . . . . . . . . . . . 87,5 MHz à 108 MHz Antenne . . . . . . . . . . . . . . . . . . . . . . . . . . . 75 Ω, asymétrique • Section syntoniseur AM Gamme de fréquences . . . . . . . . . . . . .
SX-SW260_FR.book Page 36 Wednesday, March 29, 2006 1:43 PM Should this product require service in the U.S.A. and you wish to locate the nearest Pioneer Authorized Independent Service Company, or if you wish to purchase replacement parts, operating instructions, service manuals, or accessories, please call the number shown below. 800–421–1404 Please do not ship your product to Pioneer without first calling the Customer Support Division at the above listed number for assistance.