UDP-LX500 Operating Instructions UNIVERSAL DISC PLAYER
Thank you for buying this Pioneer product. Please read through these operating instructions so you will know how to operate your model properly. After you have finished reading the instructions, put them away in a safe place for future reference.
For European models Information for users on collection and disposal of old equipment and used batteries Symbol for equipment Symbol examples for batteries Pb These symbols on the products, packaging, and/or accompanying documents mean that used electrical and electronic products and batteries should not be mixed with general household waste.
Contents 01 Before you start What’s in the box . . . . . . . . . . . . . . . . . . . . . . . . . . . . . . . 5 Putting the batteries in the remote control . . . . . . . 5 Software Update. . . . . . . . . . . . . . . . . . . . . . . . . . . . . . . . 6 Types of discs/files that can be played. . . . . . . . . . . . 7 Playable discs . . . . . . . . . . . . . . . . . . . . . . . . . . . . . . . . . 7 Playable files . . . . . . . . . . . . . . . . . . . . . . . . . . . . . . . . . .10 Part Names and Functions .
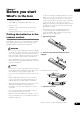
Chapter 1 01 Before you start What’s in the box • To prevent leakage of battery fluid, remove the batteries if you do not plan to use the remote control for a long period of time (1 month or more). If the fluid should leak, wipe it carefully off the inside of the case, then insert new batteries. If a battery should leak and the fluid should get on your skin, flush it off with large quantities of water.
01 Software Update Product information on this player is provided on the Pioneer website. Check this website for update and service information on your Blu-ray disc player. IN Europe: http://www.pioneer-audiovisual.eu/ In the U.S.A.: https://www.pioneerelectronics.com/PUSA/Home In Canada: http://www.pioneerelectronics.ca/POCEN/Home In ASEAN: http://intl.pioneer-audiovisual.com/ In Hong Kong: http://hk.pioneer-audiovisual.com/ In Taiwan http://intl.pioneer-audiovisual.
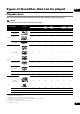
Types of discs/files that can be played 01 Playable discs Discs with the logo marks below indicated on the disc label, package or jacket can be played. Caution • Only the discs that have been finalized can be played.
01 Discs that cannot be played • HD DVDs • DVD-RAM discs It is possible that some discs other than the ones listed above may not be playable either. About audio formats The following audio formats are supported on this player: • Dolby TrueHD • Dolby Digital Plus • Dolby Digital Note • Some discs cannot be played, even if one of the logo marks on the previous page is indicated. • To play 8 cm discs, set the disc in the 8 cm disc depression in the center of the disc tray. No adapter is necessary.
With BD-ROMs, it is possible to use BD-J (Java) applications to create highly interactive titles, for example including games. • BDs (BDAV) compatible with the formats below can be played. – Blu-ray Disc Recordable (R) Format Version 1 – Blu-ray Disc Rewritable (RE) Format Version 2 • To enjoy an UHD-BD disc with better quality, connect the unit to a TV or AV amplifier supporting 4K/HDR.
01 About video, audio, and image files and folders Audio and image files can be played on this player when the folders on the disc or USB device are created as described below. Example of folder structure: 001.jpg/001.mp3 Root 01 Folder xxx.jpg/xxx.mp3 001.jpg/001.mp3 Folder xxx.jpg/xxx.mp3 XX Folder xxx.jpg/xxx.mp3 001.jpg/001.mp3 001.jpg/001.mp3 xxx.jpg/xxx.mp3 * The number of folders and files within a single folder (including the root directory) is limited to a maximum of 256.
Table of Playable Files 01 Playable media Playable files (Extensions) MP3 (.mp3) WMA2 (.wma) BD-R/RE/-R DL/ RE DL/-R LTH, DVD-R/RW/-R DL/ +R/+RW/+R DL, CD-R/RW USB devices1 Network ✓ ✓ ✓ Sampling frequencies: Up to 48 kHz Bit rate: Up to 320 kbps Audio type: MPEG-1 Audio Layer 3 ✓ Sampling frequencies: Up to 48 kHz Bit rate: Up to 192 kbps Audio type: WMA version 9 ✓ ✓ File specifications AAC (.
01 Playable media Playable files (Extensions) BD-R/RE/-R DL/ RE DL/-R LTH, DVD-R/RW/-R DL/ +R/+RW/+R DL, CD-R/RW USB devices1 File specifications Network AVI (.avi) ✓ ✓ ✓ Maximum resolution: Up to 3 840 x 2 160 Video: MPEG 2, H.264, H.265, VP9 Audio: MP3, AAC 3GP (.3gp) ✓ ✓ ✓ Maximum resolution: Up to 3 840 x 2 160 Video: H.263, MPEG4, H.264, H.265, VP9 Audio: MPEG-4 AAC FLV (.flv) ✓ ✓ ✓ Video: Sorenson H.263 (FLV1), VP6 (FLV4), H.264 Audio: MP3, AAC 1.
Part Names and Functions 01 Remote Control 9 1 2 22 3 23 10 TOP MENU – Press to display the top menu of the BD-ROM or DVD-Video. HOME MENU – (page 39) 11 q / h – (page 26) 12 t – (page 26) 4 13 g – (page 26) 5 24 14 u / 6 7 8 25 15 A-B – (page 27) 26 16 9 27 17 HDMI – Press to switch the HDMI Mode (pages 17 and 41). 28 18 DIRECT – Press to switch on/off the DIRECT function (page 29).
01 28 29 / / / – Use to select items, change settings and move the cursor. 32 ENTER – Press to execute the selected item or enter a setting that has been changed, etc. 33 SHORT SKIP – Press during playback to forward to a position 30 seconds later. (page 27) RETURN – Press to return to the previous screen. 34 e / r RESOLUTION – Use these to switch the output video resolution from the HDMI OUT terminals.
Rear Panel 01 1 2 3 4 5 6 7 8 9 10 1 ANALOG AUDIO OUT terminals – (page 20) 5 2 RS-232C terminal – Connect a home control system equipped with an RS-232C port. For installing a home control system, contact a specialized stores. HDMI OUT SUB (AUDIO ONLY) terminal – Connect with an HDMI compatible AV receiver or amplifier. This terminal is for the exclusive use of audio output.
02 Chapter 2 Connecting up Be sure to turn off the power and unplug the power cord from the power outlet whenever making or changing connections. After connecting, make the settings at the Setup Navigator or Initial Setup menu according to the type of cable connected (page 23). Also refer to the operating instructions for the device being connected. • We will not accept any responsibility for damage arising from the connection with equipment manufactured by other companies.
About Control Function with HDMI The functions work when a control function with HDMI-compatible Pioneer TV or AV system (AV receiver or amplifier, etc.) is connected to the player using an HDMI cable. Also refer to the operating instructions for the TV and AV system (AV receiver or amplifier, etc.). To use the control function with HDMI • The control function with HDMI operates when control function with HDMI is set to On for all devices connected with HDMI cables.
02 About the PQLS function Connecting a TV PQLS (Precision Quartz Lock System) is a digital audio transfer control technology using the HDMI control function. The player’s output signals are controlled from the AV receiver to achieve high sound quality playback using the receiver’s quartz oscillator. This eliminates the influence of the jitter generated during signal transfer which can adversely affect the sound quality.
Connecting an AV receiver or amplifier Connect to an AV receiver or amplifier in order to enjoy the surround sound of Dolby TrueHD, Dolby Digital Plus, Dolby Digital, DTS-HD Master Audio, DTS-HD High Resolution Audio, DTS Digital Surround, LPCM, AAC or DSD. For instructions on connecting the TV and speakers to the AV receiver or amplifier, refer to the operating instructions for AV receiver or amplifier.
02 Connecting audio cables Connecting an AV receiver or amplifier using an optical digital audio cable Connecting an AV receiver or amplifier using an coaxial digital audio cable UDP-LX500’s rear panel White Audio cable (commercially available) 2-channel analog audio can also be connected.
Input device is connected with the ZERO SIGNAL terminal. The Zero Signal is the reference (GND) for video and audio signals. If you connect the ZERO SIGNAL terminal of the equipment to the audio input terminal of another device connected to this equipment, with a pin cord, the device becomes compatible to the audio standard of this equipment, and the signal integrity improves.
02 Connecting to the network through LAN interface By connecting this player to the network via the LAN terminal, you can play image, audio and video files stored on the components on the network, including your computer, using Source inputs. Connecting with a LAN cable (wired LAN) Connect the LAN terminal on this receiver to the LAN terminal on your router (with or without the built-in DHCP server function) with a straight LAN cable (CAT 5 or higher).
Chapter 3 03 Getting Started Making settings using the Setup Navigator menu Be sure to perform these settings when using the player in the following situations. • When you use the player for the first time. • After Initial Setup format. Caution • Before turning on the power, check that the connections between the player and other devices are correct. Also, turn on the power of the devices connected to the player before turning on the player’s power.
03 Operating the TV with the player’s remote control When the manufacturer code for your brand of TV is set on the player’s remote control, the TV can be operated using the player’s remote control. TV Preset code list Important • We do not guarantee the operations of all the manufacturers and devices listed. Operation may not be possible even if a preset code is entered. Manufacturer Code(s) Caution • The setting may be restored to the default after the batteries are replaced. If this happens, reset it.
Switching the output video resolution Use the procedure below to switch the output video resolution from the various video output terminals. Press RESOLUTION e/r. • When 4K, 4K/24p, 1080/24p or Source Direct is selected, the signals are output as such, even if your TV is not compatible with 4K, 4K/24p or 1080/24p signals. If the picture is not displayed properly, use RESOLUTION e/r to set an output video resolution at which the video and audio signals are properly output.
04 Chapter 4 Playback Playing discs or files This section describes the player’s main operations. For the types of discs and files that can be played, see page 7. Video, image and audio files recorded on discs are played with the Source function (page 34). 1 Press ^ STANDBY/ON to turn on the power. Turn the TV’s power on and switch its input beforehand. 2 Press ; OPEN/CLOSE to open the disc tray and load the disc. Note • Load the disc with the printed side facing up.
Skipping content During playback, press u or i. • When i is pressed, the playback skips ahead to the beginning of the next chapter/track/file. • When u is pressed while a video or audio file is playing, the playback skips back to the beginning of the currently playing chapter/ track/file. Press twice to skip back to the beginning of the previous chapter/track/file. To return to a position a short while ago 1 During playback, press A-B to select the starting point. • [A-] is displayed on the TV screen.
04 Playing in the desired order (Programmed Play) 1 During playback, press PROGRAM. • The program screen is displayed. Zoom During playback, press ZOOM. • Each time you press ZOOM, the zoom level changes as shown below. [Zoom 2x] [Zoom 3x] [Zoom 4x] [Zoom 1/2] [Zoom 1/3] [Zoom 1/4] Normal (not displayed) 2 Select the program number. Use / to select, then press ENTER. 3 Select the track/title/chapter you want to play. Use / / / to select, then press ENTER.
Switching the subtitles Moving subtitles For discs or files on which multiple subtitles are recorded, the subtitles can be switched during playback. The position of the subtitles displayed while playing BD-ROMs or DVDs can be moved. Caution • The subtitles cannot be switched for discs recorded by a DVD or BD recorder. Also refer to the operating instructions for the device used for recording. During playback, press SUBTITLE.
04 Displaying the disc information Press DISPLAY. • The disc information appears on the TV screen. To switch off the information display, press DISPLAY again. • The information display differs between during playback and when playback is stopped. • During audio CD playback, the track elapsed playing time appears on the TV screen. Each time you press DISPLAY, it changes shown as below.
Playback functions 04 The functions that can be used differ according to the type of disc and file. In some cases, some of the functions cannot be used. Check the usable functions on the table below.
04 Using the FUNCTION menu Various functions can be called out according to the player’s operating status. 1 Display the FUNCTION menu. Press FUNCTION during playback. 2 Select and set the item. Use / to select, then press ENTER. • Items that cannot be changed are displayed in gray. The items that can be selected depend on the player’s status. ❖ To change the setting of the selected item / to change. Replay Return to a position 10 seconds earlier.
Playing from a specific time (Time Search) 1 Select Time. Use / to select, then press ENTER. 2 Input the time. Use the number buttons (0 to 9) to input the time. • To play from 45 minutes, input 0, 0, 4, 5, 0 and 0, then press ENTER. Continuing playback from a specified position (Continued Viewing Playback) This function allows you to continue playback from a position you specify to be played next time, even after turning the power off.
05 Chapter 5 Playback from Source function Files stored in a PC or DMS (Digital Media Server) as described above can be played via command from an external Digital Media Controller (DMC). Devices controlled by this DMC to play files are called DMRs (Digital Media Renderers). This player supports this DMR function. When in the DMR mode, such operations as playing and stopping files can be performed from the external controller.
❖ About playback behavior over a network • Playback may stall when the PC is switched off or any media files stored on it are deleted while playing content. • If there are problems within the network environment (heavy network traffic, etc.) content may not be displayed or played properly (playback may be interrupted or stalled). For best performance, a 10BASE-T/ 100BASE-TX/1000BASE-T connection between the player and the PC is recommended.
05 Playing back image files Playing the Playlist ❖ About Slideshow 1 Press SOURCE to display the Source function. The Source function can also be displayed by selecting Source from Home Menu, then pressing ENTER. A display of the files in the folder switches automatically. Note • Some BD-R/-RE discs have playback protection. To cancel the protection, input the password set for the disc. • It may take a few seconds before playback starts. This is normal.
Chapter 6 Setting the Audio/Video options 06 Changing the Audio options There are a number of additional sound settings you can make using the Audio Parameter menu. Operating the Audio Parameter screen 1 Press AUDIO P. to display the Audio Parameter screen. 2 Use adjust. / to select the setting you want to 3 / to set as necessary. Use ❖ Closing the Audio Parameter screen Press AUDIO P. or RETURN.
06 Changing the Video options There are a number of additional picture settings you can make using the Video Parameter menu. Operating the Video Parameter screen 1 Press VIDEO P. to display the Video Parameter screen. 2 Use / to select the setting you want to adjust, then press ENTER. 3 Use ENTER. / to set as necessary, then press ❖ Closing the Video Parameter screen Press VIDEO P. or RETURN.
Chapter 7 07 Advanced settings Changing the settings Operating the Initial Setup screen 1 When playback is stopped, display the Home Menu screen. HOME MENU. Press 2 Select and set Initial Setup. Use / to select, then press ENTER. 3 Select the item and change the setting. Use / / / to select, then press ENTER. ❖ Closing the Initial Setup screen Press HOME MENU or RETURN. Note • The items that can be selected depend on the player’s status.
Audio Output 07 Setting Options Explanation Digital Output Bitstream Select this to output digital audio signals directly. PCM Select this to output digital audio signals converted to 2-channel audio signals. Reencode When a BD containing secondary audio and interactive audio is played, the two audio signals are mixed and converted to Dolby Digital audio or DTS audio for output. Off Select this to output audio signals other than digital audio signals.
HDMI Setting Options Explanation HDMI Mode Single This is selected when connecting a device for use with the HDMI OUT (MAIN) terminal only. Separate Select this when you want to output the video and audio separately, the video from the HDMI OUT (MAIN) terminal, the audio from the HDMI OUT (SUB) terminal. Pure Audio Select this to enjoy music only with a better sound quality when devices are connected to both HDMI output terminals.
Language 07 Setting Options Explanation OSD available languages Choose a language for the on-screen displays from the listed languages. Audio * For some discs, it may not be possible to change to the selected language. available languages Choose a language from the listed languages to set the default audio language for BD-ROM and DVD-Video playback. If a language not recorded on the BD/DVD is set, one of the recorded languages is automatically selected for playback.
Setting Options Explanation Setup Navigator Start making the settings using the Setup Navigator menu. For details, see page 23. Security Register (change) the password for parental lock settings or for unlocking to play DVDVideos with the parental lock feature (page 45). The default password is "0000". Change Password Options Parental Control Change the player’s parental lock level (page 45). Country Code Change the Country/Area code (page 45).
07 ❖ Setting the IP address 1 Select and set Network IP Address Setting Next Screen. Use / to select, then press ENTER. 2 Set IP address. Use / / / to set the IP address of the player or DNS server, then press ENTER. • Auto Set IP Address On – The player’s IP address is obtained automatically. Select this when using a broadband router or broadband modem that has a DHCP (Dynamic Host Configuration Protocol) server function. This player’s IP address will automatically be allocated from the DHCP server.
❖ Erasing data that has been added to BDs and application data ❖ Changing the Parental Lock level for viewing DVDs/BD-ROMs Use this procedure to erase data that has been added to BDs (data downloaded with the BD-LIVE function and data used with the BONUSVIEW function) and application data. Some discs containing scenes of violence, for example, have Parental Lock levels (check the indications on the disc’s jacket or elsewhere).
07 Software updating • Store the update file in the root directory of the USB flash drive. Do not store it within a folder. The player’s software can be updated using one of the methods shown below. • Do not put any files other than the update file on the USB flash drive. • Connecting to the Internet. • This unit supports USB flash drives formatted in FAT16 or FAT32. When formatting a USB flash drive on your computer, do so with the settings below. • Using a USB flash drive.
• When disposing of the product, we recommend you reset it to the factory default setting to delete the data. 07 Setting the backlight mode • Default setting : 01 (normal mode) The backlight lighting pattern can be selected from among four modes, in consideration of convenience and battery service life. Caution • The setting may be restored to the default after the batteries are replaced. If this happens, reset it. Input the 2-digit code you want to set.
07 About how digital audio formats are output Setting Bitstream PCM Method of conversion Only the primary audio (the main sound for movies, etc.) is output. The secondary audio and interactive audio are not output. The primary audio, secondary audio and interactive audio are converted into PCM audio and output simultaneously. Output terminal(s) HDMI OUT terminal DIGITAL OUT terminal HDMI OUT terminal Dolby Digital Dolby Digital Dolby Digital PCM 5.
Chapter 8 Additional information Cautions on use Moving the player If you need to move this unit, first remove the disc if there’s one loaded, and close the disc tray. Next, press ^ STANDBY/ON to switch the power to standby, checking that the POWER OFF indication on the front panel display goes off. Wait at least 10 seconds. Lastly, disconnect the power cord. Never lift or move the unit during playback — discs rotate at a high speed and may be damaged.
08 Cleaning the pickup lens The player’s lens should not become dirty in normal use, but if for some reason it should malfunction due to dust or dirt, consult your nearest Pioneer authorized service center. Although lens cleaners for players are commercially available, we advise against using them since some may damage the lens. Handling discs Do not use damaged (cracked or warped) discs. Do not scratch the disc’s signal surface or let it get dirty.
Troubleshooting 08 Incorrect operation is often mistaken for trouble or malfunction. If you think that there is something wrong with this component, check the points below. Sometimes the trouble may lie in another component. Inspect the other components and electrical appliances being used. If the trouble cannot be rectified even after checking the points below, ask your nearest Pioneer authorized service center or your dealer to carry out repair work.
08 Problem Check No picture is displayed or Is the HDMI cable the picture is not properly connected? displayed properly. Is the HDMI cable damaged? Remedy • Connect the cable properly according to the connected devices (page 16). • Disconnect the cable, then reinsert it firmly and all the way in. • TV or any other device which outputs video signals must be connected to the HDMI OUT (MAIN) terminal (page 16). If the cable is damaged, replace it with a new one.
Problem Check Remedy • No sound is output. • Sound is not output properly. Is the volume set to the minimum? If the volume of the TV or AV amplifier is set to the minimum, raise it. 08 Is the disc played back in No sound is output during slow motion play and forward and slow motion? reverse scanning. Is the disc played back in fast forward or fast reverse? Are the audio cables properly connected? • Connect the cable properly according to the connected devices (page 16).
08 Problem Check Remedy Secondary audio or interactive audio is not output. Is HDMI Audio Out properly set? When listening to the sound from an HDMI OUT terminal, set HDMI Audio Out to PCM (page 41). Are Digital Output properly set? When listening to the sound from an DIGITAL OUT terminal, set Digital Output to Reencode or PCM (page 40). Sound is fast or slow.
Network Problem 08 Check Remedy Cannot connect to network. • Insert the LAN cable securely as far as it goes (page 22). • Do not connect using a modular cable. Use a LAN cable for the NETWORK terminal. • Check that the power of the Ethernet hub (router with hub function) or the modem is turned on. • Check that the Ethernet hub (router with hub function) or the modem is properly connected. • Check the network settings. BD-LIVE function (connection to the Internet) cannot be used.
08 Problem The audio files stored on components on the network, such as a computer, cannot be played back. Check Remedy There are cases where a component with Internet security software installed cannot be accessed. The audio component on Switch on the audio component on the network before the network which has switching on this unit. been switched off is switched on. If the client is automatically authorized, you need to enter the corresponding information again.
Others 08 Problem Check Remedy Power does not turn on. Is the power cord properly connected? • Plug the power cord securely into the power outlet (page 22). • Unplug the power cord, wait several seconds, then plug the power cord back in. The player’s power turns off automatically. Is Auto Power Off set to 15 If Auto Power Off is set to 15 min or 30 min, the player’s power min or 30 min? automatically turns off if no operation is performed for the set amount of time (page 43).
08 Glossary ❖ Angle (Multi angle) Up to 9 camera angles can be recorded simultaneously on BD-ROM or DVD-Video discs, letting you view the same scene from different angles. ❖ AVCHD (Advanced Video Codec High Definition) See page 60. ❖ BDAV Of the BD format, the Audio Visual Format Specifications for HD digital broadcast recording is referred to as BDAV on this player and in these operating instructions. ❖ BD-J See page 9. ❖ BD-LIVE See page 8.
❖ Interactive audio ❖ Region number The audio signals recorded in the titles of BD-ROMs. They include for example the clicking sound made when the menu screen is operated. See page 9. ❖ Interlaced scan Some BD-ROMs include sub audio streams mixed with the main audio stream. These sub audio streams are called “secondary audio”. On some discs this secondary audio is recorded as the audio for the secondary video. With this method, one picture is displayed by scanning it twice.
08 License and trademark “BONUSVIEW™” and the logo are trademarks of the Bluray Disc Association. “Blu-ray 3D™” and the logo are trademarks of the Blu-ray Disc Association. “BD-LIVE™” logo is trademark of Blu-ray Disc Association. Copyright 2004-2013 Verance Corporation. Cinavia™ is a Verance Corporation trademark. Protected by U.S. Patent 7,369,677 and worldwide patents issued and pending under license from Verance Corporation. All rights reserved. Manufactured under license from Dolby Laboratories.
Specifications 08 Model UDP-LX500 Type UNIVERSAL DISC PLAYER Rated voltage AC 120 V (For North American models) AC 110 V to 240 V (For others) Rated frequency 50 Hz/60 Hz Power consumption 28 W Power consumption (standby) 0.4 W (For North American models) 0.45 W (For others) Power consumption (Network Standby on) 1.2 W (For North American models) 1.3 W (For others) Weight 10.3 kg (22.7 lb) External dimensions (including projecting parts) 435 mm (W) x 118 mm (H) x 337 mm (D) 171/8 in.
08 62 En
08 63 En
1-10-5 Yokoami, Sumida-ku, Tokyo 130-0015 JAPAN 18 PARK WAY, UPPER SADDLE RIVER, NEW JERSEY 07458, U.S.A.