SN29402699_X-HM16_26_26D_En_European.book 1 ページ 2016年7月22日 金曜日 午後7時2分 X-HM16 X-HM26 X-HM26D CD Receiver System Micro chaîne CD Sistema receptor de CD Sistema CD con amplificatore CD-Receiversystem CD Receiver System Система ресивера CD Register your product on/ Enregistrez votre produit sur / Registre su producto en Registrare il proprio prodotto su / Registrieren Sie hier Ihr Produkt / Registreer uw product op / Зарегистрируйте ваше изделие http://www.pioneer.
SN29402699_X-HM16_26_26D_En_European.book 2 ページ CAUTION TO PREVENT THE RISK OF ELECTRIC SHOCK, DO NOT REMOVE COVER (OR BACK). NO USER-SERVICEABLE PARTS INSIDE. REFER SERVICING TO QUALIFIED SERVICE PERSONNEL. D3-4-2-1-1_B1_En WARNING This equipment is not waterproof. To prevent a fire or shock hazard, do not place any container filled with liquid near this equipment (such as a vase or flower pot) or expose it to dripping, splashing, rain or moisture.
SN29402699_X-HM16_26_26D_En_European.book 3 ページ 2016年7月22日 金曜日 午後7時2分 Information for users on collection and disposal of old equipment and used batteries Symbol for equipment These symbols on the products, packaging, and/or accompanying documents mean that used electrical and electronic products and batteries should not be mixed with general household waste.
SN29402699_X-HM16_26_26D_En_European.book 4 ページ 2016年7月22日 金曜日 午後7時2分 Thank you for buying this Pioneer product. Please read through these operating instructions so that you will know how to operate your model properly. After you have finished reading the instructions, put them in a safe place for future reference. Contents 01 Before you start What’s in the box . . . . . . . . . . . . . . . . . . . . . . . . . . . . . . . .5 Loading the batteries in the remote control . . . . . . . . . . . .
SN29402699_X-HM16_26_26D_En_European.book 5 ページ 2016年7月22日 金曜日 午後7時2分 Before you start 01 English Chapter 1: Before you start Loading the batteries in the remote control 1 Open the rear lid and load the batteries as illustrated below. Español Please confirm that the following accessories are in the box when you open it.
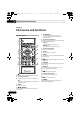
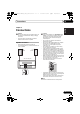
SN29402699_X-HM16_26_26D_En_European.book 02 6 ページ 2016年7月22日 金曜日 午後7時2分 Part names and functions Chapter 2: Part names and functions 5 Remote control PGM/MEMORY • Use to memory or program the CD (page 17). • Use to store FM/AM (page 20) or DAB (page 24) stations in memory. 6 TUNE +/– 2 Use to find radio frequencies (page 20). 10 11 3 Playback control buttons Use to control each function after you have selected it using the input function buttons (page 16).
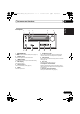
SN29402699_X-HM16_26_26D_En_European.book 7 ページ 2016年7月22日 金曜日 午後7時2分 Part names and functions 02 1 2 3 4 5 English Front panel Français TIMER Español 6 1 7 8 Í STANDBY/ON Switches the receiver between standby and on (page 12). 2 Remote sensor 9 10 7 11 Headphone socket Use to connect headphones. When the headphones are connected, there is no sound output from the speakers. Receives the signals from the remote control.
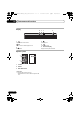
SN29402699_X-HM16_26_26D_En_European.book 02 8 ページ 2016年7月22日 金曜日 午後7時2分 Part names and functions Display 1 2 3 1 3 ; Lights when the sound is muted. Pause playback. 4 5 4 Note Timer function is set. • The mute icon will be displayed in red. 2 5 1 Speaker system 1 3 2 1 Tweeter 2 Woofer 3 Bass Reflex Duct Important • Speaker grille cannot be removed. • Both speakers can be used on either the right or the left side.
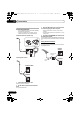
SN29402699_X-HM16_26_26D_En_European.book 9 ページ 2016年7月22日 金曜日 午後7時2分 Connections 03 English Chapter 3: Connections Speaker connection Right speaker Left speaker This unit’s rear panel Español • Push open the tabs and insert exposed wire. • Connect the black wire to (s) terminal, and the red wire to the (r) terminal. CAUTION • These speaker terminals carry HAZARDOUS LIVE voltage.
SN29402699_X-HM16_26_26D_En_European.book 03 10 ページ 2016年7月22日 金曜日 午後7時2分 Connections 3 Place the AM antenna on a flat surface and in a direction giving the best reception. Connecting antennas • Connect the AM loop antenna and the FM (DAB/FM) wire antenna as shown below. • To improve reception and sound quality, connect external antennas (see Using external antennas). • Place the antenna near a window, etc. for the best reception. • Do not place the antenna near a computer or TV.
SN29402699_X-HM16_26_26D_En_European.book 11 ページ Connections 2016年7月22日 金曜日 午後7時2分 03 Before making or changing the connections, switch off the power and disconnect the power cord from the AC outlet. After you’ve finished making all connections, plug the unit into an AC outlet. English Plugging in This unit’s rear panel Français Power cord Español To AC outlet CAUTION • Do not use any power cord other than the one supplied with this unit.
SN29402699_X-HM16_26_26D_En_European.book 04 12 ページ 2016年7月22日 金曜日 午後7時2分 Getting started Chapter 4: Getting started To turn the power on Press the Í to turn the power on. General control After use: Input function Press the Í to enter the power stand-by mode. When the INPUT on main unit is pressed, the current function will change to different mode. Press the INPUT repeatedly to select desired function.
SN29402699_X-HM16_26_26D_En_European.book 13 ページ 2016年7月22日 金曜日 午後7時2分 Getting started 04 Setting the wake-up timer Equalizer Used to change the existing timer setting, or to set a new timer. When the EQ is pressed, the current mode setting will be displayed. To change to a different mode, press the EQ repeatedly until the desired sound mode appears.
SN29402699_X-HM16_26_26D_En_European.book 04 14 ページ 2016年7月22日 金曜日 午後7時2分 Getting started Calling the wake-up timer It can be used to re-use an existing timer setting. Using Headphones 1 As well as steps 1 through 3 in “Setting the wake-up timer”. Connect to the jack plug of the headphones. When the headphones are connected, there is no sound output from the speakers. 2 Press / to select “TIMER ON”, then press ENTER.
SN29402699_X-HM16_26_26D_En_European.book 15 ページ 2016年7月22日 金曜日 午後7時2分 Disc playback 05 Disc playback Play MP3 music files MP3 track data is called “music file” and the location they are stored is called a “folder” in this document. e.g., Playing discs or files 1 Press Í to turn the power on. 2 Press CD on the remote control or INPUT repeatedly on the main unit to select CD input. 3 Press < on the main unit to open the disc tray. 4 Place the disc on the disc tray, label side up.
SN29402699_X-HM16_26_26D_En_European.book 05 16 ページ 2016年7月22日 金曜日 午後7時2分 Disc playback Basic operations Function Main unit Remote control Operation Play Press in the stop mode. Stop Press in the playback mode. (when playing a CD) “RESUME” is displayed and the place where you stopped play is memorized. Press again and the memorized position is cleared. Pause Press in the playback mode. Press 1; to resume playback from the paused point. Track up/ down Press in the playback or stop mode.
SN29402699_X-HM16_26_26D_En_European.book 17 ページ 2016年7月22日 金曜日 午後7時2分 Disc playback 05 Switch the display contents You can choose up to 24 selections for playback in the order you like. 1 1 Whilst in the stop mode, press PGM/ MEMORY on the remote control to enter the programming save mode. Press : 9 to select the desired tracks. 3 Press ENTER to save track number. 4 Repeat steps 2 - 3 for other tracks. Up to 24 tracks can be programmed. 5 Press 1; to start playback.
SN29402699_X-HM16_26_26D_En_European.book 06 18 ページ 2016年7月22日 金曜日 午後7時2分 USB playback Chapter 6: USB playback Playing USB storage devices It is possible to listen to two-channel audio using the USB interface with MP3 files on the front of this receiver. • Pioneer does not guarantee that any file recorded on a USB storage device will play or that power will be supplied to a USB storage device.
SN29402699_X-HM16_26_26D_En_European.book 19 ページ USB playback Repeat play can play one track, all tracks or a programmed sequence continuously. To repeat one track: Press ENTER. repeatedly until “REPEAT ONE” appears. Press 金曜日 午後7時2分 06 English Repeat play 2016年7月22日 To repeat all tracks: repeatedly until “REPEAT ALL” appears. Press To cancel repeat play: Press ENTER. repeatedly until “REPEAT OFF” appears. Press Français Press ENTER.
SN29402699_X-HM16_26_26D_En_European.book 07 20 ページ 2016年7月22日 金曜日 午後7時2分 Using the tuner Chapter 7: Using the tuner Listening to FM (For European models)/Listening to FM or AM (For North American models) The following steps show you how to tune in to FM and AM radio broadcasts using the automatic (search) and manual (step) tuning functions. Once you are tuned to a station you can memorize the frequency for recall later. See Saving station presets below for more on how to do this.
SN29402699_X-HM16_26_26D_En_European.book 21 ページ 2016年7月22日 金曜日 午後7時2分 Using the tuner 07 Search for stations by Program Type To recall a memorised station Press PRESET +/– to select the desired station. To erase entire preset memory 1 Press TUNER on the remote control. 2 Press and hold until “MEMORY CLEAR” appears. Note • All stations will be erased.
SN29402699_X-HM16_26_26D_En_European.book 07 22 ページ Whilst in the ASPM operation mode, the tuner will automatically search for new RDS stations. Up to 30 stations can be stored. If you have already stored some stations in memory, the number of new stations you can store will be less. 1 Press TUNER until “FM” appears on the display. 2 Press MENU and then press / until “FM RDS” appears on the display. 3 Press ENTER and then press / until “ASPM” appears on the display. 4 Press ENTER.
SN29402699_X-HM16_26_26D_En_European.book 23 ページ 2016年7月22日 金曜日 午後7時2分 Using the tuner 07 About DAB+ (Digital Audio Broadcasting) You can make the auto scan again when you move the unit to other areas or add multiplex channels to the station list. 1 Press the TUNER until “DAB” appears on the display. 2 Press MENU and then press / until “DAB SCAN” appears on the display. 3 Press ENTER and then press / until “AUTO” appears on the display. 4 Press ENTER. Auto Scan scanning begins.
SN29402699_X-HM16_26_26D_En_European.book 07 24 ページ You can switch DAB+ display information. Press the DISPLAY button. Each time the button is pressed, the information display changes in the following order. When “NO SIGNAL” appears, the DISPLAY button does not allow you to change the display. 午後7時2分 DAB Frequency table (BAND III) Frequency Label Frequency 174.928 MHz 5A 208.064 MHz 9D 176.640 MHz 5B 209.936 MHz 10A [Programme Name] 178.352 MHz 5C 211.
SN29402699_X-HM16_26_26D_En_European.book 25 ページ 2016年7月22日 金曜日 午後7時2分 Other connections 08 English Chapter 8: Other connections Connect your auxiliary playback component using the AUDIO IN input on the rear panel. This function automatically switches to "AUDIO IN" when there is audio input to the AUDIO IN jack. 1 Press MENU and then press / until “Audio In detect” appears on the display. 2 Press ENTER and then press / to switch Audio In detect ON/OFF.
SN29402699_X-HM16_26_26D_En_European.book 09 26 ページ 2016年7月22日 金曜日 午後7時2分 Bluetooth® Audio playback Chapter 9: Bluetooth® Audio playback X-HM26/26D only Music playback using Bluetooth wireless technology Remote control operation The remote control supplied with this unit allows you to play and stop media, and perform other operations. Note Bluetooth wireless technology enabled device: Cell phone • The Bluetooth wireless technology enabled device must support AVRCP profiles.
SN29402699_X-HM16_26_26D_En_European.book 27 ページ 2016年7月22日 金曜日 午後7時2分 Bluetooth® Audio playback Listen to music on the unit from a Bluetooth capable device 1 Press the . The unit will switch to Bluetooth input. 2 A Bluetooth connection will be created between the Bluetooth capable device and the unit. Procedures for connecting to the unit should be performed from the Bluetooth capable device.
SN29402699_X-HM16_26_26D_En_European.book 09 28 ページ 2016年7月22日 金曜日 午後7時2分 Bluetooth® Audio playback Radio wave caution This unit uses a 2.4 GHz radio wave frequency, which is a band used by other wireless systems (see list below). To prevent noise or interrupted communication, do not use this unit nearby such devices, or make sure these devices are switched off during use. • Cordless phones • Cordless facsimiles • Microwave ovens • Wireless LAN devices (IEEE802.
SN29402699_X-HM16_26_26D_En_European.book 29 ページ 2016年7月22日 金曜日 午後7時2分 Additional information 10 Additional information Incorrect operations are often mistaken for trouble and malfunctions. If you think that there is something wrong with this component, check the points below. Sometimes the trouble may lie in another component. Investigate the other components and electrical appliances being used.
SN29402699_X-HM16_26_26D_En_European.book 10 30 ページ 2016年7月22日 金曜日 午後7時2分 Additional information When a USB storage device is connected Problem Check Remedy USB storage device is not recognized. Is the USB storage device properly connected? Connect the device securely (all the way in). Is the USB storage device connected via a USB hub? This unit does not support USB hubs. Connect the USB storage device directly. This unit only supports USB mass storage class devices.
SN29402699_X-HM16_26_26D_En_European.book 31 ページ 2016年7月22日 金曜日 午後7時2分 Additional information 10 When the Bluetooth wireless technology device is connected or operated Remedy The Bluetooth wireless technology device cannot be connected or operated. Sound from the Bluetooth wireless technology device is not emitted or the sound is interrupted. Check that no object that emits electromagnetic waves in the 2.
SN29402699_X-HM16_26_26D_En_European.book 10 32 ページ 午後7時2分 Regarding copy protected CDs About condensation This unit is designed to conform to the specifications of the audio CD format. This unit does not support the playback or function of discs that do not conform to these specifications. If this unit is moved suddenly from a cold place into a warm room (in winter, for example) or if the temperature in the room in which this unit is installed rises suddenly due to heater operation, etc.
SN29402699_X-HM16_26_26D_En_European.book 33 ページ 2016年7月22日 金曜日 午後7時2分 Additional information 10 Cleaning the lens Handling discs Storing • Always place discs in their cases and store them vertically, avoiding hot, humid places, places exposed to direct sunlight and extremely cold places. • Be sure to read the cautions included with the disc. Cleaning discs About specially shaped discs Specially shaped discs (heart-shaped, hexagonal, etc.) cannot be played on this unit.
SN29402699_X-HM16_26_26D_En_European.book 10 34 ページ • Amplifier section RMS Power Output: . . . . . . . . . . . . . . . . . . . . 15 W + 15 W (1 kHz, 10 %, T.H.D., 8 ) • Tuner section Frequency Range (FM) . . . . . . . . . 87.5 MHz to 108.0 MHz Antenna Input (FM). . . . . . . . . . . . . . . . . . 75 unbalanced Frequency Range (AM) (For North American models) . . . . . . . . . . . . . . . . . . . . . . . . . . . . . . 530 kHz to 1710 kHz Antenna (AM) . . . . . . . . . . . . . . . . . . . . . . .
SN29402699_X-HM16_26_26D_En_European.
X-HM16_26_26D_Fr.book 2 ページ 2016年7月22日 ATTENTION POUR ÉVITER TOUT RISQUE D’ÉLECTROCUTION, NE PAS ENLEVER LE COUVERCLE (NI LE PANNEAU ARRIÈRE). AUCUNE PIÈCE RÉPARABLE PAR L’UTILISATEUR NE SE TROUVE À L’INTÉRIEUR. CONFIER TOUT ENTRETIEN À UN PERSONNEL QUALIFIÉ UNIQUEMENT. D3-4-2-1-1_B1_Fr AVERTISSEMENT Cet appareil n’est pas étanche.
X-HM16_26_26D_Fr.book 3 ページ 2016年7月22日 金曜日 午後5時11分 Information à destination des utilisateurs sur la collecte et l’élimination des équipements et batteries usagés Marquage pour les équipements Ces symboles qui figurent sur les produits, les emballages et/ou les documents d’accompagnement signifient que les équipements électriques et électroniques et batteries usagés ne doivent pas être jetés avec les déchets ménagers et font l’objet d’une collecte sélective.
X-HM16_26_26D_Fr.book 4 ページ 2016年7月22日 金曜日 午後5時11分 Nous vous remercions d’avoir acheté ce produit Pioneer. Veuillez lire attentivement ce mode d'emploi de manière à pouvoir utiliser votre modèle correctement. Lorsque vous avez terminé, rangez ces instructions en lieu sûr afin de pouvoir vous y référer à l’avenir. Table des matières 01 Préparatifs Contenu de l’emballage . . . . . . . . . . . . . . . . . . . . . . . . . . .5 Mise en place des piles dans la télécommande . . . . . . . .
X-HM16_26_26D_Fr.book 5 ページ 2016年7月22日 金曜日 午後5時11分 Préparatifs 01 English Chapitre 1 : Préparatifs Utilisation de la télécommande La télécommande a une portée d’environ 7 mètres avec un angle de 30° par rapport au capteur de télécommande. T 2 Refermez le couvercle arrière. 30° ATTENTION • N’utilisez que les piles spécifiées à l’exclusion de toute autre. N’utilisez pas non plus une pile neuve avec une pile usée.
X-HM16_26_26D_Fr.book 02 6 ページ 2016年7月22日 金曜日 午後5時11分 Les organes et leurs fonctions Chapitre 2 : Les organes et leurs fonctions 5 Télécommande PGM/MEMORY • Utiliser pour mémoriser ou programmer le CD (page 17). • Utiliser pour mettre en mémoire les stations FM/AM (page 20) ou DAB (page 24).
X-HM16_26_26D_Fr.book 7 ページ 2016年7月22日 金曜日 午後5時11分 Les organes et leurs fonctions 02 1 2 3 4 5 English Panneau avant Français TIMER Español 1 7 8 9 Í STANDBY/ON 10 7 11 Prise casque / écouteurs Cette touche permet d’allumer le récepteur et de le mettre en veille (page 12). Permet de raccorder un casque. Lorsque le casque est branché, les enceintes ne fournissent aucun son.
X-HM16_26_26D_Fr.book 02 8 ページ 2016年7月22日 金曜日 午後5時11分 Les organes et leurs fonctions Afficheur 1 2 3 4 1 3 ; S’allume lorsque le son est coupé. Pour mettre la lecture en pause. 5 4 Remarque La fonction réveille-matin est activée. • L’icône de silence est affichée en rouge. 2 5 1 Enceintes Acoustiques 1 3 2 1 Aigu 2 Grave 3 Bornes d’enceintes Important • La grille du haut-parleur ne peut pas être enlevée.
X-HM16_26_26D_Fr.book 9 ページ 2016年7月22日 金曜日 午後5時11分 Connexions 03 English Chapitre 3 : Connexions • Poussez sur les languettes pour les ouvrir et insérez le fil dénudé. • Branchez le fil noir à la borne (s), et le fil rouge à la borne (r). Enceinte gauche Deutsch Panneau arriere de cet apparei Italiano Enceinte droite Español Raccordement des enceintes ATTENTION • Les bornes des haut-parleurs sont sous une tension ACTIVE DANGEREUSE.
X-HM16_26_26D_Fr.book 03 10 ページ 2016年7月22日 金曜日 午後5時11分 Connexions Raccordement des antennes • Raccordez l’antenne cadre AM et l’antenne filaire FM (DAB/FM) comme indiqué ci-dessous. • Pour améliorer la réception et la qualité du son, raccordez les antennes externes (voir la section Utilisation des antennes externes ci-dessous). 3 Placez l’antenne AM sur une surface plane en l’orientant vers une direction qui offre la meilleure réception.
X-HM16_26_26D_Fr.book 11 ページ 2016年7月22日 Connexions 金曜日 午後5時11分 03 Avant d’effectuer ou de modifier les raccordements, mettez l’appareil hors tension et débranchez le cordon d’alimentation au niveau de la prise secteur. Après avoir effectué toutes les connexions, branchez l’appareil sur une prise secteur. Français Panneau arrière de cet appareil English Branchement Español Cordon d’alimentation ATTENTION • N’utilisez aucun autre cordon d’alimentation que celui fourni avec cet appareil.
X-HM16_26_26D_Fr.book 04 12 ページ 2016年7月22日 金曜日 午後5時11分 Pour commencer Chapitre 4 : Pour commencer Pour allumer l’appareil Commandes générales Appuyez sur la touche Í pour mettre l’appareil sous tension. Après utilisation : Fonction d’entrée Appuyez sur Í pour passer en mode veille. La touche INPUT située sur le panneau supérieur de l’appareil permet de permuter la source d’entrée. Appuyez sur la touche INPUT à plusieurs reprises pour sélectionner la source souhaitée.
X-HM16_26_26D_Fr.book 13 ページ 2016年7月22日 金曜日 午後5時11分 Pour commencer 04 Réglage de l’alarme de réveil Equalizer Vous pouvez modifier les réglages de l’alarme de réveillematin en cours ou définir une nouvelle alarme.
X-HM16_26_26D_Fr.book 04 14 ページ 2016年7月22日 金曜日 午後5時11分 Pour commencer Rappel de l’alarme de réveil Cette procédure permet de réutiliser les réglages d’une alarme existante. 1 Suivez les étapes 1 à 3 de la procédure « Réglage de l’alarme de réveil ». Utilisation avec un casque Branchez le casque sur la prise PHONES située sur le panneau avant de l’appareil. Lorsque le casque est branché, les enceintes ne fournissent aucun son.
X-HM16_26_26D_Fr.book 15 ページ 2016年7月22日 金曜日 午後5時11分 Lecture de disque 05 Lecture de disque Lire les fichiers musicaux MP3 Les données d'une piste MP3 sont appelées « music file » et l'endroit où ils sont stockés est appelé « folder » dans ce document. Ex : Lecture de disques ou de fichiers 1 Appuyez sur Í pour la mise sous tension. 3 Appuyez sur la touche < de l'appareil principal pour ouvrir le plateau du disque. 4 Placez le disque sur le tiroir disque, côté étiquette vers le haut.
X-HM16_26_26D_Fr.book 05 16 ページ 2016年7月22日 金曜日 午後5時11分 Lecture de disque Astuce • Si aucune opération n’a été effectuée en mode CD ou si le fichier audio n’a pas été lu depuis plus de 20 minutes, l’appareil se met automatiquement hors tension. Pour cela, il est nécessaire d’activer (ON) la fonction d’arrêt automatique la fonction de mise hors tension automatique. • La fonction de mise hors tension automatique peut être activée/désactivée (ON/OFF) (page 33).
X-HM16_26_26D_Fr.book 17 ページ 2016年7月22日 金曜日 午後5時11分 Lecture de disque Appuyez à plusieurs reprises sur la touche RANDOM jusqu’à ce que l’indication « RANDOM OFF » apparaisse. Appuyez sur la touche ENTER. Remarque On peut sélectionner 24 morceaux (maxi) pour la lecture dans un ordre souhaité. 2 Appuyez sur : 9 pour sélectionner les pistes de votre choix. 4 Répétez les étapes 2 - 3 pour les autres pistes. Il est possible de programmer jusqu'à 24 pistes.
X-HM16_26_26D_Fr.book 06 18 ページ 2016年7月22日 金曜日 午後5時11分 Lecture USB Chapitre 6 : Lecture USB Lecture à partir d’un périphérique USB Il est possible d'écouter du son provenant de deux canaux avec les fichiers MP3 en utilisant l'interface USB située à l'avant de cet ampli-tuner. • Pioneer ne garantit pas que tout fichier enregistré sur un périphérique de stockage USB puisse être lu par l’appareil, ni que ce dernier puisse fournir l’alimentation nécessaire au périphérique de stockage USB.
X-HM16_26_26D_Fr.book 19 ページ 2016年7月22日 Lecture USB Avec répétition lecture, l’appareil peut relire continuellement une piste toutes les pistes ou une séquence programmée. Pour répéter la lecture d’une piste : Appuyez à plusieurs reprises sur la touche jusqu’à ce que l’indication « REPEAT ONE » apparaisse. Appuyez sur la touche ENTER. Appuyez à plusieurs reprises sur la touche jusqu’à ce que l’indication « REPEAT ALL » apparaisse. Appuyez sur la touche ENTER.
X-HM16_26_26D_Fr.book 07 20 ページ 2016年7月22日 金曜日 午後5時11分 Utilisation du tuner Chapitre 7 : Utilisation du tuner Écoute en FM (Pour les modèles européens)/Écoute en FM ou AM (Pour les modèles nord-américains) Les étapes suivantes décrivent la façon de régler les bandes FM et AM à l’aide de la recherche automatique et des fonctions de réglage manuel. Une fois que le tuner est réglé sur une station, vous pouvez mémoriser sa fréquence pour accéder facilement à cette station plus tard.
X-HM16_26_26D_Fr.book 21 ページ 2016年7月22日 金曜日 午後5時11分 Utilisation du tuner Pour plus d’information à ce sujet, voir la section Accord audessus. 2 Appuyez sur PGM/MEMORY. L’affichage du numéro de préréglage clignote. 4 Appuyez sur la touche PGM/MEMORY pour enregistrer la station dans la mémoire. • La fonction de sauvegarde conserve les réglages mémorisés pendant quelques heures en cas de panne de courant ou lorsque le cordon d’alimentation secteur est débranché.
X-HM16_26_26D_Fr.book 07 22 ページ 2016年7月22日 News – Informations Current Affairs – Analyse de l’actualité Information – Informations d’ordre général Sport – Sport Education – Éducation Drama – Pièces radiophoniques, etc. Cultures – Culture nationale ou régionale, théâtre, etc. Science – Science et technologie Varied Speech – Habituellement programmes de discussion, quiz ou entretiens.
X-HM16_26_26D_Fr.book 23 ページ 2016年7月22日 金曜日 午後5時11分 Utilisation du tuner 07 SIGNAL DAB+ MULTIPLEX (ENSEMBLE) Tuner Accord manuel Vous pouvez stocker manuellement des stations que le balayage automatique ne peut pas trouver. Si la réception est faible, vous pouvez régler la sensibilité. Un accord manuel n’est possible qu’après un accord automatique. Effectuez tout d’abord un balayage automatique. 1 Appuyez sur TUNER jusqu’à ce que « DAB » s’affiche sur l’écran.
X-HM16_26_26D_Fr.book 07 24 ページ 2016年7月22日 Vous pouvez changer les informations DAB+ affichées. Appuyez sur le bouton DISPLAY. Chaque fois que vous appuyez sur le bouton, l’écran d’informations change dans l’ordre suivant. Lorsque « NO SIGNAL » s’affiche, le bouton DISPLAY ne vous permet pas de changer l’affichage. [Nom du programme] Le nom de la station s’affiche.
X-HM16_26_26D_Fr.book 25 ページ 2016年7月22日 金曜日 午後5時11分 Autres raccordements 08 English Chapitre 8 : Autres raccordements Branchez à la mini-prise AUDIO IN du panneau arrière votre appareil de lecture auxiliaire. Cette fonction passe automatiquement sur “AUDIO IN” lorsque l’entrée du son s’effectue par la prise AUDIO IN. 1 Appuyez sur MENU puis appuyez sur / jusqu'à ce que “Audio In detect” apparaisse sur l'afficheur. 2 Appuyez sur ENTER puis appuyez sur / pour commuter Audio In detect sur ON/OFF.
X-HM16_26_26D_Fr.book 09 26 ページ 2016年7月22日 金曜日 午後5時11分 Lecture audio Bluetooth® Chapitre 9 : Lecture audio Bluetooth® X-HM26/26D uniquement Lecture de musique par la technologie sans fil Bluetooth Fonctionnement par télécommande La télécommande fournie permet de lire et d’arrêter la lecture de contenus sur l’appareil, ainsi que d’effectuer d’autres opérations.
X-HM16_26_26D_Fr.book 27 ページ 2016年7月22日 金曜日 午後5時11分 Lecture audio Bluetooth® BT STANDBY Remarque 4 Vérifiez que l’association a bien été effectuée sur le périphérique sans fil Bluetooth. 3 Appuyez sur ENTER puis appuyez sur / pour commuter BT STANDBY sur ON/OFF. Si l’association avec le périphérique sans fil Bluetooth a été réalisée correctement, le nom du périphérique s’affiche sur le panneau avant de l’appareil. (Seuls les caractères alphanumériques d’un seul octet peuvent être affichés.
X-HM16_26_26D_Fr.book 09 28 ページ 2016年7月22日 Cet appareil utilise une fréquence d’ondes radio de 2,4 GHz, cette bande étant également utilisée par d’autres systèmes sans fil (consultez la liste ci-dessous). Pour éviter le brouillage ou les interruptions de communication, n’utilisez pas cet appareil à proximité de dispositifs fonctionnant sur la même bande, ou veillez à éteindre ces dispositifs lorsque vous utilisez l’adaptateur.
X-HM16_26_26D_Fr.book 29 ページ 2016年7月22日 金曜日 午後5時11分 Informations supplémentaires 10 Informations supplémentaires English Guide de dépannage Français Chapitre 10 : Souvent, les opérations incorrectes sont interprétées comme des problèmes ou des dysfonctionnements. Si vous estimez que cet appareil ne fonctionne pas correctement, vérifiez les points ci-dessous. Parfois, le problème peut provenir d’un autre composant. Examinez les autres composants et les appareils électriques utilisés.
X-HM16_26_26D_Fr.book 10 30 ページ 2016年7月22日 金曜日 午後5時11分 Informations supplémentaires Lorsqu’un périphérique de stockage USB est connecté Problème éventuel Vérification Le périphérique de stockage Le périphérique de stockage USB USB n’est pas reconnu. est-il connecté correctement ? Le périphérique de stockage USB est-il connecté via un concentrateur USB ? Solution Connectez le périphérique correctement (en l’engageant à fond). L’appareil ne prend pas en charge les concentrateurs USB.
X-HM16_26_26D_Fr.book 31 ページ 2016年7月22日 金曜日 午後5時11分 Informations supplémentaires 10 X-HM26/26D uniquement Solution Le périphérique à technologie sans fil Bluetooth ne peut pas être raccordé ou utilisé. Le son en provenance du périphérique à technologie sans fil Bluetooth n’est pas émis ou le son est interrompu.
X-HM16_26_26D_Fr.book 10 32 ページ 2016年7月22日 Ce lecteur se conforme aux spécifications du format CD Audio. Il ne prend pas en charge la lecture ou les fonctions des disques non conformes à ces spécifications. Formats de fichiers audio pris en charge Cet appareil ne prend pas en charge le codage sans perte.
X-HM16_26_26D_Fr.book 33 ページ 2016年7月22日 金曜日 午後5時11分 Informations supplémentaires Rangement Les disques à formes spéciales (en cœur, hexagonaux, etc.) ne peuvent pas être lus sur cet appareil. N’essayez pas de lire de tels disques car ils pourraient endommager cet appareil. Français • Remettez toujours les disques dans leur boîtier et rangez-les verticalement, en évitant les endroits chauds, humides, exposés directement à la lumière du soleil ou extrêmement froids.
X-HM16_26_26D_Fr.book 10 34 ページ 2016年7月22日 • Section Amplificateur Puissance de sortie RMS : . . . . . . . . . . . . . . 15 W + 15 W (1 kHz, 10 %, T.H.D., 8 Ω) • Section tuner Gamme de fréquences (FM) . . . . . 87,5 MHz à 108,0 MHz Entrée antenne (FM) . . . . . . . . . . . . . . . 75 Ω asymétrique Gamme de fréquences (AM) (Pour les modèles nord-américains) . . . . . . . . . . . . . . . . . . . . . . . . . . . . . . 530 kHz à 1710 kHz Antenne (AM) . . . . . . . . . . . . . . . . . . . . . . . .
SN29402699_X-HM16_26_26D_En_European.
X-HM16_26_26D_Es.book 2 ページ 2016年7月22日 PRECAUCIÓN PARA PREVENIR EL PELIGRO DE CHOQUE ELÉCTRICO NO REMOVER LA TAPA NI LAS PARTES DENTRO NO UTILIZADAS, LLAMAR UNA PERSONA CUALIFICADA. D3-4-2-1-1_B2_Es ADVERTENCIA Este aparato no es impermeable. Para evitar el riesgo de incendio y de descargas eléctricas, no ponga ningún recipiente lleno de líquido (como pueda ser un vaso o un florero) cerca del aparato ni lo exponga a goteo, salpicaduras, lluvia o humedad.
X-HM16_26_26D_Es.book 3 ページ 2016年7月22日 金曜日 午前10時23分 Información para los usuarios en la recogida y tratamiento de los equipos al final de su vida y de las pilas y baterías usadas. Símbolo para equipos Estos símbolos en los productos, embalaje, y/o en los documentos que los acompañan significa que los productos eléctricos y electrónicos al final de su vida, las pilas y baterías no deben mezclarse con los residuos generales de su hogar.
X-HM16_26_26D_Es.book 4 ページ 2016年7月22日 金曜日 午前10時23分 Gracias por comprar un producto Pioneer. Le sugerimos que lea atentamente estas manual de instrucciones a fin de que aprenda a utilizar su equipo de manera adecuada. Después de leer las instrucciones, guárdelas en un lugar seguro para futuras referencias. Índice 01 Antes de comenzar Contenido de la caja . . . . . . . . . . . . . . . . . . . . . . . . . . . . .5 Colocación de las pilas en el mando a distancia . . . . . . . .
X-HM16_26_26D_Es.book 5 ページ 2016年7月22日 金曜日 午前10時23分 Antes de comenzar 01 English Capítulo 1: Antes de comenzar Utilización del mando a distancia El mando a distancia tiene un alcance de unos 7 metros en un ángulo de 30º desde el sensor remoto. T Cierre la tapa trasera. 30° Nederlands INPU 2 Deutsch 1 Abra la tapa trasera e introduzca las pilas como se muestra a continuación.
X-HM16_26_26D_Es.book 02 6 ページ 2016年7月22日 金曜日 午前10時23分 Nombres y funciones de los controles Capítulo 2: Nombres y funciones de los controles 4 Mando a distancia / // , ENTER Permiten seleccionar/cambiar los modos y la configuración del sistema, así como confirmar acciones. 5 1 2 10 11 3 PGM/MEMORY • Utilícelo para memorizar o programar el CD (página 17). • Utilícelo para memorizar emisoras FM/AM (página 20) o DAB (página 24).
X-HM16_26_26D_Es.book 7 ページ 2016年7月22日 金曜日 午前10時23分 Nombres y funciones de los controles 02 1 2 3 4 5 English Panel frontal Français TIMER Español 1 7 8 Í STANDBY/ON Alterna el receptor entre encendido y modo de espera (página 12). 2 Sensor del mando a distancia 9 10 7 11 Toma de auriculares Utilícela para conectar un par de auriculares. Cuando se conecta un par de auriculares, los altavoces no emiten ningún sonido.
X-HM16_26_26D_Es.book 02 8 ページ 2016年7月22日 金曜日 午前10時23分 Nombres y funciones de los controles Indicadores 1 2 3 4 1 3 ; Se ilumina cuando se silencia el sonido. Efectuar una pausa en la reproducción. 5 4 Nota La función del temporizador está activada. • El icono de silencio se mostrará en rojo. 2 5 1 Sistema de altavoces 1 3 2 1 Altavoz de agudos 2 Altavoz de graves 3 Terminales de altavoz Importante • No se puede extraer la rejilla del altavoz.
X-HM16_26_26D_Es.book 9 ページ 2016年7月22日 金曜日 午前10時23分 Conexiones 03 English Capítulo 3: Conexiones • Empuje para abrir las pestañas e introduzca los hilos expuestos del cable. • Conecte el cable negro al terminal (s) y el cable rojo al terminal (r). Altavoz izquierdo Deutsch Panel posterior de este receptor Italiano Altavoz derecho Español Conexión de los altavoces PRECAUCIÓN • Por estos terminales de altavoz circula voltaje ACTIVO que es PELIGROSO.
X-HM16_26_26D_Es.book 03 10 ページ 2016年7月22日 金曜日 午前10時23分 Conexiones 2 Coloque la antena de cuadro de AM en el soporte fijado. Conexión de antenas • Conecte la antena de cuadro de AM y la antena de hilo de FM (DAB/FM) como se indica a continuación. • Para mejorar la recepción y la calidad de sonido, conecte antenas exteriores (consulte más abajo Uso de antenas exteriores).
X-HM16_26_26D_Es.book 11 ページ 2016年7月22日 金曜日 午前10時23分 Conexiones 03 Conexión a la corriente English Antes de realizar o cambiar las conexiones, apague el sistema y desenchufe el cable de alimentación de la toma de CA. Después de haber terminado todas las conexiones, enchufe la unidad a una toma de corriente de CA. Français Panel posterior de este receptor Español Deutsch PRECAUCIÓN • No utilice ningún cable de alimentación que no sea el suministrado con esta unidad.
X-HM16_26_26D_Es.book 04 12 ページ 2016年7月22日 金曜日 午前10時23分 Primeros pasos Capítulo 4: Primeros pasos Para encender la unidad Pulse Í para conectar la alimentación. Control general Después del uso: Función de entrada Para colocar la unidad en el modo de espera, pulse Í. Al pulsar INPUT en la unidad principal, la función en curso cambiará a otro modo. Pulse INPUT varias veces para seleccionar la función deseada.
X-HM16_26_26D_Es.book 13 ページ 2016年7月22日 金曜日 午前10時23分 Primeros pasos 04 Configuración del despertador Equalizer Para cambiar la configuración actual del despertador o realizar una nueva configuración: FLAT ACTIVE Un sonido básico, plano Un sonido potente que realza los tonos bajos y altos NIGHT Un sonido que puede escucharse de noche, incluso a un volumen más bajo Cuando se activa la alimentación por primera vez, la unidad entrará en el modo P.bass, que enfatiza las frecuencias de bajos.
X-HM16_26_26D_Es.book 04 14 ページ 2016年7月22日 金曜日 午前10時23分 Primeros pasos Cómo restablecer el despertador Permite volver a utilizar una configuración de despertador existente. 1 Siga los pasos 1 a 3 indicados en “Configuración del despertador”. 2 Pulse / para seleccionar “TIMER ON” y, a continuación, pulse ENTER. Uso de auriculares Conecte los auriculares a la toma de auriculares. Cuando se conecta un par de auriculares, los altavoces no emiten ningún sonido.
X-HM16_26_26D_Es.book 15 ページ 2016年7月22日 金曜日 午前10時23分 Reproducción de discos 05 Reproducción de discos Reproduzca archivos de música MP3 En este documento, los datos de la pista MP3 se denominan “music file” y la ubicación en la que se guardan se denomina “folder”. por ejemplo, Français Este sistema puede reproducir un CD, CD-R/RW estándar en formato CD y CD-R/RW con archivos MP3, pero no puede grabar en ellos.
X-HM16_26_26D_Es.book 05 16 ページ 2016年7月22日 金曜日 午前10時23分 Reproducción de discos Sugerencia • Si no se ha llevado a cabo ninguna operación en el modo de CD y no se ha reproducido ningún archivo de audio durante más de 20 minutos, la unidad se apagará automáticamente. En este caso es necesario que apagado automático esté ajustado a ON. • El apagado automático se puede ajustar a ON/OFF (página 33).
X-HM16_26_26D_Es.book 17 ページ 2016年7月22日 金曜日 午前10時23分 Reproducción de discos 05 Podrá seleccionar hasta 24 selecciones para la reproducción en el orden que usted prefiera. 1 Pulse DISPLAY durante la reproducción. Si el archivo contiene el título, el nombre del artista y el nombre del álbum, esta información se mostrará. (En esta unidad solo podrá visualizar caracteres alfanuméricos. Los caracteres que no sean alfanuméricos se mostrarán como “∫”.
X-HM16_26_26D_Es.book 06 18 ページ 2016年7月22日 金曜日 午前10時23分 Reproducción USB Capítulo 6: Reproducción USB Reproducción de dispositivos de almacenamiento USB Se puede escuchar audio de dos canales a través de la interfaz USB con archivos MP3 en el frontal del receptor. • Pioneer no garantiza que todos los ficheros grabados en un dispositivo de almacenamiento USB puedan reproducirse, ni que se suministrará alimentación a un dispositivo de almacenamiento USB.
X-HM16_26_26D_Es.book 19 ページ 2016年7月22日 Reproducción USB La repetición de lectura de una pista se puede realizar de forma que afecte a todas las pistas o a una secuencia programada de forma continua. Para escuchar nuevamente una pista: Para repetir todas las pistas: Pulse varias veces hasta que se muestre “REPEAT ALL”. Pulse ENTER.
X-HM16_26_26D_Es.book 07 20 ページ 2016年7月22日 金曜日 午前10時23分 Uso del sintonizador Capítulo 7: Uso del sintonizador • La sintonización automática omitirá las emisoras que presenten una señal débil. • Para detener la sintonización automática, pulse ∫. • Si ha sintonizado una emisora RDS (sistema de radiodifusión de datos), la frecuencia se mostrará en primer lugar. Finalmente, aparecerá el nombre de la emisora.
X-HM16_26_26D_Es.book 21 ページ 2016年7月22日 金曜日 午前10時23分 Uso del sintonizador 4 Pulse PGM/MEMORY para guardar la emisora en la memoria. 1 Pulse TUNER hasta que “FM” aparezca en la pantalla. 2 Pulse DISPLAY repetidamente.
X-HM16_26_26D_Es.book 07 22 ページ 2016年7月22日 News – Noticias Current Affairs – Temas de actualidad Information – Información general Sport – Deportes Education – Material educativo Drama – Radionovelas, etc. Cultures – Cultura nacional o regional, teatro, etc. Science – Ciencia y tecnología Varied Speech – Material basado normalmente en charlas, tales como concursos o entrevistas.
X-HM16_26_26D_Es.book 23 ページ 2016年7月22日 金曜日 午前10時23分 Uso del sintonizador 07 DAB + SIGNAL MULTIPLEX (CONJUNTO) Exploración automática Puede iniciar la búsqueda automática de nuevo si desplaza la unidad a otras zonas o añade canales multiplex a la lista de emisoras. 1 Pulse TUNER hasta que aparezca “DAB” en la pantalla. 2 Pulse MENU y después pulse / hasta que “DAB SCAN” aparezca en la pantalla. 3 Pulse ENTER y después pulse / hasta que “AUTO” aparezca en la pantalla. 4 Pulse ENTER.
X-HM16_26_26D_Es.book 07 24 ページ 2016年7月22日 Puede cambiar la visualización de información de DAB+. Pulse el botón DISPLAY. Cada vez que se pulsa el botón la visualización de información cambia en el siguiente orden. Cuando aparece “NO SIGNAL”, el botón DISPLAY no permite cambiar la visualización. [Programme Name] 5 Repita los pasos 1 - 4 para establecer otras emisoras o para cambiar una emisora presintonizada.
X-HM16_26_26D_Es.book 25 ページ 2016年7月22日 金曜日 午前10時23分 Otras conexiones 08 English Capítulo 8: Otras conexiones Conecte su componente de reproducción auxiliar usando la entrada AUDIO IN del panel trasero. Esta función cambia automáticamente a “AUDIO IN” cuando hay entrada de audio al conector AUDIO IN. 1 Pulse MENU y después pulse / hasta que “Audio In detect” aparezca en la pantalla. 2 Pulse ENTER y después pulse alternar Audio In detect ON/OFF.
X-HM16_26_26D_Es.book 09 26 ページ 2016年7月22日 金曜日 午前10時23分 Reproducción de audio con Bluetooth® Capítulo 9: Reproducción de audio con Bluetooth® Solamente X-HM26/26D Reproducción de música empleando la tecnología inalámbrica Bluetooth Dispositivo habilitado con tecnología Bluetooth inalámbrica: teléfono móvil Funcionamiento con mando a distancia El mando a distancia suministrado con este equipo le permite reproducir y parar diversos medios, además de realizar otras operaciones.
X-HM16_26_26D_Es.book 27 ページ 2016年7月22日 金曜日 午前10時23分 Reproducción de audio con Bluetooth® 3 Cómo reproducir música desde un dispositivo habilitado para Bluetooth. Nota Nota 1 Pulse . La unidad cambiará a la entrada de Bluetooth. 2 Se creará una conexión Bluetooth entre el dispositivo habilitado para Bluetooth y la unidad. Pulse . 2 Pulse MENU y después pulse / hasta que “BT STANDBY” aparezca en la pantalla. 3 Pulse ENTER y después pulse alternar BT STANDBY ON/OFF.
X-HM16_26_26D_Es.book 09 28 ページ 2016年7月22日 Precaución con las ondas radioeléctricas Esta unidad emplea una frecuencia de onda de radio de 2,4 GHz, que es una banda utilizada por otros sistemas inalámbricos (consulte la lista siguiente). Para impedir ruidos o interrupciones en la comunicación no use esta unidad cerca de tales aparatos, o apague esos aparatos mientras usa esta unidad. • Teléfono inalámbricos • Faxes inalámbricos • Hornos microondas • Dispositivos de LAN inalámbrica (IEEE802.
X-HM16_26_26D_Es.book 29 ページ 2016年7月22日 金曜日 午前10時23分 Información adicional 10 Información adicional English Detección y solución de problemas Français Capítulo 10: Problemas generales Verificación Solución Los ajustes realizados han sido eliminados. ¿Ha desenchufado el cable de alimentación? Cuando el cable de alimentación se ha desenchufado, los ajustes realizados se borran. Ajuste de nuevo el reloj. Si no desea que los ajustes se borren, no desenchufe el cable de alimentación.
X-HM16_26_26D_Es.book 10 30 ページ 2016年7月22日 金曜日 午前10時23分 Información adicional Cuando se ha conectado un dispositivo de almacenamiento USB Problema Verificación Solución El dispositivo de almacenamiento USB no se reconoce. ¿Ha conectado correctamente el dispositivo de almacenamiento USB? Conecte el dispositivo adecuadamente (introdúzcalo hasta el fondo). ¿Ha conectado el dispositivo de Esta unidad no es compatible con concentradores USB.
X-HM16_26_26D_Es.book 31 ページ 2016年7月22日 金曜日 午前10時23分 Información adicional 10 Solamente X-HM26/26D Solución El dispositivo de tecnología inalámbrica Bluetooth no puede conectarse ni manejarse. El dispositivo de tecnología inalámbrica Bluetooth no emite sonido o el sonido se interrumpe. Compruebe que no haya ningún objeto que emita ondas electromagnéticas en la banda de 2,4 GHz (horno microondas, dispositivo inalámbrico LAN o un aparato de tecnología inalámbrica Bluetooth) cerca de la unidad.
X-HM16_26_26D_Es.book 10 32 ページ 2016年7月22日 Esta unidad ha sido diseñada para cumplir con las especificaciones del formato CD de audio. Esta unidad no es compatible con la reproducción ni las funciones de los discos que no satisfacen estas especificaciones. Formatos de archivos de audio compatibles Esta unidad no es compatible con la codificación sin pérdidas.
X-HM16_26_26D_Es.book 33 ページ 2016年7月22日 金曜日 午前10時23分 Información adicional Almacenaje de los discos Cómo limpiar los discos Configuración del apagado automático 1 Pulse MENU en el mando a distancia. Se visualizará “Auto Power Down” en la pantalla principal. 2 Pulse ENTER en el mando a distancia. • La configuración inicial está ajustada ON. Nota • Cuando el apagado automático esté ajustado a ON, en el display principal se mostrará “APD ON”.
X-HM16_26_26D_Es.book 10 34 ページ 2016年7月22日 • Sección del amplificador Potencia de salida RMS: . . . . . . . . . . . . . . . . 15 W + 15 W (1 kHz, 10 %, T.H.D., 8 Ω) • Sección del sintonizador Intervalo de frecuencia (FM). . . De 87,5 MHz a 108,0 MHz Entrada de antena (FM) . . . . . . . . . . . . 75 Ω no equilibrada Intervalo de frecuencia (AM) (Solo para los modelos norteamericanos) . . . . . . . . . . . . . . . . . . . . . . . . . . . . . . 530 kHz a 1710 kHz Antena (AM) . . . . . . . . . . . . .
SN29402699_X-HM16_26_26D_En_European.
X-HM16_26_26D_It.book 2 ページ 2016年7月22日 ATTENZIONE PER EVITARE IL RISCHIO DI SCOSSE ELETTRICHE, NON RIMUOVERE IL COPERCHIO (O IL RETRO). NON CI SONO PARTI INTERNE LA CUI MANUTENZIONE POSSA ESSERE EFFETTUATA DALL’UTENTE. IN CASO DI NECESSITÀ, RIVOLGERSI ESCLUSIVAMENTE A PERSONALE DI SERVIZIO QUALIFICATO. D3-4-2-1-1_B2_It ATTENZIONE Questo apparecchio non è impermeabile.
X-HM16_26_26D_It.book 3 ページ 2016年7月22日 金曜日 午前10時38分 Informazioni per gli utilizzatori finali sulla raccolta e lo smaltimento di vecchi dispositivi e batterie esauste Simbolo per il prodotto Questi simboli sui prodotti, confezioni, e/o documenti allegati significano che vecchi prodotti elettrici ed elettronici e batterie esauste non devono essere mischiati ai rifiuti urbani indifferenziati.
X-HM16_26_26D_It.book 4 ページ 2016年7月22日 金曜日 午前10時38分 Vi ringraziamo per avere acquistato questo prodotto Pioneer. Prima di usare il prodotto, leggere questo manuale d’istruzioni in modo da saperlo utilizzare correttamente. Finito di leggerle, conservarle in un luogo sicuro per poterle riutilizzare in futuro. Indice 01 Prima di cominciare Contenuto della confezione . . . . . . . . . . . . . . . . . . . . . . . .5 Inserimento delle batterie nel telecomando . . . . . . . . . . . .
X-HM16_26_26D_It.book 5 ページ 2016年7月22日 金曜日 午前10時38分 Prima di cominciare 01 English Capitolo 1: Prima di cominciare Utilizzo del telecomando Il telecomando dispone di un raggio di circa 7 m con un angolo di circa 30º dal sensore remoto. T 2 Chiudere il coperchio posteriore. 30° ATTENZIONE • Non usare batterie diverse da quelle specificate. Inoltre, non usare insieme batterie vecchie e nuove. • Caricare le batteria facendo attenzione a non danneggiare le molle dei terminali - della batteria.
X-HM16_26_26D_It.book 02 6 ページ 2016年7月22日 金曜日 午前10時38分 Nome delle parti e loro funzione Capitolo 2: Nome delle parti e loro funzione 4 Telecomando / // 5 PGM/MEMORY • Usato per memorizzare o programmare il CD (pagina 17). • Utilizzato per memorizzare stazioni FM/AM (pagina 20) o DAB (pagina 24). 1 2 10 11 3 6 TUNE +/– Utilizzato per la ricerca delle frequenze radio (pagina 20). 12 PRESET +/– Utilizzare per scegliere le stazioni radio preselezionate (pagina 20).
X-HM16_26_26D_It.book 7 ページ 2016年7月22日 金曜日 午前10時38分 Nome delle parti e loro funzione 02 1 2 3 4 5 English Pannello anteriore Français TIMER Español 1 7 8 Í STANDBY/ON Commuta il ricevitore tra standby e on (pagina 12). 2 Sensore remoto 9 10 7 11 Spinotto Auricolari Utilizzare per collegare le cuffie. Se le cuffie sono collegate, non viene emesso alcun suono dagli altoparlanti.
X-HM16_26_26D_It.book 02 8 ページ 2016年7月22日 金曜日 午前10時38分 Nome delle parti e loro funzione Display 1 2 3 1 3 ; Si illumina quando il suono viene silenziato. Pausa playback. 4 5 4 Nota La funzione orologio è stata impostata. • L’icona mute verrà visualizzata in rosso. 2 5 1 Diffusori 1 3 2 1 Tweeter 2 Woofer 3 Terminali altoparlanti Importante • Non è possibile rimuovere la griglia dell’altoparlante.
X-HM16_26_26D_It.book 9 ページ 2016年7月22日 金曜日 午前10時38分 Collegamenti 03 English Capitolo 3: Collegamenti • Premere le linguette per aprirle e inserire la parte scoperta del cavo. • Collegare il filo nero al terminale (s), e il filo rosso al terminale (r).
X-HM16_26_26D_It.book 03 10 ページ 2016年7月22日 金曜日 午前10時38分 Collegamenti Collegamento delle antenne • Collegare l’antenna AM a telaio e l’antenna FM (DAB/ FM) a filo come segue. • Per migliorare la ricezione e la qualità sonora, collegare le antenne esterne (vedi Uso delle antenne esterne sotto). 3 Collocare l’antenna AM su una superficie piana e in una direzione che consenta di ottenere la ricezione migliore. • Posizionare l’antenna vicino a una finestra per migliorare la ricezione.
X-HM16_26_26D_It.book 11 ページ 2016年7月22日 Collegamenti 午前10時38分 03 Prima di eseguire o cambiare i collegamenti, spegnete l’apparecchio e scollegate la spina dalla presa AC. Finiti i collegamenti, collegare questa unità ad una presa AC. Italiano ATTENZIONE • Utilizzare solo ed esclusivamente il cavo di alimentazione fornito con questo apparecchio. • Non usate il filo di corrente in dotazione per scopi diversi da quelli descritti sopra.
X-HM16_26_26D_It.book 04 12 ページ 2016年7月22日 金曜日 午前10時38分 Come iniziare Capitolo 4: Come iniziare Per accendere l’apparecchio Premere Í per attivare l’alimentazione. Comando generale Dopo l’uso: Entrata Premere Í per inserire la modalità di corrente stand-by. Se si preme INPUT sull’unità principale, la funzione attuale si commuterà in una modalità diversa. Premere INPUT ripetutamente per selezionare la funzione desiderata.
X-HM16_26_26D_It.book 13 ページ 2016年7月22日 金曜日 午前10時38分 Come iniziare 04 Impostazione della sveglia Equalizer Usato per cambiare le impostazioni esistenti dell’orologio o per impostarne di nuove. FLAT ACTIVE Un sono piatto e basico. Un suono potente che enfatizza i toni alti e bassi. Premere Í per attivare l’alimentazione. 2 Tenere premuto TIMER sul telecomando. 3 Usare / per selezionare “ONCE” o “DAILY”, poi premere ENTER.
X-HM16_26_26D_It.book 04 14 ページ 2016年7月22日 金曜日 午前10時38分 Come iniziare Regolare la sveglia Può essere usato per riutilizzare un’impostazione esistente del timer. 1 Gli stessi passaggi da 1 a 3 in “Impostare la sveglia”. 2 Premere / per selezionare “TIMER ON”, quindi premere ENTER. Usare le cuffie Connettersi allo spinotto jack delle cuffie. Se le cuffie sono collegate, non viene emesso alcun suono dagli altoparlanti.
X-HM16_26_26D_It.book 15 ページ 2016年7月22日 金曜日 午前10時38分 Riproduzione di dischi 05 English Capitolo 5: Riproduzione di dischi Riproduzione di file musicali MP3 In questo documento, i dati relativi ai brani MP3 sono chiamati “file musicali” e la posizione in cui sono memorizzati è chiamata “cartella”. ad esempio, Riproduzione di dischi o file Español Caricare il disco 1 Premere Í per attivare l’alimentazione.
X-HM16_26_26D_It.book 05 16 ページ 2016年7月22日 金曜日 午前10時38分 Riproduzione di dischi • Lo spegnimento automatico può essere commutato su ON/OFF (pagina 33). Operazioni base Funzione Apparecchio principale Telecomando Funzionamento Riproduzione Premere mentre l’apparecchio è in modalità di arresto. Arresto Premere la modalità playback. (quando si riproduce un CD) viene visualizzato “RESUME” e viene memorizzato il punto in cui è stata arrestata la riproduzione.
X-HM16_26_26D_It.book 17 ページ 2016年7月22日 金曜日 午前10時38分 Riproduzione di dischi Si possono scegliere fino a 24 selezioni da riprodurre nell’ordine preferito. 2 Premere : 9 per selezionare i brani desiderati. 4 Ripetere i passaggi 2 - 3 per altri brani. È possibile programmare fino a 24 brani. 5 Premere 1; per avviare la riproduzione. Per aggiungere brani al programma: Aggiungere piste al programma: Premere PGM/MEMORY. Poi seguire le fasi 2 - 3 per aggiungere piste.
X-HM16_26_26D_It.book 06 18 ページ 2016年7月22日 金曜日 午前10時38分 Riproduzione USB Capitolo 6: Riproduzione USB Riprodurre dispositivi di memoria USB È possibile ascoltare audio a due canali con file MP3 usando l'interfaccia USB nella parte anteriore di questo ricevitore. • Pioneer non garantisce che tutti i file registrati su qualsiasi dispositivo di memoria USB vengano letti o che la corrente venga fornita al dispositivo di memoria USB.
X-HM16_26_26D_It.book 19 ページ 2016年7月22日 Riproduzione USB La funzione di ripetizione della riproduzione permette di eseguire la lettura continua di un brano, di tutti i brani o di una sequenza programmata. Per ripetere un brano: 午前10時38分 06 English Ripetizione di lettura 金曜日 Premere ripetutamente finché non appare “REPEAT ONE”. Premere ENTER. Premere ripetutamente finché non appare “REPEAT ALL”. Premere ENTER.
X-HM16_26_26D_It.book 07 20 ページ 2016年7月22日 金曜日 午前10時38分 Come usare il sintonizzatore Capitolo 7: Come usare il sintonizzatore • Ascolto di FM (Per i modelli per l’Europa)/Ascolto di FM o AM (Per i modelli per il Nord America) I seguenti punti mostrano come sintonizzare le trasmissioni radio FM e AM usando le funzioni di sintonizzazione automatica (ricerca) e manuale (punti). Se si è sintonizzati su una stazione, è possibile memorizzarne la frequenza per tornarci in un secondo tempo.
X-HM16_26_26D_It.book 21 ページ 2016年7月22日 金曜日 午前10時38分 Come usare il sintonizzatore • Quando l’apparecchio viene sintonizzato su una stazione che non è RDS oppure su una stazione RDS a segnale debole, lo schermo si commuta nel seguente ordine: NO RDS English • Ripetere il procedimento dei punti 1 - 4 per impostare altre stazioni, oppure per cambiare una stazione preselezionata.
X-HM16_26_26D_It.book 07 22 ページ 2016年7月22日 Usare il programma Auto Station Memory (ASPM) Mentre l’apparecchio è in modalità ASPM, il sintonizzatore ricercherà automaticamente altre stazioni RDS. È possibile immettere nella memoria fino a 30 stazioni. Se delle stazioni sono già state immesse nella memoria, il numero delle nuove stazioni che si possono immettere nella memoria sarà inferiore. 1 Premere TUNER sino a che sul display appare “FM”.
X-HM16_26_26D_It.book 23 ページ 2016年7月22日 金曜日 午前10時38分 Come usare il sintonizzatore Informazioni su DAB+ (Digital Audio Broadcasting, Trasmissione audio digitale) MULTIPLEX (GRUPPO DI DATI) Sintonizzazione É possibile effettuare nuovamente la scansione automatica quando si sposta l'unità in aree diverse o si aggiungono canali multiplex all'elenco delle stazioni. 1 Premere TUNER fino a quando sul display viene visualizzata l’indicazione “DAB”.
X-HM16_26_26D_It.book 07 24 ページ 2016年7月22日 È possibile passare alle informazioni del display DAB+. Premere il pulsante DISPLAY. Ogni volta che si preme questo pulsante, il display cambia nell’ordine seguente. Quando viene visualizzato “NO SIGNAL” (Nessun segnale), il pulsante DISPLAY non consente di modificare il display. [Nome del programma] 5 Ripetere i passaggi da 1 a 4 per preimpostare altre stazioni o per modificare una stazione predefinita.
X-HM16_26_26D_It.book 25 ページ 2016年7月22日 金曜日 午前10時38分 Altri collegamenti 08 English Capitolo 8: Altri collegamenti Collegare il proprio componente di riproduzione ausiliario all'ingresso AUDIO IN sul pannello posteriore. Questa funzione passa automaticamente a “AUDIO IN” quando è presente audio in ingresso presso il terminale AUDIO IN. 1 Premere MENU e quindi premere / sino a che sul display appare “Audio In detect”. 2 Premere ENTER e quindi premere / per selezionare Audio In detect ON/OFF.
X-HM16_26_26D_It.book 09 26 ページ 2016年7月22日 金曜日 午前10時38分 Riproduzione Bluetooth® Audio Capitolo 9: Riproduzione Bluetooth® Audio Solo X-HM26/26D Riproduzione con tecnologia wireless Bluetooth Funzionamento del telecomando Il telecomando fornito insieme all’apparecchio vi permette di leggere e fermare media e di eseguire altre operazioni. Nota Dispositivo con tecnologia wireless Bluetooth: Telefono cellulare • I dispositivi dotati di tecnologia wireless Bluetooth devono supportare i profili AVRCP.
X-HM16_26_26D_It.book 27 ページ 2016年7月22日 金曜日 午前10時38分 Riproduzione Bluetooth® Audio • Lo spegnimento automatico può essere commutato su ON/OFF (pagina 33). BT STANDBY 1 Premere . L’unità si commuterà sull’entrata Bluetooth. 2 Sarà creata una connessione Bluetooth tra l’apparecchio abilitato a tecnologia Bluetooth e l’unità. 3 Riprodurre musica dall’apparecchio con capacità Bluetooth. 3 Premere ENTER e quindi premere / per selezionare BT STANDBY ON/OFF. • L’impostazione predefinita è OFF.
X-HM16_26_26D_It.book 09 28 ページ 2016年7月22日 Questa unità utilizza una frequenza di onde radio da 2,4 GHz, che corrisponde alla banda usata da altri sistemi wireless (fare riferimento all’elenco che segue). Per evitare rumore ed interruzioni della comunicazione, non usare questa unità vicino a simili apparecchi o controllare che questi siamo spenti prima dell’uso. • Telefoni senza fili • Fax senza fili • Forni a microonde • Dispositivi wireless LAN (IEEE802.
X-HM16_26_26D_It.book 29 ページ 2016年7月22日 金曜日 午前10時38分 Informazioni aggiuntive 10 Informazioni aggiuntive English Risoluzione dei problemi Français Capitolo 10: Problema di carattere generale Problema Controllare Soluzione Se si scollega il cavo di corrente, le impostazioni eseguite vengono cancellate. Si prega di riprogrammare l’orologio. Se non si vogliono cancellare le impostazioni, non scollegare il cavo di corrente.
X-HM16_26_26D_It.book 10 30 ページ 2016年7月22日 金曜日 午前10時38分 Informazioni aggiuntive Quando si collega un dispositivo di memoria di massa USB Problema Controllare Soluzione Il dispositivo di memoria I dispositivo di memoria USB è stato Connettere il dispositivo in sicurezza (bene, fino in fondo). USB non viene riconosciuto. connesso correttamente? Il dispositivo di memoria USB è connesso tramite un hub USB? Questa unità non supporta hub USB. Connettere direttamente il dispositivo di memoria USB.
X-HM16_26_26D_It.book 31 ページ 2016年7月22日 金曜日 午前10時38分 Informazioni aggiuntive 10 Solo X-HM26/26D Soluzione Il dispositivo dotato di tecnologia wireless Bluetooth non può essere collegato o messo in funzione. Non viene emesso l’audio dal dispositivo dotato di tecnologia wireless Bluetooth oppure l’audio viene interrotto.
X-HM16_26_26D_It.book 10 32 ページ 2016年7月22日 Questa unità è costruita in conformità alle caratteristiche del formato CD audio. Questa unità non supporta la riproduzione o le funzioni di dischi che non siano conformi a tali caratteristiche. Formati dei file audio supportati Questo lettore non supporta la compressione senza perdite lossless.
X-HM16_26_26D_It.book 33 ページ 2016年7月22日 金曜日 午前10時38分 Informazioni aggiuntive Archiviazione Pulire i dischi • L’impostazione iniziale è su ON. Nota • Quando lo spegnimento automatico è impostato su ON, si visualizzerà “APD ON” sulla schermata principale. • Quando lo spegnimento automatico è impostato su OFF, si visualizzerà “APD OFF” sulla schermata principale. Ritorno di tutte le impostazioni ai valori predefiniti Usare i passaggi qui sotto per ripristinare tutte le impostazioni al default.
X-HM16_26_26D_It.book 10 34 ページ 2016年7月22日 • Sezione amplificatore Uscita alimentazione RMS: . . . . . . . . . . . . . . 15 W + 15 W (1 kHz, 10 %, T.H.D., 8 Ω) • Sezione sintonizzatore Gamma di frequenza (FM) . . . . . da 87,5 MHz a 108,0 MHz Ingresso di antenna (FM) . . . . . . . . . . . . .75 Ω asimmetrico Gamma di frequenza (AM) (Per i modelli per il Nord America) . . . . . . . . . . . . . . . . . . . . . . . . . . . . da 530 kHz a 1710 kHz Antenna (AM) . . . . . . . . . . . . . . . . . . . . .
SN29402699_X-HM16_26_26D_En_European.
X-HM16_26_26D_De.book 2 ページ 2016年11月25日 ACHTUNG UM SICH NICHT DER GEFAHR EINES ELEKTRISCHEN SCHLAGES AUSZUSETZEN, DÜRFEN SIE NICHT DEN DECKEL (ODER DIE RÜCKSEITE) ENTFERNEN. IM GERÄTEINNEREN BEFINDEN SICH KEINE VOM BENUTZER REPARIERBAREN TEILE. ÜBERLASSEN SIE REPARATUREN DEM QUALIFIZIERTEN KUNDENDIENST. D3-4-2-1-1_B1_De WARNUNG Dieses Gerät ist nicht wasserdicht. Zur Vermeidung der Gefahr von Brand und Stromschlag keine Behälter mit Flüssigkeiten (z.B.
X-HM16_26_26D_De.book 3 ページ 2016年11月25日 金曜日 午後7時2分 Informationen für Anwender zur Sammlung und Entsorgung von Altgeräten und gebrauchten Batterien Symbol für Geräte Diese Symbole auf den Produkten, der Verpackung und/oder Begleitdokumenten bedeuten, dass gebrauchte elektrische und elektronische Produkte und Batterien nicht über den Haushaltsmüll entsorgt werden dürfen.
X-HM16_26_26D_De.book 4 ページ 2016年11月25日 金曜日 午後7時2分 Wir danken Ihnen dafür, dass Sie sich für dieses Produkt von Pioneer entschieden haben. Bitte lesen Sie diese Bedienungsanleitung vor der Inbetriebnahme aufmerksam durch, damit Sie Ihr neues Gerät richtig bedienen und stets seine optimale Leistung erzielen können. Bitte bewahren Sie diese Anleitung anschließend für spätere Bezugnahme griffbereit auf. Inhaltsverzeichnis 01 Vor der Inbetriebnahme Lieferumfang . . . . . . . . . . . . . . . . . . . . . .
X-HM16_26_26D_De.book 5 ページ 2016年11月25日 金曜日 午後7時2分 Vor der Inbetriebnahme 01 Vor der Inbetriebnahme Verwendung der Fernbedienung Die Reichweite der Fernbedienung beträgt ca. 7 m innerhalb eines Winkels von ca. 30º vor dem FernbedienungssignalSensor am Gerät. T 2 Schließen Sie den Batteriefachdeckel wieder. 30° Nederlands INPU 30° Deutsch 1 Öffnen Sie den Batteriefachdeckel an der Rückseite, und legen Sie die Batterien wie in der nachstehenden Abbildung gezeigt in das Batteriefach ein.
X-HM16_26_26D_De.book 02 6 ページ 2016年11月25日 金曜日 午後7時2分 Bezeichnungen und Funktionen der Teile Kapitel 2: Bezeichnungen und Funktionen der Teile 4 Fernbedienung / // , ENTER Verwendung zur Auswahl/Umschaltung der Systemeinstellungen und -modi sowie zur Bestätigung von Aktionen. 5 PGM/MEMORY • Zum Speichern oder Programmieren der CD (Seite 17). • Speichern Sie hiermit FM/AM- (Seite 20) oder DABSender (Seite 24).
X-HM16_26_26D_De.book 7 ページ 2016年11月25日 金曜日 午後7時2分 Bezeichnungen und Funktionen der Teile 02 1 2 3 4 5 English Vorderes Bedienfeld Français TIMER Español 1 7 8 Í STANDBY/ON Schaltet den Receiver zwischen Eingeschaltet und Bereitschaftsmodus um (Seite 12). 2 Fernbedienungssignal-Sensor 9 10 7 11 Kopfhörer-Anschluss Hier kann ein Kopfhörer angeschlossen werden. Wenn die Kopfhörer angeschlossen sind, kommt aus den Lautsprechern kein Ton.
X-HM16_26_26D_De.book 02 8 ページ 2016年11月25日 金曜日 午後7時2分 Bezeichnungen und Funktionen der Teile Display 1 2 3 1 3 ; Leuchtet bei stummgeschaltetem Ton. Anhalten der Wiedergabe. 4 5 4 Hinweis • Das Stummschaltungs-Icon wird in Rot angezeigt. 2 1 Lautsprecher 3 2 1 Hochtöner 2 Tieftöner 3 Lautsprecher-Anschlüsse Wichtig • Der Lautsprechergrill kann nicht entfernt werden. • Beide Lautsprecher können sowohl auf der rechten Seite als auch auf der linken Seite verwendet werden.
X-HM16_26_26D_De.book 9 ページ 2016年11月25日 金曜日 午後7時2分 Anschlüsse 03 Anschlüsse • Öffnen Sie die Klemmen und schieben Sie den hervorstehenden Draht ein. • Schließen Sie das schwarze Kabel an die (s)-Klemme und das rote Kabel an die (r)-Klemme an. Linker Lautsprecher Nederlands Pyccкий ACHTUNG • An den Lautsprecherklemmen dieses Gerätes liegt eine potentiell GEFÄHRLICHE Spannung an.
X-HM16_26_26D_De.book 03 10 ページ 2016年11月25日 金曜日 午後7時2分 Anschlüsse Anschluss der Antennen • Schließen Sie die MW-Rahmenantenne und die FM (DAB/FM)-Drahtantenne wie unten dargestellt an. • Um den Empfang und die Klangqualität zu verbessern, schließen Sie bitte externe Antennen an (siehe Verwendung externer Antennen unten). Nur bei Modellen für Nordamerika 3 Platzieren Sie die MW-Antenne auf einer ebenen Fläche in der Richtung, die den besten Empfang bietet.
X-HM16_26_26D_De.book 11 ページ 2016年11月25日 Anschlüsse Schalten Sie, ehe Sie die Anschlüsse vornehmen oder ändern, den Strom aus und ziehen Sie das Netzkabel aus der Netzsteckdose. Nachdem Sie alle übrigen Anschlüsse hergestellt haben, schließen Sie das Gerät an eine Netzsteckdose an. 03 Français Rückwand dieses Gerätes 午後7時2分 English Einstecken des Steckers 金曜日 Español Netzkabel an Steckdose Italiano ACHTUNG • Verwenden Sie kein anderes als das mit dem Gerät mitgelieferte Netzkabel.
X-HM16_26_26D_De.book 04 12 ページ 2016年11月25日 金曜日 午後7時2分 Die ersten Schritte Kapitel 4: Die ersten Schritte Einschalten der Stromversorgung Drücken Sie Í, um den Strom einzuschalten. Generelle Bedienung Nach Gebrauch: Eingangsfunktion Drücken Sie Í, um den Strom-Standby-Modus einzugeben. Wenn INPUT auf der Haupteinheit gedrückt wird, ändert sich die momentane Funktion auf einen anderen Modus. Drücken Sie INPUT wiederholt, um die gewünschte Funktion zu wählen.
X-HM16_26_26D_De.book 13 ページ 2016年11月25日 金曜日 午後7時2分 Die ersten Schritte 04 Einstellen des Weck-Timers Equalizer Zur Änderung der momentanen Timer-Einstellung oder für eine neue Timer-Einstellung verwendet. FLAT Ein kontrastgedämpfter, einfacher Klang ACTIVE Ein kraftvoller Klang, bei dem die hohen und die tiefen Töne hervorgehoben werden 1 Drücken Sie Í, um das Gerät einzuschalten. 2 Drücken und halten Sie TIMER auf der Fernbedienung gedrückt.
X-HM16_26_26D_De.book 04 14 ページ 2016年11月25日 金曜日 午後7時2分 Die ersten Schritte Anwählen des Weck-Timers Kann für die Wiederverwendung einer existierenden TimerEinstellung verwendet werden. 1 Wie die Schritte 1 – 3 in „Einstellen des Weck-Timers“. 2 Drücken Sie / , um „TIMER ON“ zu wählen und drücken Sie dann ENTER. Abbrechen des Weck-Timers Hinweis • Die Einschlaf-Zeitschaltuhr kann erneut eingestellt werden, indem Sie SLEEP drücken, während die Restzeit angezeigt wird.
X-HM16_26_26D_De.book 15 ページ 2016年11月25日 金曜日 午後7時2分 Disc-Wiedergabe 05 Disc-Wiedergabe Wiedergabe von MP3-Musikdateien MP3-Trackdaten werden in diesem Dokument als Musikdateien, ihr Speicherort als Ordner bezeichnet. Beispiel: Einlegen einer Disc 1 Drücken Sie Í, um das Gerät einzuschalten. 3 Drücken Sie < am Hauptgerät, um das DiscFach zu öffnen. 1 Wenn die Erkennung abgeschossen ist, drücken Sie 1; . Ist der letzte Track abgespielt, stoppt das Gerät automatisch.
X-HM16_26_26D_De.book 05 16 ページ 2016年11月25日 Grundlegende Funktionen Funktion Hauptgerät Fernbedienung Betrieb Wiedergabe In der Stopp-Betriebsart drücken. Stopp Drücken Sie im Wiedergabemodus. (Bei Wiedergabe einer CD) "RESUME" wird angezeigt und die aktuelle Wiedergabeposition gespeichert. Drücken Sie noch einmal, und die gespeicherte Position wird gelöscht. Pause Nächste/ vorige Nummer Schneller Vorlauf/ Rücklauf Drücken Sie im Wiedergabemodus.
X-HM16_26_26D_De.book 17 ページ 2016年11月25日 金曜日 午後7時2分 Disc-Wiedergabe 05 Im Internet gibt es zahlreiche Musik-Seiten, von denen man Musik-Dateien MP3 herunterladen kann. Befolgen Sie die Anweisungen auf der Website für das Herunterladen dieser Musikdateien. Sie können diese heruntergeladenen Musikdateien durch Brennen einer CD-R/RW Disc abspielen. • Die heruntergeladenen Songs/Dateien sind nur für den persönlichen Gebrauch bestimmt.
X-HM16_26_26D_De.book 06 18 ページ 2016年11月25日 金曜日 午後7時2分 USB-Wiedergabe Kapitel 6: USB-Wiedergabe Wiedergeben von USB-Speichern (USB-Geräten) Mit der USB-Schnittstelle an der Vorderseite des Receivers ist eine Zwei-Kanal-Wiedergabe von MP3-Dateien möglich. • Pioneer garantiert nicht, dass jede Datei, die auf einem USB-Speicher gespeichert ist, wiedergegeben wird oder dass Strom an einen USB-Speicher geliefert wird.
X-HM16_26_26D_De.book 19 ページ 2016年11月25日 USB-Wiedergabe Bei der wiederholten Wiedergabe können ein Titel, alle Titel oder eine programmierte Reihenfolge fortlaufend abgespielt werden. Wiederholen eines Titels: Drücken Sie wiederholt Drücken Sie ENTER. , bis „REPEAT OFF“ erscheint. Die Dateien des USB-Speichers können in zufälliger Reihenfolge oder automatisch wiedergegeben werden. Zufallswiedergabe aller Titel: Beenden der Zufallswiedergabe: Drücken Sie wiederholt RANDOM, bis „RANDOM OFF“ erscheint.
X-HM16_26_26D_De.book 07 20 ページ 2016年11月25日 金曜日 午後7時2分 Verwendung des Tuners Kapitel 7: Verwendung des Tuners Wiedergabe von FM (Bei Modellen für Europa)/Wiedergabe von FM oder AM (Nur bei Modellen für Nordamerika) Die folgenden Schritte beschreiben die Einstellung von UKW- und MW-Radiosendungen mittels der automatischen (Suchlauf) und der manuellen (Rasterschritt) Einstellfunktionen.
X-HM16_26_26D_De.book 21 ページ 2016年11月25日 金曜日 午後7時2分 Verwendung des Tuners Hinsichtlich weiterer Einzelheiten siehe den Abschnitt Abstimmung oben. 2 Betätigen Sie PGM/MEMORY. Die voreingestellte Zahl blinkt. Hinweis • Die Backup-Funktion schützt die gespeicherten Sender für den Fall eines Stromausfalls oder einer Entfernung des Stromkabels einige Stunden. Drücken Sie PRESET +/–, um den gewünschten Sender zu wählen. Festsender-Suchlauf 1 Drücken Sie TUNER auf der Fernbedienung.
X-HM16_26_26D_De.book 07 22 ページ 2016年11月25日 News – Nachrichten Current Affairs – Aktuelle Themen Information – Allgemeine Informationen Sport – Sport Education – Bildungssendungen Drama – Hörspiele usw. Cultures – Nationale oder regionale Kultur, Theater usw. Science – Wissenschaft und Technologie Varied Speech – Für gewöhnlich Gesprächssendungen wie beispielsweise Quizshows oder Interviews.
X-HM16_26_26D_De.book 23 ページ 2016年11月25日 金曜日 午後7時2分 Verwendung des Tuners Über DAB+ (Digital Audio Broadcasting) MULTIPLEX (ENSEMBLE) DIENSTKO MPONENTEN (SENDER) Manuelle Sendersuche Sie können Sender, die die automatische Suche nicht finden kann, manuell speichern. Bei einem schlechten Empfang können Sie die Empfindlichkeit anpassen. Die manuelle Sendersuche ist erst nach der automatischen Sendersuche verfügbar. Führen Sie zuerst eine automatische Sendersuche durch.
X-HM16_26_26D_De.book 07 24 ページ 2016年11月25日 Sie können die DAB+-Displayinformationen umschalten. Drücken Sie die Taste DISPLAY. Die Informationsanzeige ändert sich mit jedem Drücken der Taste in der folgenden Reihenfolge. Wenn „NO SIGNAL“ angezeigt wird, erlaubt Ihnen die Taste DISPLAY kein Umschalten der Anzeige. [Programmname] Der Name des Senders wird angezeigt. (Standardeinstellung) 5 Wiederholen Sie Schritt 1 - 4, um andere Sender einzustellen oder um einen vorgewählten Sender zu ändern.
X-HM16_26_26D_De.book 25 ページ 2016年11月25日 金曜日 午後7時2分 Andere Anschlüsse 08 English Kapitel 8: Andere Anschlüsse Schließen Sie Ihre Zusatz-Wiedergabekomponente an die AUDIO IN-Ministecker-Buchse auf der Rückseite an. Mit dieser Funktion wird automatisch zu "AUDIO IN" gewechselt, wenn Audiosignale über die AUDIO IN-Buchse eingehen. 1 Drücken Sie MENU und dann / , bis "Audio In detect" auf dem Display angezeigt wird. 2 Drücken Sie ENTER und dann / , um bei Audio In detect zwischen ON/OFF zu wechseln.
X-HM16_26_26D_De.
X-HM16_26_26D_De.book 27 ページ 2016年11月25日 金曜日 午後7時2分 Bluetooth® Audio-Wiedergabe Drücken Sie automatische Stromabschaltung auf ON umgeschaltet wird. • Die automatische Stromabschaltung kann ein- oder ausgeschaltet werden (ON/OFF) (Seite 33). . Die Einheit schaltet auf Bluetooth um, und „Pairing“ wird angezeigt. BT STANDBY • Folgendes kann getan werden, wenn sich die Einheit mit dem BT STANDBY auf ON umgeschaltet im Standby befindet.
X-HM16_26_26D_De.book 09 28 ページ 2016年11月25日 Dieses Gerät arbeitet mit einer Funkwellenfrequenz von 2,4 GHz, einem Frequenzband, das auch von anderen drahtlosen Systemen genutzt wird (siehe Liste weiter unten). Nutzen Sie dieses Gerät nicht in der Nähe solcher Anlagen oder stellen Sie sicher, dass diese während der Nutzung abgeschaltet sind, damit es nicht zu Geräuschen oder Verbindungsunterbrechungen kommt. • Drahtlose Telefone • Drahtlose Faxgeräte • Mikrowellengeräte • WLAN-Geräte (IEEE802.
X-HM16_26_26D_De.book 29 ページ 2016年11月25日 金曜日 午後7時2分 Zusätzliche Informationen 10 Zusätzliche Informationen English Fehlersuche Français Kapitel 10: Allgemeine Probleme Wenn das Netzkabel nicht angeschlossen ist, werden die Einstellungen, die Sie vorgenommen haben, gelöscht. Bitte stellen Sie die Uhr erneut ein. Wenn Sie die Einstellungen nicht löschen wollen, dann trennen Sie das Netzkabel nicht vom Netz. Die Wiedergabelautstärke von CDs, MP3, Tuner und AUDIO IN ist jeweils verschieden.
X-HM16_26_26D_De.book 10 30 ページ 2016年11月25日 金曜日 午後7時2分 Zusätzliche Informationen Wenn ein USB-Speichergerät angeschlossen ist Problem Prüfpunkt Der USB-Speicher wird nicht Ist der USB-Speicher richtig erkannt. angeschlossen? Ist der USB-Speicher (Speichergerät) über einen USBHub angeschlossen? Maßnahme zur Behebung Schließen Sie den Speicher richtig an (bis zum Anschlag). Diese Einheit unterstützt nicht USB-Hubs. Schließen Sie den USB-Speicher (Speichergerät) direkt an.
X-HM16_26_26D_De.book 31 ページ 2016年11月25日 金曜日 午後7時2分 Zusätzliche Informationen 10 Nur X-HM26/26D Maßnahme zur Behebung Ein Gerät mit Bluetooth drahtloser Technologie kann nicht angeschlossen oder betätigt werden. Das Gerät mit Bluetooth drahtloser Technologie gibt keinen Ton aus, oder Tonunterbrechungen treten auf. Prüfen Sie nach, dass sich kein Gerät in der Nähe dieser Anlage befindet, das elektromagnetische Wellen auf dem 2,4-GHz-Band abgibt (z. B.
X-HM16_26_26D_De.book 10 32 ページ 2016年11月25日 Hinweise zu CDs, die mit Kopierschutz versehen sind Dieses Gerät ist auf Übereinstimmung mit den Spezifikationen des Audio-CD-Formats ausgelegt. Dieses Gerät unterstützt keine Wiedergabe oder Funktionen von Discs, die diesen Spezifikationen nicht entsprechen. Unterstützte Audiodateiformate Dieses Gerät unterstützt keine Lossless-Codierung.
X-HM16_26_26D_De.book 33 ページ 2016年11月25日 金曜日 午後7時2分 Zusätzliche Informationen Aufbewahren Speziell geformte Discs (herzförmig, sechseckig usw.) können nicht mit diesem Gerät abgespielt werden. Verwenden Sie keine derartigen Discs, da diese das Gerät beschädigen können. Reinigen der Discs Einstellen der automatischen Stromabschaltung 1 Drücken Sie MENU auf der Fernbedienung. "Auto Power Down" wird auf dem Hauptdisplay angezeigt. 2 Drücken Sie ENTER auf der Fernbedienung.
X-HM16_26_26D_De.book 10 34 ページ 2016年11月25日 • Verstärkerteil Effektive Ausgangsleistung: . . . . . . . . . . . . . . 15 W + 15 W (1 kHz, 10 %, THD, 8 Ω) • Tunerbereich Frequenzbereich (UKW). . . . . . . . 87,5 MHz bis 108,0 MHz Antenneneingang (UKW) . . . . . . . . . . 75 Ω unsymmetrisch Frequenzbereich (MW) (Nur bei Modellen für Nordamerika) . . . . . . . . . . . . . . . . . . . . . . . . . . . . . 530 kHz bis 1710 kHz Antenne (MW) . . . . . . . . . . . . . . . . . . . . .
SN29402699_X-HM16_26_26D_En_European.
X-HM16_26_26D_Nl.book 2 ページ 2016年7月22日 LET OP OM HET GEVAAR VOOR EEN ELEKTRISCHE SHOCK TE VOORKOMEN, DEKSEL (OF RUG) NIET VERWIJDEREN. AAN DE BINNENZIJDE BEVINDEN ZICH GEEN ELEMENTEN DIE DOOR DE GEBRUIKER KUNNEN BEDIEND WORDEN. ENKEL DOOR GEKWALIFICEERD PERSONEEL TE BEDIENEN. D3-4-2-1-1_B2_Nl WAARSCHUWING Dit apparaat is niet waterdicht.
X-HM16_26_26D_Nl.book 3 ページ 2016年7月22日 金曜日 午前10時42分 Gebruikersinformatie voor het verzamelen en verwijderen van oude producten en batterijen Symbool voor toestellen De symbolen op producten, verpakkingen en bijbehorende documenten geven aan dat de gebruikte elektronische producten en batterijen niet met het gewone huishoudelijk afval kunnen worden samengevoegd.
X-HM16_26_26D_Nl.book 4 ページ 2016年7月22日 金曜日 午前10時42分 Hartelijk dank voor de aanschaf van dit Pioneer produkt. Lees de handleiding aandachtig door zodat u volledig op de hoogte bent van de bediening en werking. Bewaar de handleiding op een veilige plaats voor eventuele naslag in de toekomst. Inhoudsopgave 01 Voordat u begint Inhoud van de doos . . . . . . . . . . . . . . . . . . . . . . . . . . . . . .5 Aanbrengen van de batterijen in de afstandsbediening . . . . . . . . . . . . . . . . . . . . . . . .
X-HM16_26_26D_Nl.book 5 ページ 2016年7月22日 金曜日 午前10時42分 Voordat u begint 01 English Hoofdstuk 1: Voordat u begint Gebruik van de afstandsbediening De afstandsbediening heeft een bereik van ongeveer 7 m bij een hoek van ongeveer 30º vanaf de afstandsbedieningssensor. T Sluit het achterdekseltje. 30° 30° Wanneer u de afstandsbediening gebruikt, houd dan rekening met het volgende: • Zorg ervoor dat zich geen obstakels tussen de afstandsbediening en de sensor op het apparaat bevinden.
X-HM16_26_26D_Nl.book 02 6 ページ 2016年7月22日 金曜日 午前10時42分 Overzicht van de bedieningstoetsen Hoofdstuk 2: Overzicht van de bedieningstoetsen 4 Afstandsbediening / // , ENTER Gebruiken om de systeeminstellingen en modi te selecteren en daartussen te wisselen, en om acties te bevestigen. 5 1 2 10 11 3 PGM/MEMORY • Gebruik om de CD (bladzijde 17) op te slaan of te programmeren. • Gebruik om FM/AM (bladzijde 20) of DAB (bladzijde 24) stations in het geheugen op te slaan.
X-HM16_26_26D_Nl.book 7 ページ 2016年7月22日 金曜日 午前10時42分 Overzicht van de bedieningstoetsen 02 1 2 3 4 5 English Voorpaneel Français TIMER Español 1 7 8 Í STANDBY/ON Schakelen tussen ruststand en aan (bladzijde 12). 2 Afstandsbedieningssensor Hier komen de signalen van de afstandsbediening binnen. TIMER indicator Gaat branden als de receiver met de timerinstelling wordt uitgeschakeld. 4 Hoofddisplay 10 7 11 Hoofdtelefoonaansluiting Sluit hierop een hoofdtelefoon aan.
X-HM16_26_26D_Nl.book 02 8 ページ 2016年7月22日 金曜日 午前10時42分 Overzicht van de bedieningstoetsen Display 1 2 3 1 3 ; Brandt wanneer het geluid is gedempt. De weergave onderbreken. 4 5 4 Opmerking De Timerfunctie is ingesteld. • Het Mute-icoon verschijnt in rood. 2 5 1 Luidsprekersysteem 1 3 2 1 Tweeter 2 Woofer 3 Aansluitpunten luidspreker Belangrijk • De luidsprekergrill kan niet verwijderd worden. • Beide luidsprekers kunnen aan de rechter- of linkerzijde worden gebruikt.
X-HM16_26_26D_Nl.book 9 ページ 2016年7月22日 金曜日 午前10時42分 Aansluitingen 03 English Hoofdstuk 3: Aansluitingen • Duw de klemaansluiting open en steek de ontblote draad naar binnen. • Verbind de zwarte draad met de (s)-aansluiting en de rode draad met de (r)-aansluiting. Linkerluidspreker Deutsch Het achterpaneel van dit apparaat Italiano Rechterluidspreker Español Aansluiten van de luidsprekers WAARSCHUWING • Op deze luidsprekeraansluitingen staat een GEVAARLIJKE spanning.
X-HM16_26_26D_Nl.book 03 10 ページ 2016年7月22日 金曜日 午前10時42分 Aansluitingen Antennes aansluiten • Sluit de AM-raamantenne en de FM (DAB/FM)draadantenne aan zoals hieronder getoond. • Om de ontvangst en de geluidskwaliteit te verbeteren, kunt u buitenantennes aansluiten (zie Buitenantennes gebruiken hieronder). • Plaats de antenne bij een venster e.d. voor de beste ontvangst. • Plaats de antenne niet in de buurt van een computer of tv. Dat kan ruis veroorzaken.
X-HM16_26_26D_Nl.book 11 ページ 2016年7月22日 Aansluitingen 金曜日 午前10時42分 03 Het achterpaneel van dit apparaat Français Schakel het apparaat uit en verwijder het netsnoer van het wandcontact voordat u apparatuur aansluit of aansluitingen wijzigt. Nadat alle aansluitingen zijn voltooid, kunt u het apparaat op een stopcontact aansluiten. English Insteken Español Naar stopcontact Netsnoer Italiano WAARSCHUWING • Gebruik uitsluitend het netsnoer dat bij dit apparaat is meegeleverd.
X-HM16_26_26D_Nl.book 04 12 ページ 2016年7月22日 金曜日 午前10時42分 Aan de slag Hoofdstuk 4: Aan de slag Het apparaat inschakelen Druk op de toets Í om het apparaat in te schakelen. Algemene bediening Na gebruik: Ingangsfunctie Druk op de toets Í om het apparaat op stand-by te zetten. Als INPUT op het hoofdsysteem wordt ingedrukt, gaat de huidige functie over op een andere modus. Druk herhaaldelijk op INPUT om de gewenste functie te kiezen.
X-HM16_26_26D_Nl.book 13 ページ 2016年7月22日 金曜日 午前10時42分 Aan de slag 04 De wekkerfunctie instellen Equalizer Gebruiken om de bestaande timerinstelling te wijzigen of om een nieuwe timer in te stellen. FLAT ACTIVE Basisgeluid met weinig intonatie Krachtig geluid waarbij de lage en hoge tonen worden benadrukt 1 2 Druk TIMER op de afstandsbediening in en houd de toets vast. 3 Druk op / om “ONCE” of “DAILY” te selecteren, en druk daarna op ENTER.
X-HM16_26_26D_Nl.book 04 14 ページ 2016年7月22日 金曜日 午前10時42分 Aan de slag Activeren van de wekkerfunctie Deze kan worden gebruikt om een bestaande timerinstelling opnieuw te gebruiken. 1 En ook stappen 1 tot 3 bij “De wekkerfunctie instellen”. 2 Druk op / om “TIMER ON” te selecteren en druk dan op ENTER. Gebruik van hoofdtelefoons Aansluiting op de stekerplug van de hoofdtelefoon. Wanneer een hoofdtelefoon is aangesloten, wordt er geen geluid weergegeven via de luidsprekers.
X-HM16_26_26D_Nl.book 15 ページ 2016年7月22日 金曜日 午前10時42分 Disc-weergave 05 Disc-weergave Speel MP3-muziekbestanden af MP3-nummergegevens heten “music file” en de locatie waar deze zich bevinden heeft een “map” in dit document. bv., Laad deze disc 1 Druk op Í om het apparaat in te schakelen. 3 Druk op < op het hoofdtoestel om de disclade te openen. • Wanneer het spelen begint, kunnen er alleen muziekbestanden in dezelfde map continu gespeeld worden.
X-HM16_26_26D_Nl.book 05 16 ページ 2016年7月22日 Basisbediening Functie Hoofdtoestel Afstandsbediening Bediening Afspelen Indrukken tijdens de stopfunctie. Stoppen Indrukken voor de weergavemodus. (wanneer er een CD gespeeld wordt) “RESUME” wordt afgebeeld en de plaats waar het spelen gestopt is wordt opgeslagen. Druk opnieuw om de opgeslagen positie weg te halen. Pauzeren Hoger/ lager fragment Snel voorwaarts/ achterwaarts Indrukken voor de weergavemodus.
X-HM16_26_26D_Nl.book 17 ページ 2016年7月22日 金曜日 午前10時42分 Disc-weergave U kunt maximaal 24 fragmenten voor weergave in de gewenste volgorde kiezen. 2 Druk op : 9 of de nummertoetsen van de afstandsbediening om de gewenste tracks te selecteren. 4 Herhaal stappen 2 - 3 voor andere nummers. Er kunnen maximaal 24 nummers geprogrammeerd worden. 5 Druk op 1; om de weergave te starten. Annuleren van de geprogrammeerde weergavefunctie: Toevoegen van tracks aan het programma: Druk op PGM/MEMORY.
X-HM16_26_26D_Nl.book 06 18 ページ 2016年7月22日 金曜日 午前10時42分 USB-weergave Hoofdstuk 6: USB-weergave Afspelen van USB-opslagapparaten Het is mogelijk om naar twee-kanaalsgeluid m.b.v. de USBinterface met MP3-bestanden op de voorkant van deze ontvanger. • Pioneer garandeert niet dat bestanden die op een USBopslagapparaat zijn opgenomen kunnen worden afgespeeld of dat stroom naar een USBopslagapparaat kan worden toegevoerd.
X-HM16_26_26D_Nl.book 19 ページ 2016年7月22日 金曜日 午前10時42分 USB-weergave 06 Herhaalde weergave English In de herhalingsfunctie kan één fragment, alle fragmenten of een geprogrammeerde reeks herhaald worden afgespeeld. Herhalen van één fragment: Druk herhaaldelijk op Druk op ENTER. totdat “REPEAT ONE” verschijnt. Druk herhaaldelijk op Druk op ENTER. totdat “REPEAT ALL” verschijnt. Annuleren van de herhaalde weergave: Druk herhaaldelijk op Druk op ENTER. totdat “REPEAT OFF” verschijnt.
X-HM16_26_26D_Nl.book 07 20 ページ 2016年7月22日 金曜日 午前10時42分 Gebruik van de tuner Hoofdstuk 7: Gebruik van de tuner • Automatische tuning slaat stations met een zwak signaal over. • Druk op ∫ om automatische tuning te stoppen. • Als op een RDS-station (Radio Data System) wordt afgestemd, wordt eerst de frequentie getoond. Tenslotte zal de naam van het station getoond worden. • RDS-stations kunnen geheel automatisch worden afgestemd via de functie Auto Station Program Memory (ASPM), zie bladzijde 22.
X-HM16_26_26D_Nl.book 21 ページ 2016年7月22日 金曜日 午前10時42分 Gebruik van de tuner 4 Druk op PGM/MEMORY om dat station in het geheugen op te slaan. Opmerking Instellen van een voorkeurzender Druk op PRESET +/– om het gewenste station te selecteren. Wissen van het gehele ingestelde geheugen 1 Druk op TUNER op de afstandsbediening. 2 Druk op totdat “MEMORY CLEAR” verschijnt.
X-HM16_26_26D_Nl.book 07 22 ページ 2016年7月22日 News – Nieuws Current Affairs – Actualiteiten Information – Algemene informatie Sport – Sport Education – Educatief Drama – Hoorspelen e.d. Cultures – Nationale of regionale cultuur, theater enz. Science – Wetenschap en technologie Varied Speech – Meestal praatprogramma’s, zoals quizzen of interviews.
X-HM16_26_26D_Nl.book 23 ページ 2016年7月22日 金曜日 午前10時42分 Gebruik van de tuner DAB + SIGNAL SERVICES Tuning Manual tune U kunt handmatig afstemmen op zenders die de functie Automatisch scannen niet kan vinden. Als de ontvangst slecht is, kunt u de gevoeligheid aanpassen. Handmatig afstemmen kan alleen gebruikt worden na automatisch afstemmen. Voor eerst een automatische scan uit. 1 Druk op TUNER tot “DAB” op het display verschijnt.
X-HM16_26_26D_Nl.book 07 24 ページ 2016年7月22日 U kunt de informatie op de DAB+ display omschakelen. Druk op de toets DISPLAY. Telkens als u de toets indrukt, verandert de informatie op de display als volgt. Als “NO SIGNAL” verschijnt, kan de display niet gewijzigd worden met de toets DISPLAY. [Programmanaam] De naam van de zender. (standaardinstelling) [Schuivende tekst] 5 Herhaal stap 1 - 4 om andere zenders in te stellen of om een voorkeuzezender te wijzigen.
X-HM16_26_26D_Nl.book 25 ページ 2016年7月25日 月曜日 午前11時34分 Overige aansluitingen 08 English Hoofdstuk 8: Overige aansluitingen Verbind uw hulp-afspeelcomponent met de AUDIO IN ingang op het achterpaneel. Deze functie schakelt automatisch naar “AUDIO IN” als audio naar de AUDIO IN-aansluiting ingevoerd wordt. 1 Druk op MENU en druk vervolgens op / tot “Audio In detect” op het display verschijnt. 2 Druk op ENTER en druk vervolgens op / om naar Audio In detect ON/OFF te schakelen.
X-HM16_26_26D_Nl.book 09 26 ページ 2016年7月22日 金曜日 午前10時42分 Bluetooth® audioweergave Hoofdstuk 9: Bluetooth® audioweergave alleen X-HM26/26D Muziek weergeven met behulp van Bluetooth draadloze technologie Gebruik van de afstandsbediening Met de afstandsbediening die bij dit systeem wordt geleverd kunt u media afspelen en stopzetten en andere bewerkingen uitvoeren.
X-HM16_26_26D_Nl.book 27 ページ 2016年7月22日 金曜日 午前10時42分 Bluetooth® audioweergave BT STANDBY BT STANDBY-instellingen 1 Druk op . 2 Druk op MENU en druk vervolgens op / tot “BT STANDBY” op het display verschijnt. Als de paring met het met Bluetooth uitgeruste apparaat op de juiste wijze is voltooid, wordt de naam van het met Bluetooth uitgeruste apparaat op het voorpaneel van het systeem weergegeven. (Alleen alfanumerieke tekens van één byte kunnen worden getoond.
X-HM16_26_26D_Nl.book 09 28 ページ 2016年7月22日 Dit apparaat maakt gebruik van een radiogolffrequentie van 2,4 GHz, wat een band is die wordt gebruikt door andere draadloze systemen (zie lijst hieronder). Om ruis of onderbroken communicatie te voorkomen, dient u dit apparaat niet in de buurt van dergelijke apparaten te gebruiken, of dient u ervoor te zorgen dat die apparaten tijdens het gebruik uitgeschakeld zijn. • Draadloze telefoons • Draadloze faxmachines • Magnetrons • Draadloze LAN-apparaten (IEEE802.
X-HM16_26_26D_Nl.book 29 ページ 2016年7月22日 金曜日 午前10時42分 Aanvullende informatie 10 Aanvullende informatie Algemeen probleem Controle Oplossing De instellingen die u hebt gedaan zijn gewist. Is het netsnoer uitgetrokken? Als het netsnoer is uitgetrokken, worden de gedane instellingen gewist. Stel de tijd nogmaals in. Verwijder het netsnoer niet als u niet wilt dat de instellingen worden gewist.
X-HM16_26_26D_Nl.book 10 30 ページ 2016年7月22日 金曜日 午前10時42分 Aanvullende informatie Wanneer er een USB-geheugenapparaat is aangesloten Probleem Controle Oplossing Het USB-opslagapparaat wordt niet herkend. Is het USB-opslagapparaat op de juiste wijze aangesloten? Sluit het apparaat stevig aan (geheel ingestoken). Is het USB-opslagapparaat via een USB-hub aangesloten? Dit apparaat ondersteunt geen USB-hubs. Sluit het USBopslagapparaat rechtstreeks aan.
X-HM16_26_26D_Nl.book 31 ページ 2016年7月22日 金曜日 午前10時42分 Aanvullende informatie 10 alleen X-HM26/26D Oplossing Het apparaat dat is voorzien van Bluetooth draadloze technologie kan niet worden aangesloten of bediend. Er komt geen geluid uit het apparaat dat is voorzien van Bluetooth draadloze technologie of het geluid is onderbroken.
X-HM16_26_26D_Nl.book 10 32 ページ 2016年7月22日 Omtrent kopieerbeveiligde CD’s Dit apparaat is ontworpen om te voldoen aan de specificaties van het audio-CD formaat. Dit apparaat is niet geschikt voor het afspelen of voor andere functies van discs die niet voldoen aan deze specificaties. Geschikte audiobestandsformaten Dit apparaat is niet geschikt voor verliesvrije codering.
X-HM16_26_26D_Nl.book 33 ページ 2016年7月22日 金曜日 午前10時42分 Aanvullende informatie Bewaren Gebruik in dit apparaat geen discs met afwijkende vormen (zeshoekig, hartvormig e.d.). Probeer niet om dergelijke discs af te spelen, want dat kan dit apparaat beschadigen. Français • Plaats schijven altijd in hun cover en bewaar ze rechtop, waarbij hitte, vocht, plaatsen die blootstaan aan direct zonlicht en zeer koude plaatsen dienen te worden vermeden. • Lees de waarschuwingen die bij de schijf worden gegeven.
X-HM16_26_26D_Nl.book 10 34 ページ 2016年7月22日 • Versterkergedeelte RMS-uitgangsvermogen: . . . . . . . . . . . . . . . . 15 W + 15 W (1 kHz, 10 %, T.H.D., 8 Ω) • Tunergedeelte Frequentiebereik (FM) . . . . . . . . . 87,5 MHz tot 108,0 MHz Antenne-ingang (FM) . . . . . . . . . . . . 75 Ω ongebalanceerd Frequentiebereik (AM) (Voor Noord-Amerikaanse modellen) . . . . . . . . . . . . . . . . . . . . . . . . . . . . . 530 kHz tot 1710 kHz Antenne (AM) . . . . . . . . . . . . . . . . . . . . . . . .
SN29402699_X-HM16_26_26D_En_European.
X-HM16_26_26D_Ru.book 2 ページ 2016年7月22日 ВНИМАНИЕ ВО ИЗБЕЖАНИЕ ПОРАЖЕНИЯ ЭЛЕКТРИЧЕСКИМ ТОКОМ НЕ СНИМАЙТЕ КРЫШКУ (ИЛИ ЗАДНЮЮ СТЕНКУ). ВНУТРИ НЕ СОДЕРЖАТСЯ ДЕАТЛИ, ПРЕДНАЗНАЧЕННЫЕ ДЛЯ РЕМОНТА ПОЛЬЗОВАТЕЛЕМ. ДЛЯ ОБСЛУЖИВАНИЯ ОБРАТИТЕСЬ К КВАЛИФИЦИРОВАННОМУ СОТРУДНИКУ СЕРВИСНОЙ СЛУЖБЫ. D3-4-2-1-1_B1_Ru ПРЕДУПРЕЖДЕНИЕ Данное оборудование не является водонепроницаемым.
X-HM16_26_26D_Ru.book 3 ページ 2016年7月22日 金曜日 午前11時2分 Информация для пользователей по сбору и утилизации бывшего в эксплуатации оборудования и отработавших элементов питания Обозначение для оборудования Обозначения для элементов питания Эти обозначения на продукции, упаковке, и/или сопроводительных документах означают, что бывшая в эксплуатации электротехническая и электронная продукция и отработанные элементы питания не должны выбрасываться вместе с обычным бытовым мусором.
X-HM16_26_26D_Ru.book 4 ページ 2016年7月22日 金曜日 午前11時2分 Благодарим за покупку этого изделия компании Pioneer. Для того чтобы правильно обращаться с приобретенной моделью устройства, прочтите, пожалуйста, внимательно данную инструкцию. После того как вы ознакомитесь с инструкцией, сохраните ее в надежном месте для обращения к ней в будущем. Содержание 01 Перед началом работы Комплект поставки . . . . . . . . . . . . . . . . . . . . . . . . . . . . . .5 Установка батареек в пульт дистанционного управления .
X-HM16_26_26D_Ru.book 5 ページ 2016年7月22日 金曜日 午前11時2分 Перед началом работы 01 Перед началом работы Использование пульта дистанционного управления Пульт дистанционного управления имеет дальность действия около 7 м при угле отклонения от датчика дистанционного управления 30°. Закройте заднюю крышку. INPU T 30° 30° • • • • ВНИМАНИЕ Не используйте любые другие типы батареек, кроме указанных батареек. Также не используйте новую батарейку вместе со старой.
X-HM16_26_26D_Ru.book 02 6 ページ 2016年7月22日 金曜日 午前11時2分 Названия частей и функции Глава 2: Названия частей и функции 4 Пульт ДУ / // 5 PGM/MEMORY • Используется для сохранения радиостанций или программирования компакт-диска (стр. 17). • Используется для сохранения в памяти станций FM/ AM (стр. 20) или DAB (стр. 24). 1 2 10 11 3 6 TUNE +/– Используется для поиска радиочастот (стр. 20).
X-HM16_26_26D_Ru.book 7 ページ 2016年7月22日 金曜日 午前11時2分 Названия частей и функции 02 1 2 3 4 5 English Передняя панель Français TIMER Español 1 7 8 Í STANDBY/ON Используется для включения ресивера или его переключения в режим ожидания (стр. 12). 2 Датчик дистанционного управления 9 10 7 11 Гнездо для наушников Используйте для подключения наушников. При подключении наушников звук не будет воспроизводиться через громкоговорители.
X-HM16_26_26D_Ru.book 02 8 ページ 2016年7月22日 金曜日 午前11時2分 Названия частей и функции Дисплей 1 2 3 1 3 ; Высвечивается при приглушении звука. Пауза в воспроизведении. 4 5 4 Примечание • Значок приглушения звука будет отображаться красным цветом. 2 Акустическая система 1 3 2 1 Высокочастотный динамик 2 Низкочастотный динамик Терминалы громкоговорителя ВАЖНО • Решетка громкоговорителя не снимается. • Оба громкоговорителя можно использовать или с правой, или с левой стороны.
X-HM16_26_26D_Ru.book 9 ページ 2016年7月22日 金曜日 午前11時2分 Подключения 03 Подключения Подключение громкоговорителей Левый громкоговоритель Deutsch Задняя панель данного устройства Italiano Правый громкоговоритель Español • Откройте защитные выступы и вставьте оголенный провод. • Присоедините черный провод к гнезду (s), а красный провод — к гнезду (r). ВНИМАНИЕ • На контактах громкоговорителей имеется ОПАСНОЕ ДЛЯ ЖИЗНИ напряжение.
X-HM16_26_26D_Ru.book 03 10 ページ 2016年7月22日 金曜日 午前11時2分 Подключения 2 Прикрепите рамочную антенну AM к специальной стойке. Подключение антенн • Подключите рамочную антенну АМ и проволочную антенну FM (DAB/FM), как показано ниже. • Для улучшения приема и качества звука подключите внешние антенны (см. раздел Использование внешних антенн ниже). Только для моделей для Северной Америки 3 Установите антенну AM на плоскую поверхность в направлении наилучшего приема.
X-HM16_26_26D_Ru.book 11 ページ 2016年7月22日 Подключения Задняя панель данного устройства 03 Français Перед выполнением или изменением соединений выключите питание и отсоедините кабель питания от сетевой розетки. Когда выполнение всех соединений будет завершено, вставьте вилку питания устройства в розетку сети переменного тока. 午前11時2分 English Подключение 金曜日 Español Deutsch ВНИМАНИЕ • Используйте только кабель питания, входящий в комплект поставки данного устройства.
X-HM16_26_26D_Ru.book 04 12 ページ 2016年7月22日 金曜日 午前11時2分 Начало работы Глава 4: Начало работы Для включения питания Нажмите Í, чтобы включить питание. После использования: Нажмите кнопку Í, чтобы войти в режим ожидания. Настройка часов Примечание • При восстановлении электропитания после повторного подключения аппарата или после аварийного отключения питания, переустановите часы. Общее управление Функция ввода При нажатии кнопки INPUT на основном блоке текущая функция изменится на другой режим.
X-HM16_26_26D_Ru.book 13 ページ 2016年7月22日 金曜日 午前11時2分 Начало работы 04 Настройка таймера включения Эквалайзер Используется для изменения текущей установки таймера или для установки нового таймера. FLAT ACTIVE Пониженный на полтока и базовый звук Мощный звук, который усиливает низкие и высокие тона NIGHT Звук, который можно слушать ночью даже при низкой громкости При первом включении питания аппарат входит в режим P.bass, при котором выделяются низкие частоты. Для отмены режима P.
X-HM16_26_26D_Ru.book 04 14 ページ 2016年7月22日 金曜日 午前11時2分 Начало работы Вызов таймера включения Может использоваться для повторного применения текущей установки таймера. 1 Также выполните шаги с 1 до 3 в разделе «Настройка таймера включения». 2 Нажмите кнопки / , чтобы выбрать параметр «TIMER ON», затем нажмите ENTER. Отмена таймера включения Примечание • Таймер отключения можно установить нажатием SLEEP во время отображения оставшегося времени.
X-HM16_26_26D_Ru.book 15 ページ 2016年7月22日 金曜日 午前11時2分 Воспроизведение диска 05 Воспроизведение диска Воспроизведение дисков или файлов 2 Нажмите / , чтобы выбрать музыкальный файл ([ ]), затем нажмите 1; или ENTER. • После запуска воспроизведения будут непрерывно воспроизводиться только музыкальные файлы, хранящиеся внутри одной и той же папки. Примечание Воспроизведение композиций на компакт-диске После воспроизведения последней дорожки устройство автоматически остановится.
X-HM16_26_26D_Ru.book 05 16 ページ 2016年7月22日 金曜日 午前11時2分 Воспроизведение диска Основные операции Назначение Основной блок Пульт ДУ Операция Воспроизведение Нажмите в режиме остановки. Стоп Нажмите в режиме воспроизведения. (при воспроизведении компакт-диска) Отображается сообщение «RESUME», и место остановки воспроизведения запоминается. При повторном нажатии это место стирается из памяти. Пауза Дорожка вперед/ назад Быстрая перемотка вперед/ назад Нажмите в режиме воспроизведения.
X-HM16_26_26D_Ru.book 17 ページ 2016年7月22日 金曜日 午前11時2分 Воспроизведение диска О загрузке файлов MP3 В интернете имеется много музыкальных сайтов, где вы можете загрузить музыкальные файлы в формате MP3. Для загрузки музыкальных файлов следуйте инструкциям на веб-сайте. Затем вы сможете воспроизвести эти загруженные музыкальные файлы, записав их на диск CD-R/RW. • Загруженные композиции/файлы предназначены только для личного пользования.
X-HM16_26_26D_Ru.book 06 18 ページ 2016年7月22日 金曜日 午前11時2分 Воспроизведение с USB Глава 6: Воспроизведение с USB Воспроизведение запоминающих устройств USB Этот ресивер позволяет прослушивать файлы MP3 с двухканальным звуком через интерфейс USB на его передней панели. • Pioneer не гарантирует, что будет воспроизводиться любой файл, записанный на запоминающем устройстве USB, или что будет подаваться питание на запоминающее устройство USB.
X-HM16_26_26D_Ru.book 19 ページ 2016年7月22日 金曜日 午前11時2分 Воспроизведение с USB 06 Переключение содержимого дисплея При повторном воспроизведении можно непрерывно воспроизводить одну дорожку, все дорожки или дорожки в запрограммированной последовательности. Данный аппарат может повторно воспроизводить папки, сохраненные на запоминающем устройстве USB. Подробнее, см. Переключение содержимого дисплея на стр. 17.
X-HM16_26_26D_Ru.book 07 20 ページ 2016年7月22日 金曜日 午前11時2分 Использование тюнера Глава 7: Использование тюнера Прослушивание передач FMдиапазона (Только для европейских моделей)/Прослушивание передач FM- или AM-диапазона (Только для моделей для Северной Америки) В приведенных ниже пунктах описывается процедура настройки на радиостанции диапазона FM и AM с использованием функций автоматической (поиск) или ручной (пошаговой) настройки.
X-HM16_26_26D_Ru.book 21 ページ 2016年7月22日 金曜日 午前11時2分 Использование тюнера Подробнее об этом см. Настройка выше. 2 Нажмите PGM/MEMORY. Запрограммированный номер будет мигать. 4 Нажмите кнопку PGM/MEMORY, чтобы сохранить эту станцию в памяти. Station name (PS) Frequency • При аварийном отключении питания или отсоединении кабеля питания переменного тока функция резервирования защитит занесенные в память станции на несколько часов.
X-HM16_26_26D_Ru.book 07 22 ページ 2016年7月22日 News – новости Current Affairs – текущие события Information – информация Sport – спорт Education – oбразовательная информаци Drama – pадиоспектакли и т.д. Cultures – национальная и местная культурная жизнь, театр и т.д. Science – наука и техника Varied Speech – программы, построенные на беседе или общении, например викторины или интервью.
X-HM16_26_26D_Ru.book 23 ページ 2016年7月22日 金曜日 午前11時2分 Использование тюнера СИГНАЛ DAB + СЛУЖБЫ Настройка Вручную можно настроить станции, не обнаруженные автоматическим поиском. В случае плохого приема можно настроить чувствительность. Ручная настройка доступна только после автоматической настройки. Сначала выполните автоматический поиск. 1 Нажимайте TUNER до тех пор, пока на дисплее не отобразится «DAB». 2 Нажмите MENU и затем нажимайте / до тех пор, пока на дисплее не отобразится «DAB SCAN».
X-HM16_26_26D_Ru.book 07 24 ページ 2016年7月22日 金曜日 午前11時2分 Использование тюнера [Scrolling text] Таблица частот DAB (ДИАПАЗОН III) Информация пролистывается по дисплею при ее получении со станции. [Programme type] Описание типа содержимого, транслируемого станцией. Частота Метка 208.064 МГц 9D 176.640 МГц 5B 209.936 МГц 10A 178.352 МГц 5C 211.648 МГц 10B Частота DAB+ станции. 180.064 МГц 5D 213.360 МГц 10C [Stereo mode] 181.936 МГц 6A 215.
X-HM16_26_26D_Ru.book 25 ページ 2016年7月22日 金曜日 午前11時2分 Другие подключения 08 English Глава 8: Другие подключения Соедините гнездо AUDIO IN на задней панели с вашим вспомогательным устройством воспроизведения кабелем с миништекером. Эта функция используется для автоматического переключения на вход "AUDIO IN" при поступлении входного аудиосигнала через гнездо AUDIO IN. 1 Нажмите MENU и затем нажимайте / до тех пор, пока на дисплее не отобразится “Audio In detect”.
X-HM16_26_26D_Ru.
X-HM16_26_26D_Ru.book 27 ページ 2016年7月22日 金曜日 午前11時2分 Воспроизведение Bluetooth® Audio 2 Нажмите кнопку 3 Воспроизведение музыки с устройства с поддержкой Bluetooth. . Примечание Устройство переключается на Bluetooth, и на дисплее появится индикация «Pairing». 3 Включите электропитание того устройства с поддержкой Bluetooth, с которым нужно выполнить спаривание, и выполните процедуру спаривания. Примечание 1 Нажмите кнопку .
X-HM16_26_26D_Ru.book 09 28 ページ 2016年7月22日 Предостережение по радиоволнам Данное устройство работает на радиочастоте 2,4 ГГц, которая может использоваться другими беспроводными системами (см. список ниже). Во избежание шума или прерывания связи, не используйте уданный аппарат возле таких устройств, или убедитесь, что такие устройства отключены во время использования. • Беспроводные телефоны • Беспроводные факсимильные аппараты • Микроволновые печи • Беспроводные устройства (IEEE802.
X-HM16_26_26D_Ru.book 29 ページ 2016年7月22日 金曜日 午前11時2分 Дополнительная информация 10 Дополнительная информация English Устранение неполадок Français Глава 10: Общие проблемы Проверьте Устранение Настройки, которые вы выполнили, удалены. Отсоединен кабель питания? Если отсоединяется кабель питания, выполненные настройки удаляются. Заново установите часы. Если вы не хотите удалять настройки, не отсоединяйте кабель питания.
X-HM16_26_26D_Ru.book 10 30 ページ 2016年7月22日 金曜日 午前11時2分 Дополнительная информация Когда подключено запоминающее устройство USB Неполадка Проверьте Запоминающее устройство USB не распознается. Запоминающее устройство USB Подключите устройство надежно (до упора). подключено правильно? Подключено ли запоминающее устройство USB через концентратор USB? Устранение Данное устройство не поддерживает концентраторы USB. Подключите запоминающее устройство USB напрямую.
X-HM16_26_26D_Ru.book 31 ページ 2016年7月22日 金曜日 午前11時2分 Дополнительная информация 10 Только X-HM26/26D Устранение Устройство, оснащенное беспроводной технологией Bluetooth, не подключается или не работает. Не воспроизводится или прерывается звук с устройства, оснащенного беспроводной технологией Bluetooth.
X-HM16_26_26D_Ru.book 10 32 ページ 2016年7月22日 Не закрывайте вентиляционные отверстия. Не используйте данное устройство на ворсистых коврах, кроватях, диванах и т. д. или завернутым в ткань и т. д. Это может помешать рассеиванию тепла, что может привести к поломке. Относительно компакт-дисков с защитой от копирования Не подвергайте ресивер воздействию тепла. Данное устройство сконструировано в соответствии со спецификациями формата звуковых компакт-дисков (Audio CD).
X-HM16_26_26D_Ru.book 33 ページ 2016年7月22日 金曜日 午前11時2分 Дополнительная информация 10 Диски особой формы (в виде сердца, шестиугольника и т. п.) не могут воспроизводиться на данном устройстве. Не пытайтесь воспроизвести такие диски, так как они могут повредить данное устройство. Обращение с дисками Хранение Чистка дисков 1 Нажмите MENU на пульте ДУ. На главном дисплее отобразится сообщение «Auto Power Down» (Автоматическое выключение питания). 2 Нажмите ENTER на пульте ДУ.
X-HM16_26_26D_Ru.book 10 34 ページ 2016年7月22日 • Усилитель Выходная среднеквадратическая мощность: . . . . . . . . . . . . . . . . . . . . . . . . . . . . . . . . . . . .15 Вт + 15 Вт (1 кГц, 10 % коэффициент гармоник, 8 Ом) • Секция тюнера Частотый диапазон (FM) . . . . . . .87,5 МГц до 108,0 МГц Вход антенны (FM) . . . . . . . 75 Ом несбалансированный Частотный диапазон (AM) (Только для моделей для Северной Америки) . . . . . . . . . . . . . . . . . . . . . . . . . . . . . . . . . . .
SN29402699_X-HM16_26_26D_En_European.book 35 ページ 2016年7月22日 金曜日 午後7時2分 Дату изготовления оборудования можно определить по серийному номеру, который содержит информацию о месяце и годе производства.
SN29402699_X-HM16_26_26D_En_European.book 36 ページ 2016年7月22日 金曜日 午後7時2分 Примечание: Корпорация О энд Пи устанавливает следующую продолжительность срока службы официально поставляемых на Российский рынок товаров. Аудио и видеооборудование: 7 лет Переносное аудиооборудование: 6 лет Другое оборудование (наушники, микрофон и т.д.): 5 лет Информация для покупателей в ЕАЭС: Уполномоченной организацией в соответствии с требованиями ТР ТС 004/2011, 020/2011, является ООО “ПИОНЕР РУС”, Россия, 105064, г.
SN29402699_X-HM16_26_26D_En_European.book 37 ページ 2016年7月22日 金曜日 午後7時2分 Declaration of Conformity with regard to the R&TTE Directive 1999/5/EC 0 Manufacturer: O&P Corporation 2-3-12, Yaesu, Chuo-Ku, Tokyo 104-0028, Japan EU Representative’s: Pioneer Europe NV Haven 1087, Keetberglaan 1, 9120 Melsele, Belgium http://www.pioneer.eu [*] X-HM26/X-HM26D English: Hereby, O&P, declares that this [*] is in compliance with the essential requirements and other relevant provisions of Directive 1999/5/EC.
SN29402699_X-HM16_26_26D_En_European.book 38 ページ Português: O&P declara que este [*] está conforme com os requisitos essenciais e outras disposições da Directiva 1999/5/CE. Čeština: O&P tímto prohlašuje, že tento [*] je ve shodě se základními požadavky a dalšími příslušnými ustanoveními směrnice 1999/5/ES Eesti: Käesolevaga kinnitab O&P seadme [*] vastavust direktiivi 1999/5/EÜ põhinõuetele ja nimetatud direktiivist tulenevatele teistele asjakohastele sätetele.
SN29402699_X-HM16_26_26D_En_European.
X-HM16_26_26D_BackCover_Europe.fm 40 ページ 2016年11月25日 金曜日 午後7時28分 2-3-12 Yaesu, Chuo-ku, Tokyo 104-0028 JAPAN 18 PARK WAY, UPPER SADDLE RIVER, NEW JERSEY 07458, U.S.A. Tel: 1-201-785-2600 Tel: 1-844-679-5350 Hanns-Martin-Schleyer-Straße.