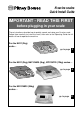
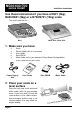
N series scales Quick Install Guide IMPORTANT - READ THIS FIRST before plugging in your scale These instructions describe how to quickly unpack and setup your N series scale. Follow them carefully to install the scale, then refer to the Operating Guide for full details of how to operate the machine. For the N421 (2kg) Surface Europe EU scale… Select y Categor Capacity :2kg x 1g Select Zone Select Fees 1st Class 1st Register Postal Scale.
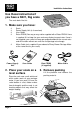
N421 install Installation Instructions Use these instructions if you have a N421, 2kg scale The scale looks like this: Surface Select Zone red Del'y 1st Registe w 1st Reg.+Lo gh 1st Reg.+Hi Del'y 1st Special Zone 1 Zone 2 Swiftair Advice of Delivery Error Parts Count Zero Postage Status Batch Status Change t Accoun Meter Set Tape Zone Enter Parts Count 1. Make sure you have: Scale Power Supply Unit (in its own box) User Guide Rates PROM (You may or may not be supplied with a Rates PROM.
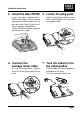
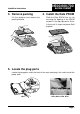
N421 Installation Instructions 4. Install the Rate PROM If you have been supplied with a PROM, slide it into its slot ensuring the opening in the PROM handle is in the top right corner. Press it firmly until it snaps into place. Refit platform. If a rate PROM has not been supplied, you can omit this stage. 6. Connect the postage meter cable If using a Postage Meter, plug the small end of the meter cable into the scale. install 5.
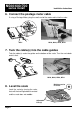
N421 install Installation Instructions 8. Level the scale Level the scale by turning the scale feet until the levelling bubble is centred and the scale does not wobble. :2kg x 1g Select Zone Select Fees 1st Class Postal Scale. selling to the Not for direct Letters International Printed Papers Small Packets d Del'y Recorde 2nd Class 1st Register ed Del'y 1st Reg.+Lo Int'l Register w public Zone 1 Zone 2 ed Del'y Swiftair h 1st Reg.
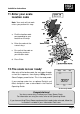
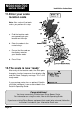
N421 install Installation Instructions 11.Enter your scale location code Note: Your scale will not work unless you perform this step. a. Find the location code corresponding to your location on the map. b. Enter the code via the numeric keys. c. Ensure that the code on the display matches your location code. d. Press Enter. 12.
N500/600/700 series install Installation Instructions Use these instructions if you have a N521 (2kg), N620/N621 (5kg) or a N720/N721 (12kg) scale The scales look like this: N620, N621, N720, N721 N521 1. Make sure you have: ✓ ✓ ✓ ✓ ✓ Scale Power Supply Unit (in its own box) User Guide Rate PROM Meter Cable (only if you ordered a Pitney Bowes Postage Meter at the same time as your scale) Power Supply Unit User Guide 2.
N500/600/700 Installation Instructions 3. Remove packing ,,, ,,, Lift the platform and remove the packing material. series install 4. Install the Rate PROM Slide the Rate PROM into its slot ensuring the opening in the PROM handle is in the top right corner. Press it firmly until it snaps into place. Refit platform. 5. Locate the plug ports Locate the plug ports under the front of the scale and plug in the small end of the power cord.
N500/600/700 series install Installation Instructions 6. Connect the postage meter cable If using a Postage Meter, plug the small end of the meter cable into the scale. N521 N620, N621, N720, N721 7. Tuck the cable(s) into the cable guides Tuck the cable(s) under the guides on the bottom of the scale. Turn the scale back onto its feet. N620, N621, N720, N721 N521 Bubble must be in centre. 8.
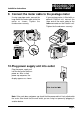
N500/600/700 series install Installation Instructions 9. Connect the meter cable to the postage meter If using a postage meter, connect the large end of the meter cable to the the meter as shown. Tighten the thumbscrews securely. If your postage meter is fitted with an optional Datalink unit, connect the large end of the meter cable to the lower connector on the Datalink unit. Tighten the thumbscrews securely. DM series B900 B900 Datalink B700 10.
N500/600/700 series install Installation Instructions 11.Enter your scale location code Note: Your scale will not work unless you perform this step. a. Find the location code corresponding to your location on the map. b. Enter the code via the numeric keys. c. Ensure that the code on the display matches your location code. d. Press Enter. 12.The scale is now ‘ready’ After entry of the location code, the scale goes through a short test sequence, then displays 0g and the Select Category message.
N900 series install Installation Instructions Use these instructions if you have a N921, 35kg scale Weighing platform The scale looks like this: Note: The weighing platform and control module are separate units connected by a single cable. Control module 1.
N900 series install 3. Assemble the weighing platform Place the cover on the weighing platform. Press down on each corner to be sure it is completely seated. 5. Install the Rate PROM Slide the Rate PROM into the slot with the unlabelled side facing you. Press it firmly until it snaps into place. Refit cover. Installation Instructions 4. Remove the control module cover Remove the cover from the top rear of the control module and set aside. 6.
N900 Installation Instructions series install 7. Locate the plug ports Locate the plug ports under the front of the control module and plug in the small end of the power cable. 8. Connect the postage meter cable If using a Postage Meter, plug the small end of the meter cable into the control module. 9. Tuck the cable(s) into the cable guides Tuck the cable(s) under the guides on the bottom of the control module. Turn the module back onto its feet.
N900 series install Installation Instructions 10.Connect the meter cable to the postage meter If using a postage meter, connect the large end of the meter cable to the the meter as shown. Tighten the thumbscrews securely. If your postage meter is fitted with an optional Datalink unit, connect the large end of the meter cable to the lower connector on the Datalink unit. Tighten the thumbscrews securely. DM series B900 B900 Datalink B700 11.
N900 series install Installation Instructions 12.Enter your scale location code Note: Your scale will not work unless you perform this step. a. Find the location code corresponding to your location on the map. b. Enter the code via the numeric keys. c. Ensure that the code on the display matches your location code. d. Press Enter. 13.The scale is now ‘ready’ After entry of the location code, the scale goes through a short test sequence, then displays 0g and the Select Category message.
Problems? • If you experience any problems installing your equipment, refer to the Troubleshooting section in the Operating Guide supplied with the machine. • If you want to configure the scale to more closely match your personal requirements, refer to the section ‘Changing/Selecting Setup Options’ in the Operating Guide. • Installation help and other useful information is available on our support web site at: http://www.pitneybowestsg.com/public/cinstall.