
User Manual
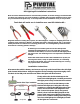

Mount the switch in an easily accessible area
near the battery and connect it to the power
wire as shown in the diagram to the left.
Connect each wire to the switch using crimp
on spade connectors or soldering them directly
to the switches’ tabs. The gold color tab is the ground (negative ground from battery),
the middle silver tab is the power out (power to the lights), and the outer silver tab is
the power in (power from the battery). Make sure that the wires do not touch each
other, this will cause a short. You can prevent this by wrapping each connected
terminal in elect
rical tape.
dy
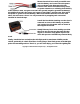
Install the fuse holder (making sure the fuse is
removed) as close to the battery as possible
and connect it to the power wire as shown in
the diagram to the left.
Neatly hide any loose wires making sure that
the wires are not near any hot parts like the
engine or exhaust. Using plastic zip ties will
aid in this process. Reinstall any removed bo
work.
Finally, install the fuse and adjust the LED light pods for maximum visibility on the
vehicle, preferably in a dark area like a closed garage. Then firmly press each LED light
pod to the mounting surface. That is it, you are done! Enjoy your new LED Lighting Kit!
Copyright © 2008 Pivotal Powersports Corp. / All Rights Reserved