
User Guide

8
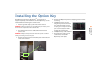
Installing Screens
Installing Screens
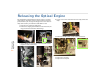
1 Using two people, remove the screen from the packing
case. Grab near the corners as you lift the screen from the
packing case.
Note:
We suggest you save the screen packaging until the entire array
is installed.
2 Cut open the protective envelope. Be careful not to
scratch the screen or the frame.
Caution: The screen is heavy, delicate and expensive. Take care when
handling.
3 Remove the screen from the envelope and carefully place
it aside. Notice there are two slots in the back edge of the
screen. The screen guide arms go into slots.
Note:
There is a label on the bottom of the screen.
4 Prepare the center unit in the bot-
tom row to receive a screen by pull-
ing the support rails all the way out.
5 Using two people, lift the
screen at the sides. Hang
the screen on the screen
guide hooks. It is easier
to do this one side at a
time, with one person
holding still, and the
other person hanging
the screen on the hook.
6 Press the heel of your hand against all four corners of the
screen until the spring-loaded latches click into place.
Note:
You may have to lift the screen a little to get guide pins on the
screen brackets to fit into the holes in the back of the screen.
Caution: Don’t hit the screen hard; it can break.
7 Continue installing screens from the center out until you
have installed screens for an entire row.
8 Move to the next row up, and install a screen on the center
unit.
9 Repeat steps 1 through 8 until all screens have been
installed.
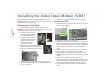
Fine Adjustment
If the screens are not flat with
each other, there is a z-axis
adjustment screw at the top
and bottom of the inside
edge of the screen. You must
open the screen to make this
adjustment.
You can also make x-axis (left
or right) and y-axis (up or
down) adjustments at the top
corners on both sides of the
screen. These can be adjusted
without opening the screen.
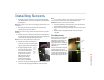
Pin in the
slot in
screen
Hook in
screen
arm
Y-axis
X-axis
Z-axis