M A N U A L O W N E R ’ S I M P O R TA N T I N F O R M AT I O N SERIAL NUMBER
Important Information • Always disconnect the Polaris from the pool wall when cleaning or backwashing the pool filter. • After cleaning or backwashing, let the filtration system run for at least five minutes before re-connecting the Polaris. • New plumbing lines should be flushed out before installing the Polaris. • The Polaris should not be used to remove plaster dust in new pools. • Always remove the Polaris before swimmers enter the pool.
Introduction Like most mechanical devices, it will require periodic adjustments, routine maintenance, and the replacement of cer tain hardworking par ts. Please have your cleaner checked occasionally by your local Polaris dealer or authorized service center. Always insist on genuine Polaris replacement parts. Non-Polaris parts are not made to our specifications. They may have an adverse effect on the operation of your Polaris or may even damage it.
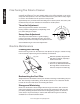
English Quick Installation Instructions Four quick steps to install and get maximum performance from the Polaris 280: • Install the Universal Wall Fitting (UWF) with Quick Disconnect • Adjust feed hose to fit pool length • Assemble the cleaner • Check for proper wheel RPM (revolutions per minute) 1 Install the Universal Wall Fitting Installs in minutes on pools with a dedicated cleaner return line and a threaded 1-1/2” female pipe fitting. 1. Turn on the filtration pump and flush out the plumbing line.
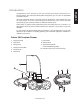
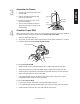
1. Use the nut to attach the feed hose to the feed pipe. 2. Pull out the bag and attach the bag collar to the feed hose. Bag Collar Hose Nut 3. Position the head float 1/2 to 1 inch back from feed pipe. Feed Pipe Head Float 4. Turn on the pool filtration pump and allow it to prime before turning on the booster pump. 4 Check for Proper RPM Before operating the Polaris, check for proper wheel revolutions per minute (RPM). For maximum efficiency, the Polaris should operate between 28 and 32 RPM. 1.
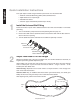
When operating correctly, the Polaris 280 vacuums, sweeps and scrubs all surfaces randomly throughout the pool. The climbing ability of the Polaris depends on the pool’s shape and waterPushes pressure or flow. The Polaris climbs best in pools without sharp angles Unit Left place l unit versfrom la gauche or curves inDthe transition the pool floor to the pool wall. Dr ckt Ger t Nach Links Empujaevery la unidad hacia la izquierda Approximately 3 minutes the Polaris 280 goes into back-up mode.
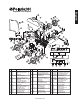
English Exploded Parts Diagram 2 19 3 18 20 39 21 14 15 4 1 16 17 13 1 32 11 17 2 Install dished side out 2 21 33 33 34 37 D MA 5 IN U SA 2 Serial Number 22 6 32 10 23 E 35 9 8 D MA 12 E 2 36 IN U SA 7 30 17 20 42 31 40 29 18 19 27 17 24 43 44 45 46 16 25 38 Pool Wall 14 26 41 47 48 49 48 50 10-foot Hose 10-foot Hose 15 17 15 28 19 18 17 10-foot Leader Hose 54 19 18 52 51 52 13 55 21 To The Polaris 17 53 No.
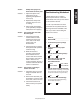
English Troubleshooting If the Polaris cleaner displays the following actions, adjustments may be necessary to restore performance. Refer to exploded parts diagram for part numbers indicated in parentheses. Action: Solution: Hangs up on steps or other obstacles for longer than 3 minutes. 3. Verify the back-up valve (#54) is cycling. Hold the valve out of the water and watch the jet. It should come on and go off. Action: Polaris does not back up. Solution: 1. Verify the back-up valve (#54) is cycling.
Action: 1. Adjust the speed of the sweep hose (#7) by tightening the adjustment screw (#10). 2. Replace the sweep hose scrubber (#5) if it is worn or missing. 3. Add a sweep hose weight (order part #B2) to keep the sweep hose from spraying. Action: The cleaner does not clean the entire pool. Solution: 1. Check the hose length reaches within 6” of the farthest point of the pool. If not, order a new hose section from your Polaris dealer. 2.