ENGLISH Getting Started Please inspect your loudspeakers carefully. Notify your Polk Audio dealer if you notice any damage or missing items. Keep the carton and packing material; this will do the best job of protecting your loudspeakers if they must be transported. Safe limits of Operation Damage to loudspeakers can occur when an amplifier, regardless of its wattage, is made to play at higher listening levels than it can produce at low distortion levels.
FRANCAIS Guide de demarrage Inspectez vos haut-parleurs avec soin. Si vous constatez des dommages ou s'il manque des pieces, contactez votre revendeur Polk Audio. Conservez la boite et I'emballage-ils assureront la meilleure protection de vos haut-parleurs en cas de transit eventuel. Limites d'operation Un haut-parleur peut etre endommage lorsqu'un amplificateur, quelle que soit sa puissance, est pousse au dela de ses limites ltypiquement a la position 12h ou 13h du controle de volume).
PORTUGUES Primeiros passos Inspecione cuidadosamente cada alto-falante. Notifique 0 revendedor da Polk Audio caso note algum dana ou caso estiver faltando algum componente.
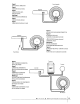
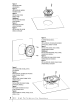
Figure 1 BASIC COAXIAL CONNECTION Figura 1 CONEXION COAXIAL BAslCA Figure 1 CONNEXION O'UN HAUTPARLEUR COAXIAL Coaxial speaker Amplifier 00 Abbildung 1 EINFACHE KOAXIALVERBINOUNG Figura 1 CONEXAO COAXIAL BAslCA Figura 1 CONNESSIONE COASSIALE 01 BASE Figure 2 BASS BLOCKER OXi350 WIRING CONNECTION Figura 2 BLOQUEAOOR DE BAJOS CONEXION DE CABLEAOO DEL OXi350 Figure 2 «BASS BLOCKER» (bloqueur de graves) CONNEXION: DXi350 Abbildung 2 BASS-BLOCKIEREINHEIT OXi350-VERKABELUNGSANSCHLUSS Figura 2 BLOQUEADOR DE G
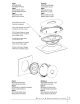
Figure 4 INSTALLING DXi350 ROUND MODEL Figura 4 INSTALACION DEL MODElO REDONDO DXi350 Figure 4 INSTALLATION: DXi350 MODELE ROND Abbildung4 INSTALLATION VON DXi350 RUNDE MODELLE Figura 4 INSTALACAO DO DXi350 MODElO REDONDO Figura 4 INSTAlLAZIONE DEL DXi350 MODEllO CIRCOLARE Figure 5 INSTALLING DXi400, DXi525, DXi650, & DXi6500 ROUND MODELS Figura 5 INSTAlACION DE lOS MODElOS REDONDOS DXi400, DXi525, DXi650 YDXi6500 Figure 5 INSTALLATION: DXi400. DXi525.
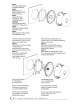
Figure 7 INSTALLING DXi690 OVAL MODEL WITH GRILLE Figura 7 INSTALACION DEL MODELO OVALADO DXi690 CON REJILLA Figure 7 INSTALLATION: DXi690 MODELE OVALE avec grille Abbildung 7 INSTALLATION VON DXi690 OVALES MODELL mit Grill Figura 7 INSTALACAO DO DXi690 MODELO OVAL com grade Figura 7 INSTALLAZIONE DEL DXi690 MODELLO OVALE con griglia Remove bottom mount spacer ring before installing grille. Quite el anillo espaciador de la montura de abajo antes de instalar la rejilla.
Figure 9 INSTALLING DXi650& DXi6500 WITH GASKET AND GRILLE Figura 9 INSTALACION DE LOS MODELOS DXi650 YDXi6500 CON JUNTA YREJILLA Figure 9 INSTALLATION: DXi650 et DXi6500 avec JOINT D'ETANCHEITE et GRILLE Abbildung9 INSTALLATION VON DXi650 & DXi6500 MIT DICHTUNG und Grill Figura 9 INSTALACAO DO DXi650 e DXi6500 COM GAXETA e grade Figura 9 INSTALLAZIONE DEL DXi650 e DXi6500 CON GUARNIZIONE e griglia ~I Figure 10 INSTALLING DXi6500/DXi650 WITH GRILLE Some applications may require using the additional space
Figure 11 CROSSOVER MOUNTING Allow for ventilation clearance. Figura 11 MONTAJE DE CROSSOVER Deje espacio para la ventilacion Figure 11 MONTAGE DU SEPARATEUR Assurez un degagement suffisant pour la ventilation. Abbildung 11 CROSSOVER-INSTALLATION Lassen Sie Freiraum zur LOftung. Figura 11 MONTAG EM DO CROSSOVER Deixar espa~o para ventila~ao. Figura 11 FISSAGGIO DEL CROSSOVER Lasciare spazio sufficiente per la circolazione dell'aria. If. ~ ~ ~ ........ ~ ,.
ENGLISH DXi6500 Figure 14 Flush Mount TWEETER MOUNTING 1. Check for proper clearance: The flush mount kit is 7/8" (22.2mm) deep. 2. Mark the center of the spot and cut a 2" (508mml diameter hole using a hole saw, drill bit or razor knife. 3. Assemble the cup, clamp and machine screw loosely as shown. 4. Route wires through the round opening in the bottom of the cup. 5. Press the assembly into the 2" (508mml diameter hole until the clamp edge is below the mounting surface, then tighten the screw.
DEUTSCH Abbildung 14 Biindige Montage HOCHTONER-MONTAGE 1. PrUfen Sie. ob genug Freiraum da ist: Der Kit zurbUndigen Montage ist 22.2 mm tief. 2. Markieren Sie den Mittelpunkt und schneiden Sie mit einer Lochsage. einem Bohrer oder einem Teppichmesser ein Loch mit 50.8 mm Durchmesser. 3. Kombinieren Sie den Becher. die Klammer und die Flachkopfschraube lose. wie in der Abbildung gezeigt 4. FUhren Sie die Kabel durch die runde Offnung unten am Becher. 50.8 mm Durchmesser.
ENGLISH DXi6500 Figure 15 Surface Mount TWEETER MOUNTING 1. Using the base of the surface mount cup as a template. mark the screw hole and drill them using a 1/S'(3mml drill bit. Drill a second hole (for the speaker wire) using a 3/16' (5mm) drill bit. 2. Screw surface mount cup to the panel. 3. Push the tweeter wires through the open area at the bottom of the cup and through the 3/16" (5mm) hole in the panel. 4.
DEUTSCH Abbildung 15 Oberfliichenmontage HOCHTONER-MONTAGE 1. Verwenden Sie die Unterseite des Oberflachenmontagebechers als Schablone und markieren Sie damit das Schraubenloch, das Sie mit einem 3-mm-Bohrer bohren. Bohren Sie ein zweites Loch (fur das Lautsprecherkabell mit einem 5-mm-Bohrer. 2 Schrauben Sie den Oberflachenmontagebecher an die Platte. 4. Verbinden Sie die Drahte von den Hochtoneranschlussen am Crossover mit den Hochtonerdrahten unter Verwendung der FastonAnschlusse.
ENGLISH DXi Series Full Range/Component Systems Specifications Type Driver complement DXi350 31/2" coaxial DXi400 4' coaxial DXi460 4' x 6" coaxial DXi460p 4' x 6" plate DXi525 51/4" coaxial 31/2" 188.9mm) mid/woofer 4' (102mm) mid/woofer 4" x 6" 1102mm x 152.4mm) mid/woofer 4' (102mm) mid/woofer 51/4" (133.4mml mid/woofer ................................................................................ .................................. ................................. ~ .....................
DXi Series Full Range/Component Systems Specifications DXi570 5" x 7" coaxial DXi650 61/2" coaxial DXi690 6" x 9" three way DXi6500 61/2" component system 5" x 7" (127mm x 178mm) mid/woofer 61/2" (165mml mid/woofer 6" x 9" 61/2" (152.4mm x 229mm) (165mml mid/woofer mid/woofer 3/4" (19mml soft dome tweeter 3/4" (19mm) soft dome tweeter 1" (25.4mm) soft dome tweeter and 3/4" (19mm) soft dome tweeter 1" (25.4mm) soft dome tweeter 71/8" x415/16" (181mmx 125.4mml 5" (127mm) 87/16" x 53/4" (214.
LIMITED WARRANTY Polk Audio, Inc. warrants the original purchaser only that this Polk Audio DXi Product (the Product) will be free from defects in materials and workmanship for a period of (11 one year from the date of original retail purchase from a Polk Audio Authorized Dealer. However. this warranty will automatically terminate prior to the expiration of the III one year period if the original retail purchaser sells or otherwise transfers the Product to any other party.
polkaudio.. This is your Product Model and Serial Number. Enter this number in the "Serial Number" space when registering your product online. Keep this card handy for Model and Serial Number reference when calling Polk Customer Service. Model:DXi460 SERIAL#: Serial Number Register Your New Polk Audio Product Online NOWifor aChance to win $500 of (Polk Product www.polkauio.com/registration/ .. ~ ~ ~ ~ ~ Creates a permanent record of your purchase, in case you misplace your original receipt.