
User Guide


Customer Service Hours of Operation: Monday-Friday, 9AM-6PM EST polkcs@polkaudio.com 9
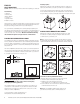
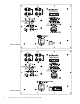
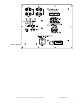
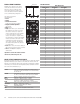
OPTION #3 Receivers with full-range (unfiltered) Left and Right “Pre Out”
jacks (this is the least commonly used hookup)
• Connect the left and right preamp outputs from your receiver to the left and
right LINE LEVEL inputs of the subwoofer. Do not use speaker wires.
• Connect the left and right LINE LEVEL outputs to the left and right inputs
on the power amplifier.
• Adjust the settings on your receiver as follows:
Front speakers = LARGE
Subwoofer = OFF or NO
ADJUSTING YOUR SUBWOOFER
Note: When you set up your subwoofer for the first time, you will probably have
to make adjustments several times before you hear what you personally like.
Don’t forget to turn the AC MAIN power switch on.
INITIAL SETTINGS
Your powered subwoofer offers a range of settings. The unit’s
initial settings are as follows:
• Phase: 0
• Volume: 50% (20, on a scale from 0-40)
•
PRO
™
setting: mid-room
The settings that are best for you depend upon your subwoofer placement,
electronics and personal taste. After you’ve become familiar with what the
settings do, experiment with alternate options to find the method that
works best for your system setup. You’ll find an informative article on
“Subwoofer Positioning and Adjustment” in the set up section at:
www.polkaudio.com/education/article.php?id=19.
POLK ROOM OPTIMIZER (
PRO
™
)
Where you place your subwoofer in your room affects its response. DSW
PRO Series
subwoofers incorporate the Polk Room Optimizer ( PRO
™
) feature—four push-
button room equalization presets that maximize your subwoofer’s performance
for typical room placements: “cabinet,” “corner,” “mid-wall” and “mid-room.”
A traditional subwoofer’s response is affected by its location in a room. The
Polk Room Optimizer (
PRO) feature allows you to place your DSWPRO Series
subwoofer where you want it in your listening room. Based upon the four most
common room placements for subwoofers,
PRO maximizes sound quality for you,
smoothing out the bass response that a particular room placement creates. You
simply choose the location you want and select the corresponding button on your
subwoofer’s remote control.
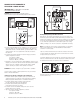
FINE TUNING YOUR SUBWOOFER
• Volume: Adjust by ear using a wide variety of CDs and video sources.
Adjust for deep, powerful bass without “boominess.”
• Low Pass Filter Control: NOTE: This control does not operate when the
subwoofer is connected with Option #1 (LFE Input). This control, which is
located on the back of the amplifier, adjusts the frequency range over which
the subwoofer operates. When using smaller main speakers the upper range
of the control will probably yield the best results. With larger speakers the
lower end of the control range will probably sound best, but always let your
ear be the final judge. If male vocals sound “thin,” turn this control up until
the voice sounds rich but not “boomy.” If male vocals sound too “thick” or
“chesty,” turn this control down until the voice sounds natural.
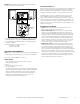
• 4 Button Phase Control (0, 90, 180 and 270 degree settings): This control
enables the subwoofer to blend more seamlessly with your main speakers.
Sit in your favorite listening position. Using the subwoofer’s remote control,
play music (not a movie) with a walking bass line. We recommend playing
jazz or country music. Now listen carefully for the point at which the subwoofer
transitions to your main speakers. This is the crossover point, and this point
should be below the frequency of a male human voice. Whichever phase setting
sounds louder or fuller at the subwoofer’s crossover (transition) point is the
optimum setting. If after trying all four possible phase settings you cannot
hear any difference, leave the phase setting at “0.”
(Artwork not
to scale)