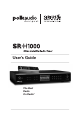
User’s Guide The Best Radio On Radio™.
Introduction Before you do another thing, please read this owner’s manual. Read this owner’s manual in its entirety. Understanding the features and basic functions of your new Polk Audio Designs™ SIRIUS Satellite Radio SR-H1000 Home Tuner first will help you set up and operate it more efficiently. Congratulations on the purchasing your new Polk Audio Designs™ SIRIUS Satellite Radio SR-H1000 Home Tuner.
Table of Contents 2 3 4 4 4 4 5 5 7 8 9 9 11 13 13 13 13 13 14 14 14 14 15 16 16 17 17 18 18 19 20 20 21 22 22 22 23 23 25 25 26 Introduction Table Of Contents Warning & Safety Information FCC Warning FCC Compliance Canadian Compliance General Precautions Safety Precautions Copyrights & Trademarks Carton Contents Controls & Features Tuner Remote Control Getting Started Installation & Setup Introduction Installing Your SIRIUS Tuner Installation/Wiring Precautions Cable Interconnections Installing/Positionin
Warning & Safety Information FCC Warning This equipment may generate or use radio frequency energy. Changes or modifications to this equipment may cause harmful interference unless the modifications are expressly approved in this owners guide. The user could lose the authority to operate this equipment if an unauthorized change or modification is made. FCC Compliance This equipment has been tested and found to comply with Part 15 of the FCC Rules.
General Precautions Liquid Crystal Precautions If the LCD screen on the Polk Audio Designs SIRIUS Satellite Radio Home Receiver is damaged, do not to touch the liquid crystal fluid. If any of the following situations happen, take the action indicated: 1. If the liquid crystal fluid comes in contact with your skin, wipe the skin area with a cloth and then wash the skin thoroughly with soap and running water. 2.
13. Unplug this apparatus during lightning storms or when unused for long periods of time. 14. Refer all servicing to qualified service personnel. Servicing is required when the apparatus has been damaged in any way, such as power supply cord or plug is damaged, liquid has been spilled or objects have fallen into the apparatus, the apparatus has been exposed to rain or moisture, does not operate normally, or has been dropped.
Copyrights & Trademarks © 2007 SIRIUS Satellite Radio Inc. All Rights Reserved. © 2006, Directed Electronics. All rights reserved. © 2005-2012 Polk Audio Designs. All Rights Reserved. No part of this work may be reproduced, modified, distributed or otherwise used without prior written permission. All trademarks referenced herein are the property of Polk Audio and SIRIUS Satellite Radio. “SIRIUS” and the SIRIUS dog logo are registered trademarks of SIRIUS Satellite Radio Inc.
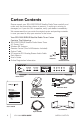
Carton Contents Please unpack your SR-H1000 SIRIUS Satellite Radio Tuner carefully and make sure that everything shown is present. If anything is missing or damaged, or if your unit fails to operate, notify your dealer immediately. We recommend that you retain the original carton and packing materials in case you need to ship your receiver in the future.
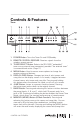
Controls & Features Tuner 1. POWER Button. Turns the Tuner On and Off/Standby. 2. REMOTE CONTROL RECEIVER. Receives signals from the wireless remote control. 3. TUNER SELECT Button. Selects the SR-H1000 “embedded” tuner or any external tuner connected, provided “the external tuner” is connected and active. (Page 17) 4. MENU Button. Used to access menu options to change the receiver setup and features. 5. DISPLAY (DISP) Button. Changes text size of artist names and song titles on the display screen.
9. SCAN ( ) Buttons. Pressing this button enables the receiver to play each Channel/Preset in ascending order for 10 seconds. Scan terminates when the SCAN, CATEGORY, CHANNEL or ENTER button is pressed. 10. NUMBER BUTTONS (0-10). Sets and selects preset channels. 11. CHANNEL Buttons ( ). Navigates through channels and display screens, and highlights items on the display. Pressing the button increases or moves up the menus. Pressing the button decreases or moves down in menus. 12.
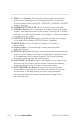
Controls & Features Remote Control The wireless remote control supplied with the Receiver is capable of operating most of the features from a remote location. Each button on the remote control functions in the same way as the button on the Receiver. For a full description of a keypad button or function, refer to the sections in this user manual where they are described. For optimal operation of the remote control, always aim it toward the Remote Sensor on the front panel of the Receiver.
3. CAT (CATEGORY) ( ) Buttons. Navigates through categories and display screens. 4. ENTER Button. Selects a Category or Channel or Menu setting. 5. REWIND ( ) Button. Pressing this button rewinds through content saved to Instant Replay. Pressing and releasing this button rewinds to the beginning of the song or program. Pressing and holding rewinds by timed through the saved content. 6. FAST FORWARD ( ) Button. Used to fast forward through Instant Replay saved content.
Getting Started Installation & Setup Introduction The SIRIUS Home Satellite Radio Tuner must be connected to the windowsill antenna (supplied) to process the SIRIUS signal. The Tuner recognizes and decodes the incoming SIRIUS program information and provides an audio signal to your stereo receiving equipment or other audio output equipment.
Recommended Guidelines Terrestrial repeaters are located in major cities. In those areas, it may be possible to locate the windowsill antenna away from a window and still get satisfactory reception. You can also place the antenna outside (on a roof structure), provided it is clear of any overhead obstructions. Note: Because of the orbiting characteristics of the SIRIUS satellites, the strength of the SIRIUS signal may change over time. In most cases however, the signal should be available continuously.
Antenna Placement Consult the map for the direction in which to point the antenna. Aim the portion of the antenna with the logo on it toward the location indicated by the X on the map. To ensure strong reception in your home, observe the following antenna placement considerations: 1. BEST Reception can be achieved by placing the antenna outside on the roof. The antenna is waterproof. This position will afford the best view of the sky for best reception.
4. Turn the Tuner on and listen for audio. If no audio is heard, aim the antenna in different directions until audio output is heard. This is the desired antenna aiming position. 5. After determining the optimum antenna aiming position, turn the Tuner off, disconnect the power adapter from the wall outlet receptacle, and disconnect the antenna cable. 6. Plan the routing of the antenna cable to the Tuner. Be sure you avoid any obstructions that could crimp, kink, or twist the cable.
1. Make sure that the Tuner is properly connected and that its antenna is oriented to receive the SIRIUS satellite signal. 2. Press the POWER button to turn the Tuner on. After displaying the SIRIUS logo, the Tuner will update all the SIRIUS channels. The display will read “UPDATING CHANNELS” on the top line and “X% Completed” (0%-20%40%-60%-80%-100%) on the bottom line until the update completes. Note: Don’t push any buttons or perform any operations until updating has been completed. 3.
Operation Display Screen Information The display screen of the Polk Audio Design’s SR-H1000 Home Tuner provides information about the operation of the receiver, such as the currently tuned channel, song or show being played, artist name, time and other information. This screen is referred to as the Default display screen in this manual. Figure 1 identifies the information displayed when listening to a typical broadcast.
DISP (Display) Button Pressing and releasing the DISP button from the Default display screen toggles between the artist name/song title and large character displayed text. The large character format will change the character size and cause the field to scroll from right to left. This feature is useful when viewing the display screen from a distance. Note that the displayed text will scroll only if the length of the artist or title cannot be viewed in its entirety.
Search Modes (Category, Channel, Artist, Song Title) The Polk Audio Design’s SIRIUS Home Tuner has four ways to search for and select music: by category, by channel, by artist, and by song title. Each search method is discussed in the sections which follow. Searching Categories If you want to browse different entertainment categories, push either Category ( ) button to activate the category search screen. 1. Use the Category buttons ( ) to scroll through the music and entertainment categories. 2.
Searching Channels (Channel List Mode) It is possible to search for a different channel while listening to your current channel. Be sure that the display shows the Default display screen prior to the following steps: 1. Press and hold the DISP button for two seconds to activate the channel list mode. The channel list screen be displayed, showing all available channels regardless of category.
Direct Tuning Channels can be directly accessed by pressing CHANNEL ( ) buttons or by using the 0-10 keys to enter the desired channel number. Then press ENTER to select the channel. Once the desired number has been entered, the channel will change and the display will revert to the default screen for the selected channel.
Recalling Channel Presets The 10 presets in the active bank (A, B, or C) can be selected by pressing the 0-10 buttons. 1. Press the BAND button to activate the preset bank you want. The selected bank is shown in the lower right corner of the default display screen. 2. Press the desired preset button 0-10 to recall the preset. The channel will change and the display will revert to the default display screen for the new channel, with the preset shown in the lower right corner.
Refer to the Jump Settings section in the Menu Options section for information on configuring the Jump button. If the jump button is set to Traffic, pressing the Jump button will take you to your stored traffic channel. If your traffic report is not immediately available, the band indicator on the display will change to the jump icon to indicate a jump is active. Once your local traffic report is ready, the tuner will automatically tune to your stored traffic channel.
Channel Presets (P. TUNE Mode) Searching For A Channel Preset It is possible to quickly search through all of your presets using the CHANNEL ( ) buttons: 1. Press and hold the BAND button to enter the preset tune mode (P.TUNE). 2. The bottom right portion of the display will change to highlight the current preset number. 3. Press the CHANNEL ( ) buttons to move through the presets. The selected preset channel will begin to play as soon as you stop pressing CHANNEL ( ) buttons.
Preset Tune List Mode While in the preset tune mode, you can view your list of presets showing channel name, artist name, or song title, just like in the channel list mode: 1. Press and hold the BAND button to enter the preset tune mode (P. TUNE). 2. Press the DISP button for two seconds which will bring up the preset tune mode displaying up to 6 preset channel names. 3. Pressing the DISP button again while in this mode will change between channel name, artist name, and song title list modes.
Memory (MEMO) & Song Seek (S-Seek) Functions This feature allows you to capture and store information about the programming (artist, song, sports team, or traffic city) on the currently tuned channel, up to a total of 30 items. The receiver then continuously searches all the SIRIUS channels and alerts you when a match to a saved program is being played.
If either the artist name or song title is not available to save, the choice will be displayed as unavailable. Figure 10 Press CHANNEL ( ) buttons to highlight Store Artist or Store Song (when available) and press the ENTER button to save the current selection to memory. If both the artist and song are available to save, you will be prompted again to save whichever one you haven’t yet saved, song title or artist name. If you do not wish to save, press the MEMO button to exit.
For Sports Games: If the current tuned channel is an NFL, NBA, NHL, or College play-by-play sports broadcast, momentarily press and release the MEMO button. The receiver will display a menu to choose which sports team should be saved to memory. Figure 12 If either of the teams is not available to save, that team will be displayed as unavailable. Figure 13 Press CHANNEL ( ) buttons to highlight the desired sports team (when available) and press the ENTER button to save the current selection to memory.
Figure 14 Initial Game Alert will provide an alert when the team you have chosen is playing a game. All Score Updates will provide an alert when the team you have chosen is playing a game, and also when the scores are updated for the team. Press CHANNEL ( ) buttons to highlight the desired alert and press the ENTER button to save the selection to memory. Figure 15 If both teams are available to save, you will be prompted again to save the other team.
If the new alert was successfully stored in memory, an Artist/Song/Game Stored pop-up screen followed by an X Used/Y Empty screen will be displayed for one and two seconds respectively. X is the total number of listings stored in memory, and Y is the total number of memory listings still available for storage. Figure 16 If the MEMO button is pressed, and all of the memory spaces are full, a Memory Full screen will be displayed for one second.
Press CHANNEL ( ) to select whether to replace an existing alert or cancel saving the alert to memory. If you choose to cancel saving the alert, the tuner will revert to the last active display mode. If you have chosen to replace an existing alert, a listing of all the alerts stored in memory will be displayed. Figure 19 Press CHANNEL ( ) buttons to highlight the alert that you would like to replace and press the ENTER button to store the new alert.
Figure 20 Deleting A Song Title Stored In Memory To Delete A Song Title Stored In Memory: 1. Press the ENTER button while in S-Seek mode. A pop-up screen displaying three selectable options, Song Seek On, Song Seek Off and Delete will be displayed. Figure 21 2. Press CHANNEL ( ) to highlight the Delete option. 3. Press the ENTER button and a Delete confirmation screen will appear.
4. To permanently delete the program from your list, highlight Yes using the CHANNEL ( ) button and press the ENTER button to confirm. 5. A Deleted popup screen followed by an X Used/Y Empty screen will be displayed for one and two seconds respectively. X is the total number of listings stored in memory, and Y is the total number of memory listings still available for storage. The tuner will revert to the last active display mode.
3. Press CHANNEL ( ) buttons to highlight the Seek On option. 4. Press the ENTER button to turn on S-Seek. When the S-Seek option is on, when ever the tuner is turned on, it automatically searches the incoming channels to determine if a match exists with the program information stored in the S-Seek memory. If one or more S-Seek matches are found, a list appears (Figure 24). You can scroll through the list and select a program using the CHANNEL ( ) buttons.
Game Alert The Polk Audio Design’s SIRIUS Home Tuner tuner can automatically identify when your favorite team is playing. When a game is found, Game Alert is displayed and the My Game Zone screen is displayed listing the sports games which are currently being played. (Figure 25) Use the CATEGORY ( ) buttons to select and tune to the desired game. Figure 25 Refer to the Game Alert section in the Menu Options section for information on setting your favorite sports team.
Pressing and releasing the Play/Pause ( ) button again causes the tuner to begin playing the stored audio from the point at which the tuner was paused. During playback, the tuner will continue to store the live channel audio. Pressing and holding the Play/Pause ( ) button changes the display to a listing of the artist’s names in the stored audio, from the most recent to the oldest, beginning with an entry called “Live.
When the end of the stored audio is reached, a beep will be heard, the Instant Replay mode will be exited, and the tuner will resume playing the live broadcast. Rewind ( ) Button This rewinds (moves you backwards) through the stored audio. Pressing and releasing the Rewind button rewinds to the start of the current song or program in the stored audio, and playback automatically begins.
Progress Bar While playing from Instant Replay memory, status information is shown at the bottom of the tuner’s display screen. Figure 27 Play Position Indicator Progress Bar Instant Replay Time Position Instant Replay Mode The Instant Replay mode icon that is displayed at the bottom left of the screen indicates the current mode. Pause ( ) Mode This indicates that the receiver is paused and muted. Play ( ) Mode This indicates that you are in the playback mode, listening to stored audio.
The Progress Bar is a visual indicator of the status of the Instant Replay memory. (Figure 28) As the memory fills, the Progress Bar begins to fill from the left side providing a visual indication of how much of the Instant Replay memory is filled. The end of the bar indicates the end of the stored audio, where the live broadcast begins. When all available memory has been used, the bar will be completely filled.
Figure 30 Play Position Indicator The portion of the Progress Bar behind the Play Position indicator shows how much you can rewind in the Instant Replay memory, while the filled portion ahead of the Play Position indicator shows how much you can fast-forward in the memory. While you are in the playback mode, the tuner continues to store the audio from the channel.
The Instant Replay Time Position provides the exact amount of time the Play Position indicator is behind the live broadcast, expressed as Hours:Minutes:Seconds, and displayed as a negative number. Figure 31 Play Position Indicator Time Position of Play Position Indicator For example, if -02:40 is displayed, this would indicate that the Play Position indicator is 2 minutes and 40 seconds behind the live broadcast.
The following selections (shown in bold text) are available from the Menu Options screen, and allow you to change the parameters for the items listed under the heading: SIRIUS ID Game Alert Settings Jump Settings Display Options Memory Options Audio Level Confirmation Tone Parental Control OSD On/Off Time Based Features Clock Alarm Program Alert Auto Shutdown Sleep Mode Signal Indicator Factory Default Each of these menu options are explained in the sections which follow.
Game Alert Game Alert allows you to store your favorite sports teams in memory. The Polk Audio Design’s SIRIUS Home Tuner receiver will constantly scan the channels and will sound an alert when a sports team you stored in memory is playing a game, or when there is a score update for a team, depending upon which option you have chosen for the sports team. Sports teams which you have selected and are currently playing will be displayed in a category called My Game Zone.
3. Select the league team name or college team name you wish to add. Figure 4 Note that for college teams, you will receive an alert for all teams playing for that college. There are 30 college teams currently licensed for broadcast by SIRIUS. 4. Select the type of alert you want for that team. Figure 5 Initial Game Alert This option will sound an alert when the tuner is powered on and the sports team is playing, and when the sports team begins playing a game.
Settings The Settings menu allows you access the Jump Settings, Display Options, Memory Options, Audio Level, Confirmation Tone, Parental Control, OSD on/off and add/skip menu options, which are described in the sections following. Jump Settings You can access the Jump Settings menu by pressing and holding the Jump button for two seconds or by pressing the MENU button to enter Menu Options, selecting Settings, and then selecting Jump Settings.
Note: If the channel list has not yet been downloaded from the SIRIUS data stream, an Updating City List notification screen will be displayed. Wait 10 minutes and then try selecting a city again. Setting The Jump Button To A Channel To Set The Jump Button To Any Channel Other Than A Traffic Channel: 1. Select the JumpSet menu option. (Figure 6) 2. Press the MENU button to exit the menu options and return to the Default display screen.
Confirm Tone The SR-H1000 Home Tuner can sound an audio tone alert when the tuner powers On and Off, as well as when an S-Seek Alert is activated. The default setting is On. To Change The Tone Options: 1. Select the Confirm Tone menu option. 2. Select On to enable the confirmation tone, or Off to disable the confirmation tone. To exit Confirm Tone, press the MENU button. Memory Options Memory Options provides for turning the memory search function (S-Seek) On or Off.
Figure 9 Parental Control The SR-H1000 Home Tuner has the ability to lock a channel (or channels) you do not want others to access without your permission. Like the Skip channel feature, the locked channel will not appear when browsing channels with the CHANNEL buttons. In addition, when anyone tries to access the locked channel using the Direct Tuning function, an Enter Code screen will be displayed and the channel cannot be accessed until the correct code is entered.
3. Select the channel you wish to lock or unlock from the channel list. Pressing the ENTER button will either add the text Lock next to the channel name to indicate that the channel will be locked, or unlock a locked channel by removing the text Lock. Figure 11 Changing The Lock/Unlock Code The first time the Lock/Unlock menu is accessed, you must enter the default lock code. The default lock code is 0000. This code can be kept or changed. To change the lock code: 1. Select the Lock Options menu option. 2.
Time-Based Features The Time-Based Features menu allows you access the Clock, Alarm, Program Alert, Auto Shutdown, and Sleep Mode menu options, which are described in the sections following. Clock The Clock menu option allows you to setup the clock shown on the Default display screen, based on the format desired and the time zone in which you reside. The actual time is provided via the SIRIUS satellite signal, and will automatically update based on the received signal.
Alarm The Alarm menu option allows you to set the receiver to turn on at a specific time. The last selected channel prior to shutdown will be played when the receiver powers on. When the Alarm menu option is selected, the following menu options are displayed: Set Alarm—This menu option allows you to turn the alarm feature on or off. Select On to enable the alarm clock, or Off to disable the alarm clock feature. Alarm Time—This menu option allows you to set the alarm time.
Auto Shutdown The Auto Shutdown menu option allows you to program the tuner to automatically shut off after a one hour period without any user intervention. After 59 minutes of inactivity, a beep tone will sound and a Cancel Auto Shutdown display prompt appears on the screen to allow you to delay the automatic shutdown. When the Auto Shutdown menu option is selected, select Enable to activate the auto shutdown, or Disable to cancel an auto shutdown.
SAT indicates satellite signal strength and TER indicates terrestrial signal strength, if available. 3. Adjust the antenna for maximum signal strength as described in the appropriate accessory manual. To exit, press the ENTER button or press the MENU button. Figure 13 Factory Default The Factory Default option will restore all original factory settings in your SR-H1000 Home Tuner. Note that factory default will not reset the lock code if you have changed it from the default lock code.
If Yes is chosen, the receiver reverts to the original factory settings for the following parameters: All presets revert to empty Reset to Normal Tuning Mode Reset to default screen (with 2-line PDT display) Reset previous power state setting to: Off Game Alert: Clear all favorite teams Jump Settings: Clear jump setting Display Brightness: 80% Display Contrast: 50% Auto Memory Search: On Clear all S-Seek stored entries Audio Level: -3dB Confirmation Tone: On Clock Format: 12 Hour Clock Time Zone: Eastern Ti
Troubleshooting Symptom Receiver Does Not Power On Solution Blown fuse, or the power cable is not properly connected. Check for a bad fuse and check power cable connection. Antenna Not Detected The satellite antenna is not connected to the receiver dock. Check the satellite antenna connection to the dock. Receiver Displays No satellite signal is being received. “Acquiring Signal” Check for obstacles over or around the satellite antenna. Audio Static Or Loss Of Clarity The audio cables are not connected.
Specifications Audio Output Total Harmonic Distortion (THD) Signal-To-Noise (S/N) Power Requirements Operation Temperature Receiver Dimensions (With Feet) Receiver Weight Package Weight Remote Control Dimensions Remote Control Battery SPECIFICATIONS 1V (Peak-to-Peak) <0.3% Greater than 75dB AC120 ~ 60Hz,1.5A 0°C ~ 70°C (indoor home or office environment) 14.75" W x 2.75" H x 10.625" D (375mm W x 69.5mm H x 270mm D) 4 lbs. (1.814 kg) 5.5 lbs. (2.495 kg) 1.75" W x 5.5" H x 1" D (45mm W x 140mm H x 23.
Warranty Limited One Year Consumer Warranty Directed Electronics (herein “DIRECTED”) promises to the original purchaser, to replace this product should it prove to be defective in workmanship or material under normal use, for a period of one-year from the date of purchase from the dealer as indicated by the date code marking of the product. During this one-year period, there will be no charge for this replacement PROVIDED the unit is returned to DIRECTED, shipping pre-paid.
For Your Records Serial Number (Located on the back of your SR-H1000): Model Number: Purchase Date: Staple Your Receipt Here: FOR YOUR RECORDS 59
Polk Audio, Inc. www.polkaudio.com Customer Service: polkcs@polkaudio.com 1-800-377-7655 Outside USA & Canada: 410-358-3600 SIRIUS Satellite Radio, Inc. 1-888-539-7474 www.SIRIUS.com Directed Electronics, Inc. 1 Viper Way Vista, CA 92081 www.directed.com © Copyright 2007. All rights reserved.