WELCOME TO THE CLUB THE FIRE & SMOKE SOCIETY Since the dawn of history, people of all cultures have gathered around the fires and fanned the smoke of friendship to share great food and build community. The Fire & Smoke Society is our brotherhood of family, friends, neighbors, foodies, cooks, pit masters, dungeon masters and BBQ enthusiasts.
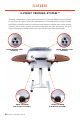
FEATURES 4 - P OINT VE NT ING S YSTEM™ The fully configurable 4-Point Venting System™ on the new PK360 is revolutionary in precision air control and heat management. Combined with its unique shape, the PK360 is ideally suited to both direct and indirect cooking, often called 2-zone cooking. The 4-point system provides exceptional air flow throughout the grill capsule. Keeping consistent heat on a charcoal grill has never been easier.
FEATURES T H E UNIQUE P K G RILL CAPSULE The PK36O is superior to round grills for direct and indirect cooking. This maximizes your cooking space, makes 2-zone set-ups easy and allows for superior air flow when indirect cooking.
FEATURES BEAUT IFUL DESIG N & RUGGED MAT ER IA LS D I M E N S I O N S & C A PACIT Y HEI GH T 42. 5 ” WI D T H 5 4” (FR OM SHE LF T IP T O T IP) D EP T H 23. 75” CAST R ADIAL VE NT S TH I CK CAST AL UM I N UM S TA I N L E S S T E L - T RU TH E RM O M E T E R D E TA C H A BL E S H E LV E S Q UI CK REL EASE K N OB M O L D E D H E AV Y DUT Y WHEEL CONT R OL T OW E R ™ STAND INCLUDE D.
FEATURES 3 6 0 SQUAR E INCHE S OF COOKI N G SURFACE Plenty of space for a pork shoulder, roasted chicken, a rack of ribs or anything else you can think of. That’s almost 100 more inches than a large Big Green Egg and 60 more than a Primo L300. R E MOVABLE MAR INE GR ADE STAINLE SS HINGE D COOKI N G SURFACE Marine grade stainless is the pinnacle of stainless cooking surfaces.
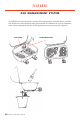
FEATURES A S H M ANAG E M E NT SYSTEM The PK360 has incorporated a unique ash management solution which controls ash within the cook chamber using high walled air intakes and covers, combined with a large opening at the rear of the capsule for easy clean-up and disposal.
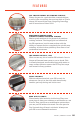
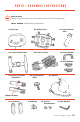
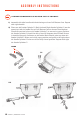
PA R T S / A S S E M B LY I N S T R U C T I O N S STEP 1 OPEN BOXES. Remove all grill components and take inventory of the following parts: TO O L S N E E D E D : Phillips Head Screwdriver 01. Top Cast 02. Bottom Cast 04. Control Tower Base 05. Grids & Grates 03. Control Tower Tube 06. Front Handle 07. Side Handles 08. Lower Air Intake Cylinders™ 09. Quick Release Knob 09. Shelves T HU M B SCRE W S 10. Ash Roofs 11. Ash Plug 12. Tel-Tru Thermometer 13.
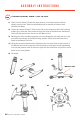
A S S E M B LY I N S T R U C T I O N S STEP 2 A S S E M BL E CO N T R OL T OW E R ™ T UBE T O BASE : 1) Place Control Tower™ Base flat, right side up on a level surface with the wheels on your left. Twist the adjustable feet as needed to balance and stabilize the Base. 2) Orient the Control Tower™ Tube so the tab on the bottom of the tube is facing toward you. Slide the Tube down through the hole in the Base into the Mount Cuff until the tab fits into the slot on the Mount Cuff.
A S S E M B LY I N S T R U C T I O N S STEP 3 M O U N T BO T T O M CAST T O CONT R OL T OW E R ™ TUB E. SE CU RE I N P L A CE BY T IGHT E NING QUICK R E LE ASE K N OB . 1) With the Control Tower Quick Release Knob off, place the Bottom Cast on Control Tower™. 2) Tighten the Quick Release Knob to secure the Bottom Cast to Control Tower™.
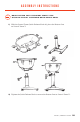
A S S E M B LY I N S T R U C T I O N S STEP 4 A S S E M BL E CO M PONE NT S OF BOT T OM CAST AS FOL L OWS: 1) Assemble left side handle with hook facing out from Grill Bottom Cast. Repeat with right handle. 2) Place one Air Intake Cylinder™ (Both Left and Right Intake Cylinder™ are the same) into left Air Intake Slot on Grill Bottom Cast as shown. Hand tighten Thumb Screw into hole on Air Intake Cylinder™ to secure in proper position.
A S S E M B LY I N S T R U C T I O N S STEP 5 A S S E M BL E T O P CAST AS FOLLOW S: 1) Place Top Cast flat on Bottom Cast, oriented as shown in picture. The Top Cast is held in place by the tabs along the back side and gravity. There is no hardware required to secure the Top Cast in place. Pretty clever, we know. 2) Open and close Top Cast to make sure hinge is oriented properly. 3) With top open, assemble front Handle using screws and inserts provided.
A S S E M B LY I N S T R U C T I O N S STEP 6 AT TA C H S H E LV E S T O GR ILL: 1) Each shelf has three knobs on the bottom that align with three shelf mount tabs on the Grill Bottom Cast. 2) With knobs on the bottom of the shelves loose, slide shelves on horizontally until shelves engage with Shelf Mount Tabs. 3) Hand tighten knobs.
A S S E M B LY I N S T R U C T I O N S STEP 7 N O W GE T RE A DY T O GR ILL: 1) Place removable Ash Hole Cover in hole in Grill Bottom Cast. 2) Place removable Ash Roofs on top of the air intake holes in the Grill Bottom Cast. 3) Place Stainless Steel Charcoal Grate on side mounts in the Grill Bottom Cast. ADD CHARCOAL. 4) Place Stainless Steel Cooking Surface on left side of Grill Bottom Cast on side mounts.
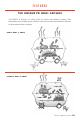
USAGE, CLEANING & CARE F I R I N G U P YO U R P K • Rotate the Air Intake Cylinders™ to the full open position. • Fill one charcoal chimney with briquettes and light the chimney as per the instructions. • Once the coals are hot (clear smoke, white appearance), open the hinged side of the cooking grid or remove the grid completely and dump the hot charcoal onto the charcoal grate. • For two-zone cooking, arrange the coals on one side of the grill. This side will be your hot zone.
USAGE, CLEANING & CARE G R I L L I N G, H O T & FAST, T HE DIR E CT ME T HOD Start the fire as indicated above, and let the coals get up to temperature. Crack open a beverage. Smile. • If you would like to set-up two zones (see page 3), as many chefs prefer, ensure the coals are on one side of the capsule and that the cooking surface is installed so that the hinged opening is over the coals. • Close the Top Cast and open all of the vents.
WARRANTY 1) We stand behind this product. If you are not entirely satisfied with your new PK Grill & Smoker, we want to know about it. Do not return to the retailer where you purchased it. Contact us immediately to resolve the issue. customerservice@ pkgrills.com or 1 (866) 354-7575 2) Immediately register your new grill online: www.pkgrills.com/warranty-registration 3) Portable Kitchens, Inc.
WARNINGS 1) Failure to follow the warnings contained in this Owner’s Manual may result in damage to your PK Grill, your property, serious bodily injury or death. 2) NEVER burn charcoal inside homes, vehicles or tents or any semi-enclosed area including garages, breezeways or balconies. Always grill in a well ventilated area. 3) Burning charcoal indoors can kill you. It releases carbon monoxide, which is an odorless gas that can cause serious injury or death.
K E E P E VEN H EAT 18 “Cooking at 225°F will allow meat to roast low and slow, liquefying the collagen in connective tissues and melting fats without getting the proteins knotted in a bunch. It’s a magic temp that creates silky texture, adds moisture, and keeps the meat tender. If you can’t hit 225°F, get as close as you can. Don’t go under 200°F and try not to go over 250°F.
RECIPES L A ST M E A L R IB S This is the recipe for making the best barbecue ribs you ever tasted. Recipe by Meathead Goldwyn I NG RE D I E N T S 1 slab of fresh St. Louis Cut Ribs 4 tablespoons of Meathead’s Memphis Dust* 1/2 teaspoon kosher salt** per pound of meat 1 cup of your favorite barbecue sauce *Find it at amazingribs.com **Kosher salt is 1/2 the concentration of table salt. If you use table salt, cut it by 1/2.
RECIPES L A ST M E A L R IB S 4) Rub. Coat the meat with a thin layer of water. The water helps dissolve the spices. Sprinkle enough Meathead’s Memphis Dust to coat all surfaces but not so much that the meat doesn’t show through. That is about 2 tablespoons per side depending on the size of the slab. Spread the Memphis Dust on the meat and rub it in. Some folks insist on putting the rub on the night before, but it isn’t necessary. 5) Set up your PK for Indirect Cooking (see pg. 02) 6) Adjust the temp.
REFERENCE F I G U R E A : P O RK C U T S 1 HEAD 7 CH EEK 2 C L E A R P L AT E 8 PI CN I C 3 B A CK FAT 9 R IB S 4 B O S T O N SHOULDE R 10 BACON 5 LOIN 11 H OCK 6 LEG F I G U R E B : RI B CU T S 1 B AB Y B ACK 2 ST.
US E G O OD , D RY WOOD 22 When cooking with wood the quality of your wood is as important as the quality of your meat. Use dry wood. Soaked wood burns longer, but the smoke is less clean. Try Hickory. It’s good with pork, ham and beef and great for bacon. Use a little hickory at the beginning of longer cooks like brisket and pork butts, and a small amount of hickory chips/chunks for short cooks. Too much hickory can bitter out your meat and add too much smoke. Smoke Note: thin and blue = tasty.
RECIPES S M O K E D BACO N Recipe by Jess Pryles of jesspryles.com PR E PAR ATI ON TI M E I NG RE D I E N T S 3lbs skinless, boneless pork belly 3 tablespoons kosher salt 1/3 cup white sugar 2 tablespoons pepper 2 teaspoons paprika Seven Days, Three Hours and Worth the Wait! 1 teaspoon pink curing salt (aka Prague Powder #1) Wood chunks, such as Apple or Hickory. 1) CURING. To start, cure the belly. In a small bowl, combine the pepper, sugar, paprika, salt & curing salt.
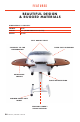
PK ACCESSORIES & GEAR 24 01. Tongs 02. Spatula 03. Rib Rack 04. Charcoal Basket 05. Pizza Stone 06.
PK ACCESSORIES & GEAR 07. Littlemore Grid 08. Cookmore Grid 09. Apron 10. Navy PK Logo Tee 11. Grey PK Pig Tee 12.
B U I LT T O C O O K . B U I LT T O L A S T T HE SIX T Y Y E AR -OLD-STAR T- UP The first PK Grill & Smoker was created in Tyler, Texas in 1952 by an inventor and local businessman named Hilton Meigs. The simple venting system and aluminum construction produced a grill that excelled at both hot and fast grilling and low and slow barbecue cooking. Meigs sold the popular grill all over the Mid-South.