Portable Winch Co.
Summary Introduction – p. 3 1.0 Safety guidelines – p. 3 1.1 Safety messages – p. 3 1.2 Labels – p. 4 1.3 Safety information – p. 4 2.0 Before first use – p. 5 2.1 Upon receiving the winch – p. 5 2.2 Is the engine ready to work? – p. 5 2.2.1 Engine oil – p. 5 2.2.2 Gas – p. 5 2.2.3 Engine start-up – p. 6 2.2.4 Capstan drum – p. 6 2.2.5 Spark arrestor – p. 7 3.0 Winch usage – p. 8 3.1 Rope – p. 8 3.1.1 Rope type – p. 8 3.1.2 Rope maintenance – p. 9 3.2 At the end of the rope – p. 9 3.2.
Introduction Portable Winch Co. wishes to thank you for purchasing a PCW5000 Portable WinchTM. This manual was written to help you make the best use of your new winch and to use it in the most secure way. Read it carefully before using the winch. For any problems or questions you may have, please refer to an authorized Portable Winch Co. dealer or contact us directly. 1.
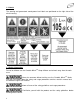
1.2 Labels The warning and guaranteed sound power level labels are positioned on the right side of the winch housing. 1.3 Safety information Do not let children use the Portable WinchTM. Keep children and animals away from the work area. Never let someone without training use the Portable WinchTM. Make sure the user knows about the safety and usage procedures and has read this manual and the HondaTM engine user manual. Inform all users of the safety guidelines and usage procedures.
Make sure that your clothes are not going to get caught into the winch mobile parts. The exhaust gas contains toxic carbon monoxide. Never run the engine in a closed area without proper ventilation. Replace any safety labels that are damaged, illegible or missing. Never put your hands on the capstan drum or near the rope guide when the engine is running. Always keep bystanders outside the working area. Never pull rolling objects that might roll out of your control.
2.2.3 Engine start-up Refer to page 3 of the HondaTM engine user manual for start-up instructions. The engine on-off switch is located on the winch housing, to the left of the handle (figure 1 to the right). Make sure to pull on the recoil starter in the axis of the rope outlet (figure 1 below). If you pull vertically (figure 2), the friction of the rope on the plastic cover might damage the rope and the cover. 2.2.
2.2.5 Spark arrestor In certain areas, it is forbidden to use a gas engine without a spark arrestor. Check local regulations. An optional spark arrestor is available from Portable Winch Co. and HondaTM Power Products dealers. Installation: 1) Insert the spark arrestor into the exhaust tube. Make sure the holes are aligned (figure 1 to the right). 2) Fasten lightly the metal screw provided with a Philips #1 screwdriver (figure 2 to the right).
3.0 Winch usage Most winching situations present POTENTIAL DANGERS! 3.1 Rope Stay out of the winch line’s path. 3.1.1 Rope type Use only low stretch rope. We recommend using double-braided polyester rope with a minimum diameter of 10 mm (3/8''). Maximum rope diameter is 16 mm (5/8"). For most situations, we recommend using 12 or 13 mm (1/2’’) DBP rope. Please contact us for other rope types suitability.
3.1.2 Rope maintenance Visually inspect your rope before each usage. If it shows any sign of deterioration (cut strands, excessive abrasion), replace it. If your rope is dirty, wash it. Dirty ropes deteriorate faster and cause premature wear of the capstan drum and rope guide. 3.2 At the end of the rope 3.2.1 Recommended knots You have to attach the load to the end of the rope.
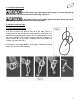
3.2.2 Recommended hooks If you usually pull with a choker chain, use a grab hook (figure 1) or grab hook with latch (figure 2). If you usually pull a sling or a ring, use a safety hook with latch (figure 3). 3.3 Winch anchor OPTION 1: In most cases, the winch is anchored to a fixed point using the polyester sling or with optional anchoring devices and the rope end is tied to the object you want to move. The load is moving towards the winch when you pull the rope.
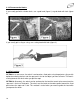
3.3.1 Using a polyester sling (included with the winch) Go around the anchor point with the sling. Insert each end of the sling in one of the safety hooks located on the winch (figure 1). Avoid installing the sling on sharp edges that might damage it. Whether you are using a post, a tree or a stump, always install the sling near the anchor’s base (figure 1). Using a stump as an anchor point means paying special attention in order to prevent the sling from slipping over it.
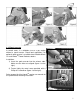
4) Wrap the rope around the drum and start winching (figure 3). NOTE: Do not leave the winch on the hitch with the engine running; the resting position will cause the Oil AlertTM device to turn the HondaTM engine off (see section 3.4). Use the hitch plate only with Category II ball hitch (1500 kg – 3500 lb) or higher. Make sure the anchoring vehicle’s hand brake is on and working properly. Position blocks behind the wheels to prevent roll back. 3.3.
3.3.4 Using the Tree/Pole Mount with rubber pads (PCA-1263, sold separately) 1) Place the tree/pole mount at the base of the tree or pole. Insert the sling’s hook into the anchor point on the left (figure 1, no 1); then feed the sling’s end through the ratchet system (figure 1, no 2); 2) Slide the whole set-up upward to the desired height (figure 2); 3) Tighten the sling with the wrench supplied while making sure the rubber pads are properly positioned.
ignition when the winch is operating at an angle greater than 20 degrees (± 4 degrees). Make sure that your set-up keeps the winch at a relatively horizontal level while winching and idling. 3.5 Rope installation Using common sense while installing the rope is the key to a secure winch usage. The great variety of situations encountered when winching prevents us from providing specific instructions; however you need to consider the following points: 3.5.
3.6.1 Wrapping the rope on the capstan drum NEVER put your HANDS on the CAPSTAN DRUM or the ROPE GUIDE when the ENGINE is RUNNING.
3.6.2.2 To ‘’rock’’ the load: Pull the rope until the engine comes close to stalling and release the tension. Pull again on the rope to put tension and repeat as needed. Be careful with this method since it generates heat and can wear the rope quickly. If the winch is pulling the rope but the load does not move (often the case when using a very long rope), it’s because your rope is stretching and could reach the breaking point and recoil towards you.
3.6.2.6 If you must keep tension on the rope at start-up: You can install a rope grab device or a Prussik knot attached to your anchor point in order to keep tension on the rope. 3.6.2.7 If your rope is too short: You will have to link two ropes together. 1) If you have to link two rope lengths, do it with two bowline knots (figure 1) (see section 3.2.1). 2) Leave about 1 m of rope tailing out of the knot on the rope holding the load (figure 1, no 1).
4.2 Lubrication The front pulley (figure 1, no 1) must turn freely. Lubricate it regularly with light oil. Dirt and grime lodged between the pulley and the shaft may prevent it from turning freely. If required, disassemble it to clean the shaft. The gearbox is lubricated at the factory and should not require additional lubrication or maintenance. If there is appearance of a leak, check oil level by placing the winch on a level surface and remove the oil plug (figure 1, no 2).
PRODUCT NUMBER DESCRIPTION PCA-1100 PCA-1215 Optional capstan drum (85 mm (3-3/8'') diameter) Double-braided polyester rope - 3674 kg MBS (8100 lb) - 13 mm x 45,75 m (1/2'' x 150') PCA-1213 Double-braided polyester rope - 3674 kg MBS (8100 lb) - 13 mm x 91,5 m (1/2'' x 300') PCA-1216 Double-braided polyester rope - 3674 kg MBS (8100 lb) - 13 mm x 183 m (1/2'' x 600') PCA-1252 Rope bag - Medium - Holds 91,5 m (300') of 13 mm (1/2") rope with shoulder straps PCA-1255 Rope bag - Medium - Holds 75 m
5.2 Warranty Portable Winch Co. products are warranted against defects in materials and workmanship while owned by the ''original purchaser'' as defined below. The ''Original purchaser'' is defined as the party or entity which purchases the winch and/or accessories from an authorized Portable Winch Co. retailer as shown by the original sales receipt. The warranty ownership is transferable, provided the end-user has a copy of the original purchaser’s invoice.
5.4 CE Declaration of conformity DECLARATION OF CONFORMITY We of PORTABLE WINCH CO. 1170 Thomas-Tremblay St. Sherbrooke, QC J1G 5G5 CANADA Tel: +1 819 563-2193 www.portablewinch.
5.
NO.
5.6 Technical data 5.6.1 Pulling force The winch provides the following pulling forces according to the drum diameter size: • 57mm (2-1/4’’) drum: 1000 kg (2200 lb) • 85mm (3-3/8’’) drum: 635 kg (1400 lb) 5.6.