
Product Manual


INSTALLING THE MOTOR (6911 "D" HANDLE BASE)
1. Loosen the clamp screw (EE) Fig. 15 to set the power unit in the base unit.
2. Insert the motor unit into the base aligning the lower pin (B) with the groove in the base.
3. Rotate the motor unit into the base clockwise until the motor switch (FF) Fig. 16 is directly
above the knob handle (GG).
4. Connect the motor unit cord to the outlet in handle (HH) Fig. 16.
5. Continue rotating the motor unit into the base until upper guide pins set rigidly into base.
6. Tighten the clamp screw firmly.
ADJUSTING THE DEPTH OF CUT (6911 BASE)
1. Loosen the clamp screw (EE) Fig. 17.
2. Hold the base (E) and turn the motor unit (F) Fig. 17 counter-clockwise until the tip of the bit
is above the bottom of the base.
3. Set the router on a flat surface.
4. Turn the motor unit (F) Fig. 17 clockwise until bit touches the wood surface.
5. Tighten the clamp screw (EE) Fig. 17.
6. Rotate the depth adjusting ring (C) Fig. 17 until the zero-line (LL) is opposite the index line (D)
on the housing.
7. Loosen the clamp screw (EE) Fig. 17.
8. Tip the router so that the bit is clear of the wood surface. Turn the motor unit (F) Fig. 17
clockwise until the index line (D) on the motor housing reaches the desired depth indicated on
the ring.
9. Tighten the clamp screw (EE) Fig. 17 firmly.
NOTE: Setting the index line to 1/4" on the ring means the cutting edge of the bit is exposed 1/4"
(6.4 mm) below the base.
CONNECTING TO POWER SOURCE
Before connecting motor unit power cord to power source or "D" handle (if applicable),
ensure the toggle switch and the "D" handle trigger switch are in the OFF position. An accidental
start-up can cause injury.
STARTING AND STOPPING THE MOTOR
Before starting the tool, clear the work area of all foreign objects. Check to see that
the cord will not snag or impede the routing operation. Also keep firm grip on tool to resist starting
torque.
To avoid personal injury and/or damage to finished work, always allow the power unit
to come to a COMPLETE STOP before putting the tool down.
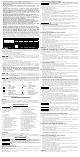
To start the tool, move the rocker switch (FF) Fig. 18 to the "ON" or "I" position. To stop the tool,
move the rocker switch to the "OFF" or "O" position.
STARTING AND STOPPING THE MOTOR - “D” HANDLE
Check to see that the motor unit power cord (II) Fig. 16 is plugged into the handle, and that the
switch (FF) on the motor is set to the “ON” position. The starting and stopping of the motor is then
controlled by pressing and releasing the trigger switch (KK) Fig. 16 in the handle of the base.
To allow the tool to run without continually pressing the trigger, press the trigger (KK) into the handle
and engage the switch locking button (JJ) on the side of the handle. While holding the button in,
slowly release the trigger. To stop the tool, squeeze the trigger into the handle and release.
USING THE TOOL
Do not operate tools rated “AC only” on a DC supply. Loss of speed control may
result, causing tool damage and possible hazard to the operator.
If the speed control ceases to operate, or is intermittent, stop using the tool
immediately. Take it to a PORTER-CABLE factory or authorized service facility for repair.
Avoid “Climb-Cutting” (cutting in direction opposite that shown in Fig. 11). “Climb-
Cutting” increases the chance for loss of control resulting in possible injury. When “Climb-Cutting”
is required (backing around a corner), exercise extreme caution to maintain control of router. Make
smaller cuts and remove minimal material with each pass.
DIRECTION OF FEED (FIG. 11)
The direction of feed is very important when routing and can make the difference between a
successful job and a ruined project. Figure 11 shows the proper direction of feed for some typical
cuts. A general rule to follow is to move the router in a counterclockwise direction on an outside cut
and a clockwise direction on an inside cut.
Shape the outside edge of a piece of stock by following these steps:
1. Shape the end grain, left to right
2. Shape the straight grain side moving left to right
3. Cut the other end grain side
4. Finish the remaining straight grain edge
6931 PLUNGE BASE
Turn the router on before plunging the cutter head into the workpiece.
TROUBLESHOOTING
For assistance with your tool, visit our website at www.portercable.com for a list of service centers,
or call the PORTER-CABLE Customer Care Center at (888) 848-5175.
MAINTENANCE
To reduce the risk of injury, turn unit off and disconnect it from power source
before installing and removing accessories, before adjusting or when making repairs. An
accidental start-up can cause injury.
REPAIRS
For assistance with your tool, visit our website at www.portercable.com for a list of service centers,
or call the PORTER-CABLE Customer Care Center at (888) 848-5175.
CLEANING
Blow dirt and dust out of all air vents with clean, dry air at least once a week. To mini-
mize the risk of eye injury, always wear ANSI Z87.1 approved eye protection when performing this.
Never use solvents or other harsh chemicals for cleaning the non-metallic parts of the
tool. These chemicals may weaken the plastic materials used in these parts. Use a cloth dampened
only with water and mild soap. Never let any liquid get inside the tool; never immerse any part of
the tool into a liquid.
NOTE FOR 6391 PLUNGE BASE ONLY: Use only a DRY cloth to wipe the plunge rods. These
rods require no lubrication. Lubricants attract dust, reducing the performance of your tool.
FAILURE TO START
Should your tool fail to start, check to make sure the prongs on the cord plug are making good
contact in the outlet. Also, check for blown fuses or open circuit breakers in the line.
LUBRICATION
This tool has been lubricated with a sufficient amount of high grade lubricant for the life of the unit
under normal operating conditions. No further lubrication is necessary.
BRUSH INSPECTION (IF APPLICABLE)
For your continued safety and electrical protection, brush inspection and replacement on this tool
should ONLY be performed by a PORTER-CABLE FACTORY SERVICE CENTER OR PORTER-
CABLE AUTHORIZED WARRANTY SERVICE CENTER.
At approximately 100 hours of use, take or send your tool to your nearest PORTER-CABLE Factory
Service center or PORTER-CABLE Authorized Warranty Service Center to be thoroughly cleaned
and inspected. Have worn parts replaced and lubricated with fresh lubricant. Have new brushes
installed, and test the tool for performance.
Any loss of power before the above maintenance check may indicate the need for immediate
servicing of your tool. DO NOT CONTINUE TO OPERATE TOOL UNDER THIS CONDITION. If
proper operating voltage is present, return your tool to the service station for immediate service.
SERVICE
REPLACEMENT PARTS
Use only identical replacement parts. For a parts list or to order parts, visit our company’s service
website at servicenet.portercable.com. You can also order parts from your nearest PORTER-
CABLE Factory Service Center or PORTER-CABLE Authorized Warranty Service Center. Or, you
can call our Customer Care Center at (888) 848-5175.
SERVICE AND REPAIRS
All quality tools will eventually require servicing and/or replacement of parts. For information about
PORTER-CABLE, its factory service centers or authorized warranty service centers, visit our
website at www.portercable.com or call our Customer Care Center at (888) 848-5175. All repairs
made by our service centers are fully guaranteed against defective material and workmanship. We
cannot guarantee repairs made or attempted by others.
You can also write to us for information at PORTER-CABLE, 4825 Highway 45 North, Jackson,
Tennessee 38305 - Attention: Product Service. Be sure to include all of the information shown on
the nameplate of your tool (model number, type, serial number, etc.).
ACCESSORIES
A complete line of accessories is available from your PORTER-CABLE Factory Service
Center or a PORTER-CABLE Authorized Warranty Service Center. Please visit our Web Site
www.portercable.com for a catalog or for the name of your nearest supplier.
Since accessories other than those offered by PORTER-CABLE have not been
tested with this product, use of such accessories could be hazardous. For safest operation, only
PORTER-CABLE recommended accessories should be used with this product.
THREE YEAR LIMITED WARRANTY
PORTER-CABLE will repair, without charge, any defects due to faulty materials or workmanship for three
years from the date of purchase. This warranty does not cover part failure due to normal wear or tool
abuse. For further detail of warranty coverage and warranty repair information, visit www.portercable.com
or call (888) 848-5175. This warranty does not apply to accessories or damage caused where repairs
have been made or attempted by others. This warranty gives you specific legal rights and you may have
other rights which vary in certain states or provinces.
In addition to the warranty, PORTER-CABLE tools are covered by our:
1 YEAR FREE SERVICE: PORTER-CABLE will maintain the tool and replace worn parts caused by
normal use, for free, any time during the first year after purchase.
90 DAY MONEY BACK GUARANTEE: If you are not completely satisfied with the performance of your
PORTER-CABLE Power Tool, Laser, or Nailer for any reason, you can return it within 90 days from the
date of purchase with a receipt for a full refund – no questions asked.
To register your tool for warranty service visit our website at www.portercable.com.
LATIN AMERICA: This warranty does not apply to products sold in Latin America. For products sold
in Latin America, see country specific warranty information contained in the packaging, call the local
company or see website for warranty information.
WARNING LABEL REPLACEMENT
If your warning labels become illegible or are missing, call (888) 848-5175 for a free replacement.
MESURES DE SÉCURITÉ - DÉFINITIONS
indique une situation dangereuse imminente qui, si elle n’est pas
évitée, causera la mort ou des blessures graves.
indique une situation potentiellement dangereuse qui, si elle
n’est pas évitée, pourrait se solder par un décès ou des blessures graves.
indique une situation potentiellement dangereuse qui, si elle n’est
pas évitée pourrait se solder par des blessures mineures ou modérées.
indique une pratique ne posant aucun risque de dommages
corporels mais qui par contre, si rien n’est fait pour l’éviter, pourrait poser des
risques de dommages matériels.
Afin de réduire le risque de blessures, lire le mode d’emploi de l’outil.
AVERTISSEMENTS DE SÉCURITÉ GÉNÉRAUX POUR LES OUTILS
ÉLECTRIQUES
Lire tous les avertissements de sécurité et les
directives. Le non-respect des avertissements et des
directives pourrait se solder par un choc électrique, un
incendie et/ou une blessure grave.
CONSERVER TOUS LES AVERTISSEMENTS ET TOUTES LES
DIRECTIVES POUR UN USAGE ULTÉRIEUR
Le terme « outil électrique » cité dans les avertissements se rapporte à votre outil électrique à
alimentation sur secteur (avec fil) ou par piles (sans fil).
1) SÉCURITÉ DU LIEU DE TRAVAIL
a) Tenir l’aire de travail propre et bien éclairée. Les lieux encombrés ou sombres sont
propices aux accidents.
b) Ne pas faire fonctionner d’outils électriques dans un milieu déflagrant, tel qu’en
présence de liquides, de gaz ou de poussières inflammables. Les outils électriques
produisent des étincelles qui pourraient enflammer la poussière ou les vapeurs.
c) Éloigner les enfants et les personnes à proximité pendant l’utilisation d’un outil
électrique. Une distraction pourrait en faire perdre la maîtrise à l’utilisateur.
2) SÉCURITÉ EN MATIÈRE D’ÉLECTRICITÉ
a) Les fiches des outils électriques doivent correspondre à la prise. Ne jamais modifier
la fiche d’aucune façon. Ne jamais utiliser de fiche d’adaptation avec un outil
électrique mis à la terre. Le risque de choc électrique sera réduit par l’utilisation de fiches
non modifiées correspondant à la prise.
b) Éviter tout contact physique avec des surfaces mises à la terre comme des tuyaux,
des radiateurs, des cuisinières et des réfrigérateurs. Le risque de choc électrique est
plus élevé si votre corps est mis à la terre.
c) Ne pas exposer les outils électriques à la pluie ou à l’humidité. La pénétration de l’eau
dans un outil électrique augmente le risque de choc électrique.
d) Ne pas utiliser le cordon de façon abusive. Ne jamais utiliser le cordon pour
transporter, tirer ou débrancher un outil électrique. Tenir le cordon éloigné de
la chaleur, de l’huile, des bords tranchants et des pièces mobiles. Les cordons
endommagés ou enchevêtrés augmentent les risques de choc électrique.
e) Pour l’utilisation d’un outil électrique à l’extérieur, se servir d’une rallonge convenant
à cette application. L’utilisation d’une rallonge conçue pour l’extérieur réduira les risques de
choc électrique.
f) S’il est impossible d’éviter l’utilisation d’un outil électrique dans un endroit humide,
brancher l’outil dans une prise ou sur un circuit d’alimentation dotés d’un disjoncteur
de fuite à la terre (GFCI). L’utilisation de ce type de disjoncteur réduit les risques de choc
électrique.
3) SÉCURITÉ PERSONNELLE
a) Être vigilant, surveiller le travail effectué et faire preuve de jugement lorsqu’un outil
électrique est utilisé. Ne pas utiliser d’outil électrique en cas de fatigue ou sous
l’influence de drogues, d’alcool ou de médicaments. Un simple moment d’inattention
en utilisant un outil électrique peut entraîner des blessures corporelles graves.
b) Utiliser des équipements de protection individuelle. Toujours porter une protection
oculaire. L’utilisation d’équipements de protection comme un masque antipoussière, des
chaussures antidérapantes, un casque de sécurité ou des protecteurs auditifs lorsque la
situation le requiert réduira les risques de blessures corporelles.
c) Empêcher les démarrages intempestifs. S’assurer que l’interrupteur se trouve à la
position d’arrêt avant de relier l’outil à une source d’alimentation et/ou d’insérer un
bloc-piles, de ramasser ou de transporter l’outil. Transporter un outil électrique alors
que le doigt repose sur l’interrupteur ou brancher un outil électrique dont l’interrupteur est à
la position de marche risque de provoquer un accident.
d) Retirer toute clé de réglage ou clé avant de démarrer l’outil. Une clé ou une clé de
réglage attachée à une partie pivotante de l’outil électrique peut provoquer des blessures
corporelles.
e) Ne pas trop tendre les bras. Conserver son équilibre en tout temps. Cela permet de
mieux maîtriser l’outil électrique dans les situations imprévues.
f) S’habiller de manière appropriée. Ne pas porter de vêtements amples ni de bijoux.
Garder les cheveux, les vêtements et les gants à l’écart des pièces mobiles. Les
vêtements amples, les bijoux ou les cheveux longs risquent de rester coincés dans les pièces
mobiles.
g) Si des composants sont fournis pour le raccordement de dispositifs de dépoussiérage
et de ramassage, s’assurer que ceux-ci sont bien raccordés et utilisés. L’utilisation
d’un dispositif de dépoussiérage peut réduire les dangers engendrés par les poussières.
4) UTILISATION ET ENTRETIEN D’UN OUTIL ÉLECTRIQUE
a) Ne pas forcer un outil électrique. Utiliser l’outil électrique approprié à l’application.
L’outil électrique approprié effectuera un meilleur travail, de façon plus sûre et à la vitesse pour
laquelle il a été conçu.
b) Ne pas utiliser un outil électrique dont l’interrupteur est défectueux. Tout outil
électrique dont l’interrupteur est défectueux est dangereux et doit être réparé.
c) Débrancher la fiche de la source d’alimentation et/ou du bloc-piles de l’outil
électrique avant de faire tout réglage ou changement d’accessoire ou avant de
ranger l’outil. Ces mesures préventives réduisent les risques de démarrage accidentel de
l’outil électrique.
d) Ranger les outils électriques hors de la portée des enfants et ne permettre à aucune
personne n’étant pas familière avec un outil électrique ou son mode d’emploi
d’utiliser cet outil. Les outils électriques deviennent dangereux entre les mains d’utilisateurs
inexpérimentés.
e) Entretien des outils électriques. Vérifier si les pièces mobiles sont mal alignées ou
coincées, si des pièces sont brisées ou présentent toute autre condition susceptible
de nuire au bon fonctionnement de l’outil électrique. En cas de dommage, faire
réparer l’outil électrique avant toute nouvelle utilisation. Beaucoup d’accidents sont
causés par des outils électriques mal entretenus.
f) S’assurer que les outils de coupe sont aiguisés et propres. Les outils de coupe bien
entretenus et affûtés sont moins susceptibles de se coincer et sont plus faciles à maîtriser.
g) Utiliser l’outil électrique, les accessoires, les forets, etc. conformément aux
présentes directives en tenant compte des conditions de travail et du travail à
effectuer. L’utilisation d’un outil électrique pour toute opération autre que celle pour laquelle
il a été conçu est dangereuse.
5) RÉPARATION
a) Faire réparer l’outil électrique par un réparateur professionnel en n’utilisant que des
pièces de rechange identiques. Cela permettra de maintenir une utilisation sécuritaire de
l’outil électrique.
RÈGLES DE SÉCURITÉ SPÉCIFIQUE
• Tenir l’outil électrique par ses parties isolées, car l’organe de coupe pourrait entrer en
contact avec son cordon. Couper un fil sous tension pourra mettre les parties métalliques
exposées de l’outil électrique sous tension et électrocuter l’utilisateur.
• Utilisez des serres de fixation ou un autre dispositif de fixation permettant de soutenir
et de retenir la pièce sur une plate-forme stable. Tenir la pièce avec la main ou contre son
corps n’est pas suffisamment stable et risque de provoquer une perte de maîtrise de l’outil.
• Découpage du métal à la toupie : si la toupie sert à découper du métal, il faut la
nettoyer souvent. La poussière de métal s’accumule souvent sur les surfaces intérieures et
pourrait causer des blessures sérieuses, une électrocution ou la mort.
• Ne jamais faire fonctionner le bloc moteur lorsqu’il n’est pas inséré dans l’une des
bases de la toupie; le moteur n’est pas conçu pour être tenu à la main.
• Maintenir les poignées sèches, propres et exemptes d’huile et de graisse afin de mieux
maîtriser l’outil.
• Maintenir une prise ferme sur l’outil, à deux mains, pour résister à tout couple de
démarrage. Maintenir systématiquement l’outil fermement.
• Maintenir les mains éloignées des zones de coupe dessus et dessous la base. Ne