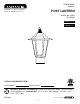
ITEM #0208504 0208541 Portfolio® is a registered trademark of LF, LLC. All Rights Reserved. POST LANTERN MODEL #PL125BK PL125WW Français p. 10 Español p. 19 ATTACH YOUR RECEIPT HERE Serial Number Purchase Date Questions, problems, missing parts? Before returning to your retailer, call our customer service department at 1-800-643-0067, 8 a.m. - 6 p.m., EST, Monday - Thursday, 8 a.m. 5 p.m., EST, Friday. EB15100 Lowes.
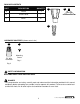
PACKAGE CONTENTS PART DESCRIPTION QUANTITY A Fixture 1 B Fixture Cover 1 C Panel 6 A B C HARDWARE CONTENTS (shown actual size) AA E3 Wire Connector BB Mounting Screw Qty. 1 Qty. 3 SAFETY INFORMATION READ AND SAVE THESE INSTRUCTIONS. DANGER • For your protection and safety, carefully read and understand the information provided in this manual completely before attempting to assemble, install or operate this product.
SAFETY INFORMATION DANGER • If using this light fixture in a WET or DAMP location, this light fixture must be connected to a supply circuit that is protected by a Ground Fault Circuit Interrupter (GFCI) to reduce the risk of personal injury, electrical shock or death. • DO NOT connect this fixture to an electrical system that does not provide a means for equipment grounding. Never use a fixture in a two-wire system that is not grounded.
SAFETY INFORMATION CAUTION • TURN OFF ELECTRICITY at main fuse box (or circuit breaker box) before beginning installation by removing the fuse (or switching the circuit breaker off). • If you are not sure the lighting system has a grounding means, DO NOT attempt to install this fixture. Contact a qualified, licensed electrician for information regarding the proper grounding methods as required by the local electrical code in your area.
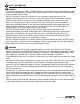
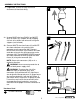
ASSEMBLY INSTRUCTIONS 2. If applicable, remove existing fixture and disconnect all electrical wiring. 2 3a. Unwrap BARE wire from BLACK and WHITE wires on fixture (A). Prepare wire by stripping 3/4 inch of insulation from wire ends using wire strippers (not included). 3a 4 3b. Connect WHITE wire from fixture (A) to WHITE wire from outlet box using existing wire connector or wire connector (AA).
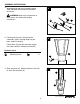
ASSEMBLY INSTRUCTIONS 4. Wrap electrical tape (not included) around each individual wire connector (AA) down to the wire. 4 WARNING: Make sure no bare wire or wire strands are visible after making connections. AA AA AA 5. Carefully push excess wiring and wire connectors (AA) inside top of post or pier base (neither included). 64 5 6 Place fixture (A) onto the mounting surface and secure with the mounting screw (BB). Hardware Used BB Mounting Screw A x1 BB 6 6.
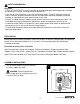
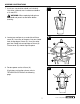
ASSEMBLY INSTRUCTIONS 6 7 7. Install one standard-base bulb (not included). Use either a 60-watt max. incandescent bulb or a 13-watt CFL. Bulb WARNING: When replacing bulb, please allow bulb and panels to cool down before touching. 8 8. Locate two small posts on underside of fixture cover (B). Insert one of the posts into non-slotted hole on top edge of fixture (A). Insert the other post into slotted hole on top edge of fixture (A). Fixture cover (B) should snap into place.
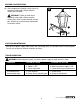
ASSEMBLY INSTRUCTIONS 6 10 10. After completing installation, caulk fixture (A) mounting surface with silicone weather sealant (not included). WARNING: Failure to caulk fixture mounting surface with silicone weather sealant may result in water damage in outlet box, which may cause electrical malfunction or electrical shock. A CARE AND MAINTENANCE • Shut off main power supply. Wipe fixture with soft, damp cloth. Use window cleaner to clean panels. Do not use an abrasive cleaner on panels or fixture.
WARRANTY The distributor warrants all of its lighting fixtures against defects in materials and workmanship for five (5) years from the date of purchase. If within this period the product is found to be defective, take a copy of the bill of sale as a proof of purchase and the product in its original carton to the place of purchase. The distributor will, at its option, repair, replace or refund the purchase price to the consumer.