Register your product and get support at www.philips.
Table of contents 1 Important 2 4.6 WIRELESS 10 1.1 Safety information 2 4.6.1 Channel and SSID 10 1.2 Network range & speed information 2 4.6.2 Access control 11 1.3 Conformity 2 4.6.3 Security 11 1.4 Recycling and disposal 2 4.7 NAT 11 1.5 FCC Radiation Exposure Statement 2 4.7.1 Address Mapping 12 1.6 Software licenses 2 4.7.2 Virtual server 12 1.7 Disclaimer 2 4.7.3 Special Applications 12 4.7.4 NAT Mapping Table 12 4.8 FIREWALL 12 4.8.
1 Important 1.4 Recycling and disposal Take time to read this user manual before you use your Wireless Router. It contains important information and notes regarding your Wireless Router. 1.1 Safety information ! Warning • This equipment must only be powered with the Power Adapter provided in the box. • For use only with power supply "Leader : 48090100-C5" and / or "DVE : DV-01AUP". • Always use the cables provided with the product.
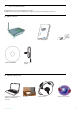
2 Your Wireless Router Congratulations on your purchase and welcome to Philips ! To fully benefit from the support that Philips offers, register your product at www.philips.com/welcome. 2.1 What’s in the box SNB5600 Quick start guide 1 Wireless Router Installation CD ROM Connect 2 Install 3 Enjoy Quick start guide Power adapter Ethernet cable (RJ-45) W EB 2.
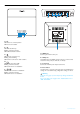
2.3 Overview of the front side of the wireless router 2.
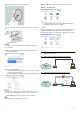
3 Getting started 3.2 Connect 1 Connect the supplied power adapter to the 9V DC port 2 Connect the power adapter to the electricity supply socket 3.
6 Connect this Ethernet cable to the LAN1 port 11 Click on Menu if you want to go back to the menu screen 12 Click on Set Encryption • Your WiFi network will be secured by generating automatically an encryption key and a network name (SSID) 7 Connect the other side of this Ethernet cable to your computer Note At any time you can retrieve your wireless security settings using your installation CD ROM on the computer where you installed your gateway and by clicking on the security icon of the menu page.
3.4 Install a WiFi device If you want to install a WiFi device you have to retrieve your wireless security settings using your installation CD ROM on the computer where you installed your gateway and by clicking on the security icon of the menu page. 3.4.1 Install a Wireless USB adapter SNU5600 If you have bought the starter kit SNK5600, the Wireless USB adapter SNU5600 is part of the box content.
LAN 4 Configuring the Wireless Router WIRELESS Advanced users may want to change the configuration of their Wireless Router. This chapter explains how to access the configuration webpages, show you the struture of these webpages and it describes them. Channel and SSID Access control Security WEP WPA 802.1X 4.1 Log on the webpages 1 Open your Internet Browser 2 Enter http://192.168.1.
4.3.2 Password Settings 4.4 WAN Use this page to change the password for accessing the management interface of the Wireless Router. The router can be connected to your Internet Service Provider (ISP) in any of the following ways : - Dynamic IP Address - PPPoE - Static IP address Passwords can contain from 3~12 alphanumeric characters and are case sensitive.
4.4.3 Static IP Address 4.5 LAN Your ISP provides a static IP address to access Internet services. You can enable DHCP to dynamically allocate IP addresses to your client PCs, or configure filtering functions based on specific clients or protocols. The router must have an IP address for the local network. 4.4.4 Clone MAC Address 4.6 WIRELESS Some ISP’s require you to register your MAC address with them.
4.6.2 Access control To manually configure the encryption key, enter five hexadecimal pairs of digits for each 64-bit key, or enter 13 pairs for the single 128-bit key. (A hexadecimal digit is a number or letter in the range 0-9 or A-F). Note that WEP protects data transmitted between wireless nodes, but does not protect any transmissions over your wired network or over the Internet. WPA Access Control allows users to define the outgoing traffic permitted or not-permitted through the WAN interface.
4.7.1 Address Mapping 4.7.3 Special Applications Allows one or more public IP addresses to be shared by multiple internal users. This also hides the internal network for increased privacy and security. Enter the Public IP address you wish to share into the Global IP field. Enter a range of internal IPs that will share the global IP into the "from" field. Some applications require multiple connections, such as Internet gaming, video-conferencing, and Internet telephony.
Network attacks that deny access to a network device are called Denial-of-Service (DoS) attacks. DoS attacks are aimed at devices and networks with a connection to the Internet. Their goal is not to steal information, but to disable a device or network so users no longer have access to network resources. 4.8.
RIP Defect (Default : Disabled) - If an RIP request packet is not acknowledged to by the router, it will stay in the input queue and not be released. Accumulated packets could cause the input queue to fill, causing severe problems for all protocols. Enabling this feature prevents the packets from accumulating. Discard Ping to WAN (Default : Disabled) - Prevent a ping on the Wireless Router’s WAN port from being routed to the network. two-way Internet access.
4.11 TOOLS 4.11.3 Reset Use the Maintenance menu to backup the current configuration, restore a previously saved configuration, restore factory settings, update firmware, and reset the Wireless Router. Click "REBOOT ROUTER" to reset the Wireless Router. If you perform a reset from this page, the configuration will not be changed back to the factory default settings. 4.11.1 Configuration Tools Note If you use the Reset button on the rear panel, the Wireless Router performs a power reset.
4.13 SET UP WIZARD 4.13.4 Connection type settings 4.13.1 Getting started This page allows you to select a connection type to connect Internet (see 4.4). Make sure the router is connected correctly. For a detailed description, refer to the user manual. This can be found on the Installation CD provided. Dynamic IP 4.13.2 Time zone This page allows you to obtain an IP address automatically from your Service Provider. This page allows you to configure the local time zone and automatic time maintenance.
5 Technical data Ports • Four 10/100Mbps Rj-45 Ports Management Features • Firmware upgrade via web based management • Web based management (configuration) • Power indicators • Event and history logging • Network ping Security Features • Password protected configuration access • User authentication (PAP/CHAP) with PPP • Firewall NAT NAPT • VPN pass through (IPSec-ESP Tunnel mode, L2TP, PPTP) Wireless Security • WEP 64/128 bit • WPA/WPA2 • WPA/WPA2-Personal (PSK) • WPA-PSK with TKIP • WPA2-PSK with AES • W
6 Frequently asked questions In this chapter you will find the most frequently asked questions and answers about your Wireless Router. Set-up I cannot connect using the Web browser • Check that you have a valid network connection to your Wireless Router • Check all parameter settings with your Internet provider • Check Internet Explorer* configuration: - Go to Start and select the Control Panel.
Copyright © 2007 Koninklijke Philips Electronics N.V. All rights reserved. Trademarks are the property of Koninklijke Philips Electronics N.V. or their respective owners. Specifications are subject to change without notice.