ENGLISH R Please do not return unit to retailer. Por favor, no devuelva el aparato al lugar de compra. Veuillez ne pas retourner l’outil au détaillant. 1--800--554--6723 www.poulan.com Instruction Manual Manual de Instrucciones Manuel d’Instructions For Occasional Use Only ESPAÑOL 1950 / 1975 / 2050 / 2055 / 2075 2150 / 2155 / 2175 / 2350 / 2375 2050WT / 2150PR WARNING: Read and follow all Safety Rules and Operating Instructions before using this product.
IDENTIFICATION OF SYMBOLS WARNING! This chain saw can be dangerous! Careless or improper use can cause serious or even fatal injury. Read and understand the instruction manual before using the chain saw. XX_ Always wear appropriate ear protection, eye protection and head protection. Measured maximum kickback value without chain brake for the bar and chain combination on the label. Always use two hands when operating the chain saw.
Hearing Protection Snug Fitting Clothing Safety Shoes Safety Hat Eye Protection Heavy Duty Gloves S S S Safety Chaps S S HANDLE FUEL WITH CAUTION S Keep all parts of your body away from the chain when the engine is running. S Keep children, bystanders, and animals a minimum of 30 feet (10 meters) away from the work area. Do not allow other people or animals to be near the chain saw when starting or operating the chain saw.
S Use the Reduced--Kickback Guide Bar and Low--Kickback Chain specified for your saw. S Pull-In can occur when the moving chain contacts a foreign object in the wood in the cut along the bottom of the guide bar and the saw chain is suddenly stopped. This sudden stopping pulls the saw forward and away from the operator and could easily cause the operator to lose control of the saw.
S Reduced--Kickback Guide Bar, designed with a small radius tip which reduces the size of the kickback danger zone on the bar tip. A Reduced--Kickback Guide Bar has been demonstrated to significantly reduce the number and seriousness of kickbacks when tested in accordance with safety requirements for gasoline powered chain saws as set by ANSI B175.1. WARNING: WE DO NOT REPRESENT AND YOU SHOULD NOT ASSUME THAT THE CHAIN BRAKE WILL PROTECT YOU IN THE EVENT OF A KICKBACK.
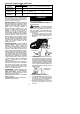
Computed kickback angle (CKA) Table BAR MODEL 1950/1975/ 2050/2050WT 2055/2075/ 2150/2150PR 2155/2175/ 2350/2375 CKA without chain brake P/N Length CHAIN P/N 952044368 14″ 952051209 24_ 952044370 16″ 952051211 19_ 952044418 18″ 952051338 14_ NOTE: If this saw is to be used for com- ASSEMBLY mercial logging, a chain brake is required and shall not be removed or otherwise disabled to comply with Federal OSHA Regulations for Commercial Logging.
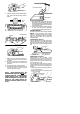
DISENGAGED Front Hand Guard Mount the Bar ENGAGED 6. Carefully remove the chain from the package. Hold chain with the drive links as shown. Chain Brake Tip of Bar 11. Now, install chain brake making sure the adjusting pin is positioned in the lower hole in the guide bar. Remember this pin moves the bar forward and backward as the screw is turned. 12. Install chain brake nuts and finger tighten only. Once the chain is tensioned, you will need to tighten chain brake nuts.
Adjusting Screw -- 1/4 Turn Chain Brake Nuts S Lift up the tip of the bar and tighten the chain brake nuts with the bar tool. S Recheck chain tension. WARNING: If the saw is operated with a loose chain, the chain could jump off the guide bar and result in serious injury. OPERATION KNOW YOUR CHAIN SAW READ THIS INSTRUCTION MANUAL AND SAFETY RULES BEFORE OPERATING YOUR CHAIN SAW. Compare the illustrations with your unit to familiarize yourself with the location of the various controls and adjustments.
CHAIN TENSION WARNING: Muffler is very hot during and after use. Do not touch the muffler or allow combustible material such as dry grass or fuel to do so. It is normal for a new chain to stretch during the first 15 minutes of operation. You should check your chain tension frequently. See CHAIN TENSION under the ASSEMBLY section. system of an engine while in storage. To avoid engine problems, the fuel system should be emptied before storage for 30 days or longer.
NOTE: In the following steps, when the choke/fast idle lever is pulled out to the full extent, the correct throttle setting for starting is set automatically. ON/STOP SWITCH (SIDE VIEW) ON STOP 1. Move ON/STOP switch to the ON position. 2. Slowly press primer bulb 6 times. 3. Pull choke/fast idle lever out to the full extent (to the FULL CHOKE position). 4. Pull the starter rope sharply 5 times with your right hand. Then, proceed to the next step.
CUTTING METHODS IMPORTANT POINTS S Check chain tension before first use and after 1 minute of operation. See CHAIN TENSION in the ASSEMBLY section. S Cut wood only. Do not cut metal, plastics, masonry, non-wood building materials, etc. S Stop the saw if the chain strikes a foreign object. Inspect the saw and repair or replace parts as necessary. S Keep the chain out of dirt and sand. Even a small amount of dirt will quickly dull a chain and thus increase the possibility of kickback.
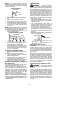
Hinge holds tree on stump and helps control fall Opening of felling cut Closing of notch use a metal wedge. Do not attempt to restart your saw when it is pinched or hung in a log. Use a wedge to remove pinched saw Turn saw OFF and use a plastic or wooden wedge to force cut open. Overcutting begins on the top side of the log with the bottom of the saw against the log. When overcutting use light downward pressure.
Using a log for support 2nd Cut LIMBING 1st Cut 1st Cut 2nd Cut S Always limb a tree after it is cut down. Only then can limbing be done safely and properly. S Leave the larger limbs underneath the felled tree to support the tree as you work. S Start at the base of the felled tree and work toward the top, cutting branches and limbs. Remove small limbs with one cut. S Keep the tree between you and the chain. Cut from the side of the tree opposite the branch you are cutting.
MAINTENANCE SCHEDULE Check: Fuel mixture level . . . . Before each use Bar lubrication . . . . . . . Before each use Chain tension . . . . . . . Before each use Chain sharpness . . . . . Before each use For damaged parts . . . Before each use For loose caps . . . . . . Before each use For loose fasteners . . . Before each use For loose parts . . . . . . Before each use Inspect and Clean: Bar . . . . . . . . . . . . . . . . Before each use Complete saw . . . . . . . After each use Air filter . . . . . . . .
If you require further assistance or are unsure about performing this procedure, contact your authorized service dealer or call 1--800--554--6723. 6. Reinstall the spark plug boot. 7. Reinstall the cylinder cover and 3 screws. Tighten securely. If your saw cuts to one side, has to be forced through the cut, or been run with an improper amount of bar lubrication it may be necessary to service your bar. A worn bar will damage your chain and make cutting difficult.
TROUBLESHOOTING TABLE WARNING: Always stop unit and disconnect spark plug before performing all of the recommended remedies below except remedies that require operation of the unit. TROUBLE CAUSE Engine will not start or will run only a few seconds after starting. 1. Ignition switch off. 2. Engine flooded. REMEDY Engine will not idle properly. 1. Idle speed requires adjustment. 2. Carburetor requires adjustment. 1. See “Carburetor Adjustment” in the Service and Adjustments Section. 2.
U.S. EPA / ENVIRONMENT CANADA EMISSION CONTROL WARRANTY STATEMENT YOUR WARRANTY RIGHTS AND OBLIGATIONS: The U. S. Environmental Protection Agency, Environment Canada and Poulan/WEED EATER are pleased to explain the emissions control system warranty on your year 2005 and later small off-road engine.
The information on the product label indicates which standard your engine is certified. Example: (Year) EPA Phase 1 or Phase 2 and/or CALIFORNIA.