ENGLISH R Instruction Manual Manual de Instrucciones Manuel d’Instructions PPB2000 ESPAÑOL IMPORTANT MANUAL -- Do not throw away MANUAL IMPORTANTE -- No lo descarte MANUEL IMPORTANT -- À Conserver Electrolux Home Products, Inc. 104 Warren Road Augusta, GA 30907 Copyright E2004 Electrolux Home Products, Inc. 530164278 2/4/04 FRANÇAIS WARNING: Read and follow all Safety Rules and Operating Instructions before using this product. Failure to do so can result in serious injury.
SAFETY RULES D WARNING: Failure to follow all Safety Rules and Precautions can result in serious injury. D KNOW YOUR UNIT S Read your instruction manual carefully until you completely understand and can follow all warnings and safety rules before operating the unit. D Restrict unit to users who understand and will follow all warnings and safety rules in this manual. WARNING: Inspect area before starting unit. Remove all debris and hard objects such as rocks, glass, wire, etc.
D D D D plug disconnected. Keep vents and discharge tubes free of debris which can accumulate and restrict proper air flow. Never place any object in the air intake opening as this could restrict proper air flow and cause damage to the unit. Never use for spreading chemicals, fertilizers, or other substances which may contain toxic materials. To avoid spreading fire, do not use near leaf or brush fires, fireplaces, barbecue pits, ashtrays, etc. Use only for jobs explained in this manual.
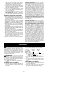
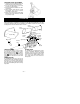
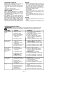
Elbow Tube 4. Hold the vacuum inlet cover open until upper vacuum tube is installed. Small Opening Vacuum Inlet Zipper Opening Retaining Post Rib NOTE: Make sure edge of the small opening is flush against the flared area of the elbow tube, and the rib on the elbow tube is on the bottom. 3. Close the zipper on the bag. Make sure the zipper is closed completely. 4. Remove blower tube from engine. Vacuum Inlet Cover 5. Place the hooks of the upper vacuum tube on the retaining posts of the unit. 6.
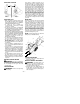
SHOULDER STRAP ADJUSTMENT 1. Hold the unit as shown with the muffler side facing away from your body and clothes. 2. Pass the shoulder strap over your head and onto your right shoulder. 3. Extend your left arm toward the rear of the vacuum bag. 4. Adjust shoulder strap until the vacuum bag/shoulder strap seam lies between your thumb and index finger. 5. Make sure air flows freely from the elbow tube into bag. If bag is kinked, the unit will not operate properly.
This engine is certified to operate on unleaded gasoline. Before operation, gasoline must be mixed with a good quality synthetic 2-cycle air-cooled engine oil designed to be mixed at a ratio of 40:1. Poulan/Weed Eater! brand synthetic oil is recommended. Mix gasoline and oil at a ratio of 40:1. A 40:1 ratio is obtained by mixing 3.2 ounces (95 ml) of oil with 1 gallon (4 liters) of unleaded gasoline. DO NOT USE automotive oil or marine oil. These oils will cause engine damage.
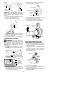
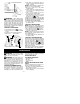
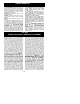
STARTING POSITION Blower Vacuum WARNING: When starting engine, hold the unit as illustrated. Do not set unit on any surface except a clean, hard area when starting engine or while engine is running. Debris such as gravel, sand, dust, grass, etc. could be picked up by the air intake and thrown out through the discharge opening, damaging the unit or property, or causing serious injury to bystanders or the operator. STARTING A COLD ENGINE 1. Move throttle lever to the position. 2.
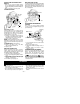
INSPECT AND CLEAN UNIT AND DECALS REPLACE FUEL FILTER S After each use, inspect complete unit for loose or damaged parts. Clean the unit and decals using a damp cloth with a mild detergent. S Wipe off unit with a clean dry cloth. To replace fuel filter, drain unit by running it dry of fuel, then remove fuel cap/retainer assembly from tank. Pull filter from tank and remove it from the fuel line. Install new fuel filter on fuel line; reinstall parts.
SEASONAL STORAGE ENGINE Prepare unit for storage at end of season or if it will not be used for 30 days or more. If your unit is to be stored for a period of time: S Clean the entire unit before lengthy storage. S Store in a clean dry area. S Lightly oil external metal surfaces. S Remove spark plug and pour 1 teaspoon of 40:1, 2-cycle engine oil (air cooled) through the spark plug opening. Slowly pull the starter rope 8 to 10 times to distribute oil.
LIMITED WARRANTY ELECTROLUX HOME PRODUCTS, INC., warrants to the original purchaser that each new Poulan PROr brand gasoline tool or attachment is free from defects in material and workmanship and agrees to repair or replace under this warranty any defective gasoline product or attachment as follows from the original date of purchase: 2 YEARS - Parts and Labor, when used for household purposes. 90 DAYS - Parts and Labor, when used for commercial, professional, or income producing purposes.
WARRANTY PERIOD: Any warranted part which is not scheduled for replacement as required maintenance, or which is scheduled only for regular inspection to the effect of “repair or replace as necessary” shall be warranted for 2 years. Any warranted part which is scheduled for replacement as required maintenanceshall be warrantedfor the period of time up to the first scheduled replacement point for that part.