Please do not return product to retailer. Por favor, no devuelva el producto al lugar de compra. Veuillez ne pas retourner le produit au détaillant. ENGLISH R 1--800--554--6723 Register your product online at: Registre su producto en línea en: Enregistrez votre produit en ligne à l’adresse : www.poulan.com Instruction Manual Manual de Instrucciones Manuel d’Instructions ESPAÑOL ES400 WARNING: Read and follow all Safety Rules and Operating Instructions before using this product.
SAFETY RULES tion. You must be in good physical condition and mentally alert. If you have any condition that might be aggravated by strenuous work, check with doctor before operating. Watch what you are doing. Use common sense. S Do not start cutting until you have a clear work area, secure footing, and especially if you are felling a tree, a retreat path. Keep work area clean. OPERATE YOUR SAW SAFELY S Do not operate with one hand.
S Keep the handles dry and clean and free from oil and grease. S Keep oil cap and fasteners securely tightened. S Nonconforming replacement components or the removal of safety devices may cause damage to the unit and possible injury to the operator or bystanders. Use only Poulan accessories and replacement parts as recommended. Never modify your saw. S Maintain chain saw with care. S Keep unit sharp and clean for better and safer performance. S Follow instructions for lubricating and changing accessories.
S Recognize that kickback can happen. With a basic understanding of kickback, you can reduce the element of surprise which contributes to accidents. S Never let the moving chain contact any object at the tip of the guide bar. S Keep working area free from obstructions such as other trees, branches, rocks, fences, stumps, etc. Eliminate or avoid any obstruction that your saw chain could hit while cutting. S When cutting a branch, do not let the guide bar contact another branch or other objects around it.
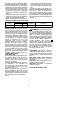
Right Hand Small Radius Tip Guide Bar Left Hand Large Radius Tip Guide Bar S Low Kickback Chain has met kickback performance requirements when tested on the representative sample of these chain saws specified in ANSI B175.1. Low Kickback Chain Contoured Depth Gauge Elongated Guard Link Deflects Kickback Force And Allows Wood To Gradually Ride Into Cutter S Position your left hand on the front handlebar so it is in a straight line with your right hand on the rear handle when making bucking cuts.
to lose control of the saw which could result in serious injury. Do not rely exclusively upon safety devices built into your saw. The following guide bar and chain combinations meet kickback requirements of CSA Z62.1 & Z62.3 and ANSI B175.1 when used on saws listed in this manual. Use of bar and chain combinations other than those listed is not recommended and may not meet the CKA requirements per standard. associated without a chain brake.
ASSEMBLY NOTE: If you need assistance or find that parts are missing or damaged, please call 1-800-554-6723. ASSEMBLY Your unit is fully assembled; no assembly is required. WARNING: Before using chain saw, ensure all fasteners are secure. CARTON CONTENTS S Chain Saw (fully assembled) S Bar Sheath Examine parts for damage. Do not use damaged parts. OPERATION KNOW YOUR SAW READ THIS INSTRUCTION MANUAL AND SAFETY RULES BEFORE OPERATING YOUR CHAIN SAW.
if any part is worn to less than 0.020″ (0.5 mm) thick. Repairs on a chain brake should be made by your authorized service dealer. Take your unit to the place of purchase or to the nearest authorized service dealer. S This saw is equipped with a chain brake. The brake is designed to stop the chain if kickback occurs. S The inertia--activated chain brake is activated if the front hand guard is pushed forward, either manually (by hand) or automatically (by sudden movement).
CUTTING METHODS S Study the natural conditions that can cause the tree to fall in a particular direction, such as: S The wind direction and speed. S The lean of the tree. The lean of a tree might not be apparent due to uneven or sloping terrain. Use a plumb or level to determine the direction of tree lean. S Weight and branches on one side. S Surrounding trees and obstacles. S Look for decay and rot. If the trunk is rotted, it can snap and fall toward the operator.
S After removing the wood from the notch, make the felling cut on the opposite side of the notch. This is done by making a cut about two inches higher than the center of the notch. This will leave enough uncut wood between the felling cut and the notch to form a hinge. This hinge will help prevent the tree from falling in the wrong direction. Hinge holds tree on stump and helps control fall. BUCKING TECHNIQUES WARNING: If saw becomes pinched or hung in a log, don’t try to force it out.
which can cause you to lose your balance or control of the saw. IMPORTANT POINTS S Watch out for spring poles. Spring poles are small size limbs which can whip toward you or pull you off balance. Use extreme caution when cutting small size limbs. S Be alert for spring back from any branches that are bent or under pressure. Avoid being struck by the branch or the saw when the tension in the wood fibers is released. S Frequently clear branches out of the way to avoid tripping over them.
MAINTENANCE CUSTOMER RESPONSIBILITIES WARNING: Disconnect power source before performing maintenance. Fill in dates as you complete regular service Before Use Check for damaged/worn parts n Check for loose fasteners/parts Check chain tension n n Check chain sharpness n Check guide bar n n Check bar and chain oil level Inspect and clean unit & labels Clean guide bar groove After Use Every 15 min.
Tighten chain CHECK CHAIN SHARPNESS A sharp chain makes wood chips. A dull chain makes a sawdust powder and cuts slowly. See CHAIN SHARPENING in the SERVICE AND ADJUSTMENTS section. CHECK GUIDE BAR Conditions which require guide bar maintenance: S Saw cuts to one side or at an angle. S Saw has to be forced through the cut. S Inadequate supply of oil to the bar and chain. Check the condition of the guide bar each time the chain is sharpened. A worn guide bar will damage the chain and make cutting difficult.
S Check bar and chain oil before use and every 15 minutes while operating the saw. See GUIDE BAR AND CHAIN OIL under the OPERATION section. INSPECT AND CLEAN UNIT AND LABELS S After each use, inspect complete unit for loose or damaged parts. Clean the unit and labels using a damp cloth with a mild detergent. S Wipe off the unit and labels with a clean dry cloth.
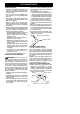
WARNING: Maintain the proper hook angle according to the manufacturer’s specifications for the chain you are using. Improper hook angle will increase the chance of kickback which can result in serious injury. 4. Check and lower depth gauges. Depth Gauge Tool LOOSEN File 3. Loosen chain tension by turning adjusting wheel (upward direction). Remove bar clamp. Depth Gauge S Place gauge tool on cutter.
8. Pull guide bar forward until the chain is snug in the guide bar groove. Ensure all drive links are in the bar groove. 9. Install bar clamp. Be sure adjusting pin is in the adjusting pin hole in the guide bar. CAUTION: It is very important when installing the bar clamp that the adjusting pin aligns into the adjusting pin hole in the bar. Failure to install the bar clamp correctly may result in permanent damage to your chain saw. CHAIN ADJUSTMENT See CHECK CHAIN TENSION in the MAINTENANCE section.
TROUBLESHOOTING TABLE WARNING: Always stop unit and disconnect from the power source before performing all of the recommended remedies below except remedies that require unit to be operating. TROUBLE CAUSE REMEDY Chain does not move when trigger switch is engaged. 1. Chain tension incorrect. 1. See “Check Chain Tension” in Maintenance section. 2. Guide bar rails pinched. 2. Repair or replace. 3. Trigger switch failure. 3. Contact an authorized service dealer. 4. Circuit breaker tripped/ 4.
WARRANTY STATEMENT In Canada, contact: Poulan 850 Matheson Blvd. West Mississauga, Ontario L5V 0B4 Poulan, a division of Husqvarna Consumer Outdoor Products N.A., Inc., warrants to the original consumer purchaser that each new Poulan brand electric or cordless product is free from defects in material and workmanship and agrees to repair or replace under this warranty any defective Poulan brand electric product within one (1) year from the original date of purchase.