
Use and Care Manual


10
NOTE: Insufficient belt tension will cause
slippage of conveyor belt on drive roller during
sanding operation. The conveyor belt is too
loose if it can be stopped by hand pressure
applied directly to top of moving conveyor belt.
Excessive belt tension can result in bent rollers,
bent brackets, and/or premature wearing of
bushings or conveyor belt.
3. Reinstall left side cover when tensioning is
complete.
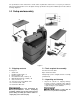
Figure 11
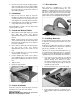
7.2.2 Tracking adjustment
A belt tracks correctly when it moves centrally on the
conveyor rollers without drifting to either side.
Tracking adjustments are made while conveyor belt
is running.
1. Make sure proper belt tension has been
achieved (see 7.2.1 Tension adjustment).
2. Turn on conveyor and set to maximum speed.
Watch for a tendency of conveyor belt to drift to
one side of conveyor. If it drifts, tighten or
loosen take-up screw nut on right side of
conveyor (Figure 11).
Note: Adjust take-up screw nut only 1/4 turn at
a time. Then allow time for belt to react to
adjustments before proceeding further.
Try to avoid over adjustments, as this may
affect belt tension. If tension is affected, if may
become necessary to remove left side cover
and use both take-up screw nuts to accomplish
tensioning and tracking.
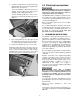
7.2.3 Trackers
The sander comes equipped with “Trackers”,
ceramic guides that reduce the amount of
adjustments needed to keep the conveyor belt
tracked (centered) on the conveyor bed. See Figure
12. These guides have a magnetic backing to keep
them in place. If a Tracker wears through, it can be
reversed by turning it over. See sect. 11.0 Tracker
Kit for more information about re-setting trackers.
Figure 12
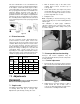
7.4 Inspecting drum alignment
The sanding drum must be parallel to conveyor bed
for proper machine operation. The sanding drum
comes pre-aligned from the manufacturer. If a
problem with drum alignment should occur, follow
the instructions below.
First, inspect the alignment with a gauge of some
kind. The following procedure uses a steel block as
a gauge.
1. Unplug sander from power source.
2. Open dust cover and remove abrasive strip
from drum.
3. Insert gauge (A, Figure 13) between drum and
conveyor bed at outboard side of drum.
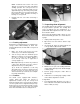
Figure 13
4. With dust cover open, lower sanding drum while
slowly rotating drum by hand, until drum lightly
contacts gauge.
5. Remove gauge and place under drum at
inboard side.
6. If drum does not contact gauge equally on both
ends of drum, alignment is needed.
To align drum:
7. Turn adjustment dial (B, Figure 13) to raise or
lower outboard end of table. Follow directional
marks on dial (+ to raise).