
Product Manual


10
Read and understand the
entire contents of this manual before
attempting set-up or operation. Failure to
comply may cause serious injury.
6.0 Setup and assembly
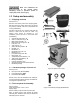
6.1 Shipping contents
See Figure 6-1.
Remove all accessory boxes from shipping pallet.
Remove items from inside cabinet. Do not discard
any packing material until saw is assembled and
running satisfactorily.
Compare contents of your container with parts list
below to make sure all parts are intact. Any
missing parts should be reported to your
distributor. (Check saw first in case parts were
preinstalled.)
1 Cabinet saw with switch – A
2 Cast iron extension wings – B
1 Miter gauge assembly – C
1 Motor cover with hinge pins – D
1 Push stick – E
1 Arbor wrench – F
1 Caster elevating handle – G
2 Handles – H
1 Handwheel – J
1 Handwheel lock knob – K
1 Blade guard – L
1 Low profile riving knife – M
1 Riving knife – N
1 Anti-kickback pawl assembly – O
1 Table insert (preinstalled) – P
1 Blade (preinstalled)
1 Product registration card
1 Operating Instructions and Parts Manual
1 Hardware package
6.1.2 Hardware package #PM2000B-HP
See Figure 6-2.
6 Hex cap screws, M10x35 (HP1)
6 Lock washers M10 (HP2)
6 Flat washers M10 (HP3)
NOTE: Fence and rail assemblies with fasteners,
and wood extension tables and legs with fasteners,
are shipped in separate boxes.
6.2 Tools required for assembly
Hex key 2.5mm
Open end wrenches: 14mm, 17mm
Straight edge
Rubber mallet (or hammer with block of wood)
Note: A ratchet wrench with sockets will speed
assembly time. Additional tools may be needed for
assembly of fence and rails.
Figure 6-1 (items not to scale)
Figure 6-2 hardware package (PM2000B-HP)