Operating Instructions and Parts Manual 24” Wood Lathe Model: 4224 WMH Tool Group 2420 Vantage Drive Elgin, Illinois 60123 Phone: 800-274-6848 www.wmhtoolgroup.
This manual has been prepared for the owner and operators of a Powermatic Model 4224 24” Wood Lathe. Its purpose, aside from machine operation, is to promote safety using accepted operating and maintenance procedures. To obtain maximum life and efficiency from your wood lathe, and to aid in using the machine safely, read this manual thoroughly and follow instructions carefully. Warranty and Service WMH Tool Group warrants every product it sells.
TABLE OF CONTENTS Safety Rules ...............................................................................................................................................4-5 Safety: Decals ............................................................................................................................................... 6 Specifications ................................................................................................................................................ 7 Receiving .
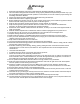
Warnings 1. Read and understand the entire owner’s manual before attempting assembly or operation. 2. This wood lathe is designed and intended for use by properly trained and experienced personnel only. If you are not familiar with the proper and safe operation of a wood lathe, do not use it until the proper training and knowledge have been obtained. 3. Always wear approved safety glasses/face shields while using this machine. 4. Make certain the machine is properly grounded. 5.
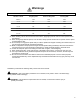
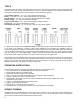
Warnings SPEED RECOMMENDATIONS Diameter of Work Roughing RPM General Cutting RPM Finishing RPM Under 2" 1500 3000 3000 2 to 4" 600 1500 2300 4 to 6" 450 1100 1500 6 to 8" 450 600 1100 8 to 10" 450 600 850 10 to 12" 450 600 850 12 to 14" 450 450 600 26. When sanding, remove the tool rest from the machine, apply light pressure and use a slow speed to avoid heat build up. 27. When turning large diameter pieces, such as bowls, always operate the lathe at low speeds.
! SAFETY: DECALS Familiarize yourself with the location and content of this decal on your machine.
SPECIFICATIONS: 4224 Lathe Distance Between Centers.................................................................................................................................... 42" Swing Over Bed .................................................................................................................................................... 24" Spindle Speeds: Low speed ..................................................................................................................................
RECEIVING Remove the lathe from the shipping container and check for damage. Report any damage to your distributor immediately. Accessories are packaged in a separate carton which will be on the shelf of the machine stand. Clean protective coating from the bed, spindles, work rest and face plate with kerosene or a good commercial solvent. Read the instruction manual thoroughly for assembly, maintenance, operation and safety instructions.
Tool Support The tool support (shown in Figure 5), is designed to allow adjustment for height, position on the bed, and angle to the work. Your 4224 lathe comes standard with the 14" tool support. Other supports are available; consult the "Optional Equipment" list on page 24. Periodically the tool rest should be disassembled and the parts cleaned and oiled to provide free movement of the parts to ensure good clamp action.
TOOLS If possible, select only quality, high speed steel turning tools. High speed tools hold an edge and last longer than ordinary carbon steel. As one becomes proficient in turning, a variety of specialty tools for specific applications can be acquired. The following tools provide the basics for most woodturning projects: Large Roughing Gouge - 1" to 1-1/4", used to eliminate waste wood. Skews - 1-1/2" and 1" or 1-1/4", used to make finishing cuts and details.
FIGURE 2 STOCK SELECTION Stock for spindles should be straight grained and free of checks, cracks, knots and other defects. It should be cut 1/8" to 1/4" larger than the finished diameter and may require additional length to remove ends if required. Larger stock should have the corners removed to produce an octagon making the piece easier to rough down to a cylinder. 1. With a combination square or plastic center finder, locate and mark center on each end of stock.
ROUGHING OUT: 1. Begin with a large roughing gouge. Place the tool on the tool support with the heel of the tool on the surface to be cut. 2. Slowly and gently raise tool handle until cutting edge comes into contact with the workpiece. 3. Beginning at the tailstock end of the workpiece, roll the flute (hollowed-out portion) of the tool in the direction of the cut, Figure 6. Make long sweeping cuts in a continuous motion to rough the piece down to a cylinder.
PARTING OFF: 1. Use parting tool. 2. Adjust lathe speed to lower RPM for parting through a workpiece. 3. Place tool on tool support and raise the handle until it starts to cut and continue to cut towards the center of the workpiece. 4. Loosely hold on to the piece in one hand as it separates from the waste wood. SANDING and FINISHING: Leaving clean cuts will reduce the amount of sanding required. Adjust the lathe to a low speed, and begin with fine sandpaper (120 grit or finer).
there are dozens of chucks to choose from, the woodturner should first consider all the different types of turning that will be done, and read reports or discuss with other turners who own chucks before making a decision. A chuck is not a requirement but is handy when working on more than one piece at a time. Rather than removing screws, you simply open the chuck and change workpieces. The most popular ones are four jaw scroll chucks with a variety of jaws to accomodate different size tenons.
10. Stop the lathe, remove workpiece and attach face plate or chuck (see "Mounting Stock" above). 11. Finish turning the outside of bowl with 1/2" or 3/8" bowl gouge. Leave additional material at base of bowl for support while turning interior. This will be removed later. TO SHAPE INTERIOR OF BOWL: 1. Stop lathe and move tailstock away. Remove center from tailstock to prevent bumping it with elbow. 2. Adjust tool support in front of the bowl just below centerline, at a right angle to the lathe ways. 3.
TROUBLE-SHOOTING (4224 Lathe) PROBLEM POSSIBLE CAUSE SOLUTION Excessive vibration. 1. Defective spindle bearings. 2. Worm or defective belt. 3. Defective motor. 4. Workpiece warped, out-of-round, has major flaw, or was improperly prepared for turning. 1. Replace bearings. 2. Replace belt. 3. Replace motor. 4. Correct problem by planing or sawing, or scrap workpiece. Motor or spindle stalls. 1. Excessive cut. 2. Defective motor. 3. Excessive belt wear. 4. Improper belt adjustment. 1.
ELECTRICAL SCHEMATIC: 4224 Lathe 17
PARTS LIST: Stand & Bed Assembly (4224 Lathe) No. 1 2 3 4 5 6 7 8 9 10 11 12 13 14 15 16 17 18 19 20 21 22 23 24 25 28 29 30 31 32 33 34 35 36 37 38 39 40 41 42 43 44 45 46 47 48 49 50 54 55 56 57 58 59 61 63 64 18 Part No.
PARTS LIST: Stand & Bed Assembly (4224 Lathe) continued No. 65 66 67 68 69 70 71 72 73 74 76 77 78 79 80 81 82 83 84 85 86 87 88 89 90 91 92 93 Part No. 6294733 6295760 6295761 6295762 6295763 6295764 6295765 6295766 6295767 6295768 6295769 6295771 6295772 6295773 6295774 6295775 6295776 6295777 6295778 6295779 6295780 6295781 6295782 6295783 6295784 6295903 6295904 6295905 6295906 Description Quantity Remote ON/OFF Switch Assembly (Items 65, 66, 68, 70, 71)...................................
Stand & Bed Assembly (4224 Lathe) 20
PARTS LIST: Headstock Assembly (4224 Lathe) No. Part No.
PARTS LIST: Headstock Assembly (4224 Lathe) Continued No. 59 60 61 62 63 22 Part No. 6295843 6295844 6294744 TS-0270011 6295923 Description Quantity Clamp........................................................................................................................ 1 Nut, #10-24 ............................................................................................................... 1 Faceplate Spanner.......................................................................................
Headstock Assembly (4224 Lathe) 23
OPTIONAL ACCESSORIES (4224 Lathe) Part No.
65" Bed Extension Assembly (Optional - 4224 Lathe) 25
PARTS LIST: Outboard Turning Assembly (Optional - 4224 Lathe) No. Part No. Description 1 2 3 4 5 6 7 8 9 10 11 12 13 14 15 16 17 6295858 6295845 6295846 6295852 6295853 6294770 TS-0650081 6295860 6295854 6295855 6295856A 6295710 6295857 6295702 6294761 6294762 6295851A 6294764 6294763 6295703 Outboard Turning Assembly (Items 1 thru 17) ................................................................ 1 Short Outfeed Bed Extension Assembly (Items 1, 5, 6, 7) ..............................................
Outboard Turning Assembly (Optional - 4224 Lathe) To order parts or reach our service department, please call our toll-free number between 7:00 a.m. and 6:00 p.m. (CST), Monday through Friday. Having the Model Number and Serial Number of your machine available when you call will allow us to serve you quickly and accurately. Locating the stock number of the part(s) required from your parts manual will also expedite your order. Phone No.: 800-274-6848 Website: www.wmhtoolgroup.
WMH Tool Group 2420 Vantage Drive Elgin, Illinois 60123 Phone:800-274-6848 www.wmhtoolgroup.