
Owner's manual


6
Channel Assembly(#27) to the body.
3. Remove the Rubber Bumper(24).
4. Pull the Driving Blade(#15) with pliers until the
Piston(#20) is fully extended outward towards the bottom of
the cylinder.
5. Use a 15/16” box wrench (Part #:
09-445-29768) to
unscrew the Driving Blade Jam Nut(#22) and remove it.
Hold the Piston from turning while unscrewing the Jam Nut
by holding the piston hex with a 1-1/8” box wrench
(Part #:
09-445-29768).
6. Push out the 1/4” diameter blade retaining Dowel
Pin(#14) and remove the broken Driving Blade stub.
7. Install a new Driving Blade in the slot and replace the
Dowel Pin(#14). Screw on the retaining Jam Nut(#22)
using the same tools. If the Jam Nut becomes worn and
loose after frequent removals, it should be replaced.
8. Check the fi t, there should be some sideways movement
between the Driving Blade and the Jam Nut assembly.
This is desirable and helps the blade to align itself with the
mating parts.
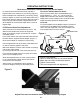
9. Reassemble the components. Be sure to align the
Driving Blade with the slot in the Adapter Foot Assembly.
SEAL REPLACEMENT: There are 7 seals that may
require replacement. We recommend that you have your
PowerStaple Dealer replace the Seals.
SEAL KIT: You may choose to buy a Seal Replacement Kit
and replace the seals yourself. It is good practice to replace
all seals at one time regardless if only one seal needs
replacement.
SEAL DESCRIPTION & NUMBER:
1. Rubber Seat (#18)
2. Plunger Seal Set (#10)
3. Piston U-Cup Lip Seal (#21)
4. Return Cylinder U-Cup Lip Seal (#17)
5. Piston Rod U-Cup Lip Seal (#12)
6. Plunger Wiper Seal (#4)
7. Return Cylinder O-Ring Gasket (#11)
To change Seals follow these procedures. Be sure the air
line is disconnected from the Stapler fi rst before making any
repairs. Consult the illustration for the name and location of
the following component parts.
SEAL REPLACEMENT REQUIRES REMOVAL OF THE
DRIVING BLADE ASSEMBLY:
1. Disconnect the air supply.
2. Remove Rubber Plunger Cap (#7).
3. Unscrew & remove Body Cap (#2).
4. Unscrew the three #10-32 cap screws holding the
Plunger (#9) to the Return Cylinder (#16).
5. Pull the Plunger up and out of the Stapler Body (#1)
cavity.
6. Remove the Return Cylinder O-Ring Gasket (#11)
located on the top of the Return Cylinder under the Plunger.
7. Turn the Stapler over and remove the four cap screws
(#3), that fasten the Adapter Foot and Staple Channel
Assembly to the Stapler Body and lift the Assembly off
the Body.
8. Remove the Rubber Bumper (#24).
9. Pull the Driving Blade Assembly out of the Stapler
Body by pulling on the Driving Blade.
10. Hold the Piston Rod (#13) with an 11/16 socket
over its hex end opposite the Piston. Do not use
pliers or a vise anywhere on the metal parts, they
can damage the sealing surfaces.
11. Use box wrenches to remove the 5/8-18 Jam Nut
(#22). Remove the Dowel Pin (#14) and Driving Blade
(#15).
12. Unscrew the Piston from the Piston Rod using box
wrenches and separate the Piston, Piston Rod and
Return Cylinder.
TO REPLACE THE SEALS:
Rubber Seat (#18):
1. Remove the Cylinder Sleeve (#23). The Cylinder
Sleeve should slide out of the Stapler Body when you
pull out the Driving Blade Assembly.
2. Remove the metal Support Ring (#19) and Rubber
Seat from inside the Stapler body. Note that the
chamfer on the inside of the Rubber Seat faces the
BOTTOM of the Stapler, do not reverse the direction of
the chamfer when you replace the Rubber Seat.
3. Replace the Rubber Seat, Support Ring and
Cylinder Sleeve. Be sure to re install the steel Cylinder
Sleeve with the chamfered inside edge facing the
BOTTOM of the Stapler
Plunger Seal Set (#10):
1. Remove the Tefl on
®
Seal and its O-Ring expander
from the groove using a bent paper clip or pick. Be
sure not to scratch the inside walls of the seal groove
with the wire hook.
2. Clean out the seal groove. Place a new O-Ring into
the seal groove by stretching it over the Plunger body.
Make sure the O-Ring is not twisted in the groove.
Place a new Tefl on° Seal Ring into the seal groove
over the O-Ring.
3. Carefully push the Tefl on
®
Seal Ring over the edge
of the Plunger with your thumbs and into the groove.
Do this as quickly as possible to reduce stretching of
the Tefl on
®
Seal Ring. DO NOT OVER STRETCH THE
TEFLON
®
SEAL RING! Be sure the Tefl on
®
Seal
Ring is centered all around the seal groove and not
twisted.
4. Wipe off the Seal surface with a clean rag and
lubricate it generously with Pneumatic Light Air Tool Oil
lubricant.
Piston U-Cup Lip Seal (#21):
1. Remove the old Piston U-Cup Lip Seal from the
Piston using a bent paper clip or pick, being careful
OPERATING INSTRUCTIONS, continued