
User Manual


POWXG9007
EN
Copyright © 2013 VARO NV
P a g e | 7
www.varo.com
9 ASSEMBLY INSTRUCTIONS
Remove all packaging materials from the unit. Check the main unit, its components and all
accessories for loss and transport damages.
9.1 Attach handle and hook
Attach the handle (picture 1, part 1) and accessory
tray (picture 1, part 8)to the frame of the pressure
washer. Insert carriage bolts (picture1, part 9)
through holes from outside of unit and attach a
knob from inside of unit. Tighten by hand.
Fit the lance hook (picture 1, part 6) to the upper
handle
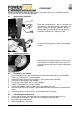
9.2 Installing the wheels
Before you fix the wheels (picture 1, part 13) you
have to loosen a screw to take out the axle. Fit a
wheel to the axle and secure using the locking nut
provided.
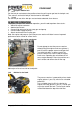
9.3 assembly of the bobbin
1. Place the bobbin on the level surface; put the water connector into one side of bobbin.
2. Tighten its connection by a screw and bolt.
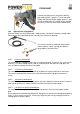
3. Connect the high pressure hose ((picture 1, part 3)to the water connector.
4. Put the bush onto another side of bobbin.
5. Then put the side handle into this side of bobbin.
6. Tighten its connection by a screw and bolt.
7. Put the whole bobbin onto the upper frame, and tighten the clips.
8. Connect the pressure hose which is connected with water connector to the pump water
outlet.
9. Connect the pressure hose which is on the bobbin to the spray gun.
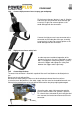
9.4 Assembling the bobbin lock
1. Put the washer onto the lock pin seat, then through the tube and tighten the nut.
2. Put the lock pin through the spring first, then through the lock pin seat.
3. Fit the pull ring on the lock pin.
4. Now the bobbin lock is finished.