INSTRUCTION MANUAL 21-inch Single Stage Gas Snow Thrower Model # DB7005 Have product questions or need technical support? Please feel free to contact us! Website: www.Amerisuninc.com www.powersmartusa.com Toll free: USA (800)791-9458 Mon-Fri 9-5 EST Canada (888)980-4937 Mon-Fri 9-5 EST Email: support@amerisuninc.
CONTENTS Technical data…...………………………………………………………... Introduction………………………………………………………………. Safety information…….………………………………………………... Knowing your snow thrower…………………………………………… Assembly and adjustments……………………………………………... Snow thrower preparation…....………………………………………… Operating your snow thrower...…………………………………………. Maintenance……………………………………………………………... Storage & Cleaning…………...…………………………………………. Troubleshooting…………………………………………………………. Exploded view and parts list……………………………………………...
INTRODUCTION Thank You for Purchasing a PowerSmart® Product. This manual provides information regarding the safe operation and maintenance of this product. Every effort has been made to ensure the accuracy of the information in this manual. PowerSmart® reserves the right to change this product and specifications at any time without prior notice. Please keep this manual available to all users during the entire life of the snow blower.
TRAINING Read, understand, and follow all instructions on the machine and in the manual(s) before attempting to assemble and operate. Keep this manual in a safe place for future and regular reference. • Be familiar with all controls and their proper operation. Know how to stop the machine and disengage them quickly. • Never allow children under 14 years of age to operate this machine.
• Read, understand and follow all instructions on your Snow Thrower and in this Operator's Manual before attempting to assemble and operate your machine. • Keep this manual in a safe place for future and regular reference. If replacement parts are needed, refer to the manual. • Stay alert, watch what you are doing and use common sense when operating your Snow Thrower. • Do not use your Snow Thrower while you are tired or under the influence of drugs, alcohol, medication.
• Never store the machine or fuel container inside where there is an open flame, spark or pilot light (e.g. furnace, water heats, space heater, clothes dryer etc.). • Allow machine to cool at least 5 minutes before storing. • Never fill containers inside a vehicle or on a truck or trailer bed with a plastic liner. Always place containers on the ground away from your vehicle before filling. • If possible, remove gas-powered equipment from the truck or trailer and refuel it on the ground.
• Disengage power to the auger impeller when transporting or not in use. • Never operate machine at high transport speeds on slippery surfaces. Look down and behind and use care when backing up. • If the machine should start to vibrate abnormally, stop the engine, disconnect the spark plug wire and ground it against the engine. Inspect thoroughly for damage. Repair any damage before starting and operating.
• Check control levels periodically to verify they engage and disengage properly and adjust, if necessary. Refer to the adjustment section in this operator's manual for instructions. • Maintain or replace safety and instruction labels, as necessary. • Observe proper disposal laws and regulations for gas, oil, etc. to protect the environment. • Prior to storing, run machine a few minutes to clear snow from machine and prevent freeze up of auger impeller.
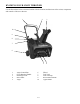
KNOWING YOUR SNOW THROWER Use the illustrations below to become familiar with the locations and functions of the various components and controls of this snow thrower.
11 12 13 12 13 14 Oil Dipstick Choke lever Drain Plug 14 15 15 Switch Key Primer Bulb Auger Control Bar The Auger Control Bar is used to engage and disengage the augers. Pull back the Auger Control Bar to engage the augers; release to disengage the augers. Chute Rotation Handle To adjust snow discharge direction, rotate the handle clockwise or counter-clockwise. Augers When engaged, the augers rotate to cut snow and direct it into the auger housing to be discharged out the chute.
ASSEMBLY AND ADJUSTMENTS The following section describes steps necessary to prepare the snow thrower for use. If after reading this section, you are unsure about how to perform any of the steps please call USA (800) 791-9458 or Canada (888)980-4937 Mon-Fri 9-5 EST for customer service. Failure to perform these steps properly can damage the snow thrower or shorten its life. Unpacking Unpack the snow thrower and all its parts, and compare against the list below. 1. Snow Thrower 2. Discharge Chute Assembly 3.
2. Insert the bolts into the aligned holes, with the bolt heads on the inside of the handle. 3. Install the washers and knobs on the bolts on the outside of the handle. Tighten firmly by hand. NOTICE: Do not bend or kink the control cable. The cables should be routed under the Lower handle and not wrapped around the handle or knobs. The cables must move freely and not bind. Step 3 – Chute assembly 1. Remove the bolts, washers and nuts from the chute base. 2.
SNOW THROWER PREPARATION Step 1 - ADD OIL The snow thrower is shipped without oil. User must add the proper amount of oil before operating the snow blower for the first time. The oil capacity of the engine crankcase is 20 fl. oz. For general use, we recommend 5W, 4-stroke engine oil. ENGINE OIL RECOMMENDATIONS Select good quality detergent oil bearing the American Petroleum Institute (API) service classifications SJ, SL, or SM (synthetic oils may be used).
OPERATING YOUR SNOW THROWER The following section describes steps to use your Snow Thrower for use. If after reading this section, you are unsure about how to perform any of the steps please call 1-800-791-9458 for customer service. Failure to perform these steps properly can damage your Snow Thrower or shorten its life. Review the SAFETY section in this manual before operating the engine and snow thrower.
STARTING 1. 2. 3. 4. Move the choke lever to START position (Left side). Press the primer bulb 3 times. Insert switch key into slot (Do not turn switch key). Pull on the recoil starter handle slowly until a slight resistance is felt, then pull quickly to start the engine. Return cord gently into the recoil starter. Never allow the cord to snap back. 5. If engine fails to start, repeat step 4.
MAINTENANCE WARNING! Never perform maintenance while your Snow Thrower is running. Turn OFF the engine before performing any maintenance tasks on your Snow Thrower. Proper maintenance of your Snow Thrower will help prolong its life. Please perform the following maintenance procedures as required. Do not attempt to repair your Snow Thrower unless you have the proper tools and instructions for disassembly and repair.
CHANGING/ADDING OIL Change the oil according to the Recommended Maintenance Schedule. Change the oil when the engine is warm. This will allow for complete drainage. Change oil more often if operating under heavy load. It is also necessary to drain the oil from the crankcase if it has become contaminated with water or dirt. The oil capacity of the engine is 20 fl.oz. Add oil when the oil level is low. For general use, we recommend 5W, 4-stroke engine oil. To drain oil, follow these steps: 1.
TROUBLESHOOTING Problem Causes Remedy WARNING - Before attempting to make any inspections, repairs or adjustments, stop the engine, wait for all moving parts to stop moving and carefully disconnect the engine spark plug wire. If tipping or turning the snow blower is required for any inspection or repair, first wait until the engine is cool to the touch and then drain the engine of all fuel and oil into suitable containers and store or dispose of in a proper manner.
EXPLODED VIEW AND PARTS LIST 20
Item 1 2 3 4 5 6 7 8 9 10 11 12 13 14 15 16 17 18 19 20 21 22 23 24 25 26 27 28 29 30 31 32 33 34 35 36 37 38 39 40 41 42 Stock# 303020106 303042013 302110079 303030036 302110078 303180852 303160655 203010748A 203010747 303070739 303070741 303010316 303070738 203010749 303020084 302040054 303020282 303041009 303042009 203010646 303042168 303100034 303070797 303010216 203050170A 203010647 303130138 D00001528 203050173A 302080032 302080033 302110017 203020865A 303030066 303042023 203020380 303020146 20305017
Engine exploded view and parts list 22
Item 1 2 3 4 5 6 7 8 9 10 11 12 13 14 15 16 17 Stock # 380140215-0003 120220031-0001 120250013-0001 380140336-0001 120080276-0001 380140089-0003 160190009-0001 380180093-0001 170430060-0001 170440089-0001 170430048-0001 170021923-0001 110940004-0001 180020806-0001 380370048-0001 380950193-0001 380750963-0001 18 171610002-0001 19 20 21 22 23 24 25 26 171590004-0001 380600117-0001 120150070-0001 270960014-0001 380180098-0001 180650065-0001 180572236-0001 380340005-0005 27 140320001-0001 28 29 30 31 32
TWO (2) YEARS LIMITED WARRANTY PowerSmart is committed to building tools that are dependable for years. Our warranties are consistent with our commitment and dedication to quality. TWO (2) YEARS LIMITED WARRANTY OF POWER SMART PRODUCTS FOR HOME USE. PowerSmart (“Seller") warrants to the original purchaser only, that all PowerSmart consumer power tools will be free from defects in material or workmanship for a period of two (2) years from date of purchase.