
Instructions / Assembly


12
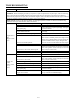
ASSEMBLY AND ADJUSTMENTS
The following section describes steps necessary to prepare the snow thrower for use. If after reading this
section, you are unsure about how to perform any of the steps please call USA (800) 791-9458 or Canada
(888)980-4937 Mon-Fri 9-5 EST for customer service. Failure to perform these steps properly can
damage the snow thrower or shorten its life.
Unpacking
Unpack the snow thrower and all its parts, and compare against the list below.
1. Snow Thrower
2. Discharge Chute Assembly
3. 2 Wheels
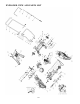
ASSEMBLY
Your Snow Thrower will require some assembly. Please complete the following steps before using your
Snow Thrower.
WARNING: This snow thrower is heavy. Assembly procedures may require lifting
equipment or two people.
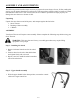
Step 1 – Installing the wheels
1. Remove locknuts from the end of the wheel
axle.
2. Position wheel on the axle, then add locknut
and tighten firmly with a wrench.
3. Repeat 1 and 2 to install the wheel on another
side of the wheel axle.
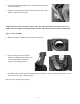
Step 2 – Upper handle assembly
1. With the upper handle in the down position, connect the control
cable to the auger control bar.