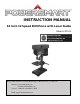
INSTRUCTION MANUAL 10 Inch 12 Speed Drill Press with Laser Guide Model # PS310 Have product questions or need technical support? Please feel free to contact us! Website: www.Amerisuninc.com www.PowerSmartUSA.com Toll free: 1-800-791-9458 M-F 9-5 EST Email: support@amerisuninc.
CONTENTS Technical data…...………………………………………………………... General safety rules…….………………………………………………... Specific safety rules for drill press……...………………………………. Electrical information…………………………………………………...... Knowing your drill press……...………………………………………… Assembly and adjustments……………………………………………… Maintenance.…………………………………………………………… Troubleshooting.………………………………………………………...
GENERAL SAFETY RULES Safety is a combination of common sense, staying alert, and knowing how your drill press works. SAVE THESE SAFETY INSTRUCTIONS. WARNING: To avoid mistakes that could cause serious injury, do not plug in the drill press until the following steps have been read and understood. 1. READ and become familiar with this entire instruction manual. LEARN the tool’s applications, limitations, and possible hazards. 2. AVOID DANGEROUS CONDITIONS.
15. DO NOT OVERREACH. Keep proper footing and balance at all times. Wear oil-resistant rubber-soled footwear. Keep the floor clear of oil, scrap, and other debris. 16. MAINTAIN TOOLS PROPERLY. ALWAYS keep tools clean and in good working order. Follow instructions for lubricating and changing accessories. 17. CHECK FOR DAMAGED PARTS. Check for alignment of moving parts, jamming, breakage, improper mounting, or any other conditions that may affect the tool’s operation.
ELECTRICAL INFORMATION Grounding instructions IN THE EVENT OF A MALFUNCTION OR BREAKDOWN, grounding provides the path of least resistance for electric current and reduces the risk of electric shock. This tool is equipped with an electric cord that has an equipment grounding conductor and a grounding plug. The plug MUST be plugged into a matching outlet that is properly installed and grounded in accordance with ALL local codes and ordinances. DO NOT MODIFY THE PLUG PROVIDED.
Guidelines for using extension cords Make sure your extension cord is in good condition. When using an extension cord, be sure to use one heavy enough to carry the current your product will draw. An undersized cord will cause a drop in line voltage resulting in loss of power and overheating. The table below shows the correct size to be used according to cord length and nameplate ampere rating. If in doubt, use the next heavier gauge. The smaller the gauge number, the heavier the cord.
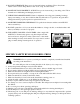
KNOWING YOUR DRILL PRESS 10 1 2 9 8 3 7 6 4 5 1 2 3 4 5 Belt cover On/Off Switch Chuck Work table Base 6 7 8 9 10 8 Height crank Rack Feed handle Motor Motor tension knob
ASSEMBLY AND ADJUSTMENTS Unpacking Unpack the drill press and all its parts, and compare against the list below. Do not discard the carton or any packaging until the drill press is completely assembled.
Tools needed for assembly - Adjustable wrench Hammer and block of wood Screwdriver Base to column 1 1. Place Column (1) on the Base (2) and align holes in the Column with holes in the Base. 2. Attach using Bolt, Spring Washer, and Washer (3) in each hole through the Column and into the Base. 2 3 Table to column 1. 2. 3. 4. Loosen the Pivot Lever (5) on the Table Support (6). Place the Table Support (6) over the Rack (4). Slide the Table Support over the Column (7).
Drill press head to column 1. Lift the drill press head assembly (1) carefully and place the mounting hole of the drill press head onto the top of the column (3). Make sure the head is seated properly on the column. 2. Align the direction of the drill press head to the direction of the base and the table. 3. Tighten the set screws (2) using a wrench. 4. Thread the three feed handle rods (4) into the holes on the feed hub. 5. Hand tighten.
Battery Assembly This drill press is equipped with laser for indicating drilling, and the laser box is assembled in the factory under the machine head without battery. When you operate this drill press, please assemble two batteries into the laser box as the following procedure refer to the picture: 3 2 1 1. Before assemble the batteries, DO NOT adjust the laser lights which have been adjusted to the best function in the factory. 2. Always use the “AAA” size battery. 3.
Adjustments Spindle speeds This drill press offers 12 spindle speeds from 300 to 2900 RPM. The highest speed is obtained when the belt is positioned on the largest motor pulley step and the smallest spindle pulley stop. WARNING: Disconnect the drill press from the power source before making any speed adjustments. 4 Table adjustment 1. Raise or lower the Table by loosening the Pivot Lever (1) and turning the Height Crank (2), clockwise to raise and 3 counterclockwise to lower. 2.
Setting drilling depth Located around the Spindle Feed Shaft is a Depth Stop Collar (2) with a scale. The collar is capable of turning about the shaft, and may be locked in place by a Locking Screw (1). 1. Lower the drill (with the power OFF) so that it contacts the material and hold in that position. 2. Loosen the locking screw and turn the collar so that the measurement for the depth of the hole required is in line with the pointer (3). 3. Lock the collar (2) in this position using the locking screw (1).
TROUBLESHOOTING 15
EXPLODED VIEW & PARTS LIST 16
Item 1 2 3 4 5 6 7 8 9 10 11 12 13 14 15 16 17 18 19 20 21 22 23 24 25 26 27 28 29 30 31 32 33 34 35 36 37 38 39 40 41 42 43 44 45 46 47 48 49 Stock # PS310-001 PS310-002 PS310-003 PS310-004 PS310-005 PS310-006 PS310-007 PS310-008 PS310-009 PS310-010 PS310-011 PS310-012 PS310-013 PS310-014 PS310-015 PS310-016 PS310-017 PS310-018 PS310-019 PS310-020 PS310-021 PS310-022 PS310-023 PS310-024 PS310-025 PS310-026 PS310-027 PS310-028 PS310-029 PS310-030 PS310-031 PS310-032 PS310-033 PS310-034 PS310-035 PS310-036
ONE (1) YEAR LIMITED WARRANTY PowerSmart® is committed to building tools that are dependable for years. Our warranties are consistent with our commitment and dedication to quality. ONE (1) YEAR LIMITED WARRANTY OF POWER SMART PRODUCTS FOR HOME USE. PowerSmart (“Seller") warrants to the original purchaser only, that all PowerSmart consumer power tools will be free from defects in material or workmanship for a period of one(1) year from date of purchase.