
Instructions / Assembly


12
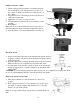
Battery Assembly
This drill press is equipped with laser for indicating drilling, and the laser
box is assembled in the factory under the machine head without battery.
When you operate this drill press, please assemble two batteries into the
laser box as the following procedure refer to the picture:
1. Before assemble the batteries, DO NOT adjust the laser lights which
have been adjusted to the best function in the factory.
2. Always use the “AAA” size battery.
3. Please take of the battery cover (3), and use two pcs of “AAA” size
battery (2), as the direction in the picture insert them into laser box
(1), make sure the anode (+) and cathode (-) of battery is according to the marks in battery cover (3).
4. Put battery cover (3) into laser box (1).
5. Please form a habit that always turn off the laser when you do not operate this drill press.
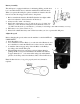
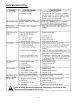
Adjust the speed
Before changing the speeds, make sure the machine is switched OFF and
UNPLUGGED.
1. Open the pulley cover.
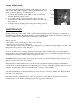
2. Loosen the Motor Tension Knob (1) on each side of the Headstock, and
move the Motor towards the Headstock to relieve tension on the Belts.
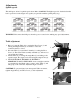
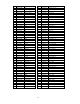
3. Consult the chart next page and position the Belts on the Pulleys
according to the desired drill speed.
4. When the Belts have been correctly positioned, tighten them by
pushing the Motor away from the Headstock until the belt deflects
by approximately 1/2″ at its center when using reasonable thumb
pressure. Lock this position in with the two Motor Tension Knobs (1).
Note: If either belt is too long to be properly tensioned, it must be
replaced.
3 2 1
1